
Lab - Implement and Tune EtherChannel
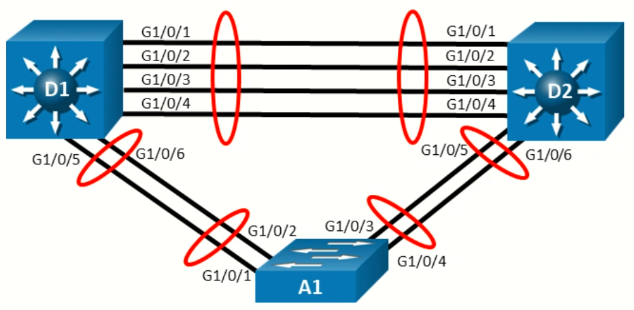
Topology
Objectives
- Part 1: Build the Network and Explore Dynamic Trunking Protocol
- Part 2: Configure Static EtherChannel
- Part 3: Implement EtherChannel Using PAgP
- Part 4: Implement EtherChannel Using LACP
- Part 5: Tune LACP-based EtherChannels
- Part 6: Explore EtherChannel Load Balancing
Background / Scenario
Our topology has multiple parallel links between pairs of switches. By default, Spanning Tree uses one link and blocks the others to prevent bridging loops. The blocked links act as failover only and do not increase bandwidth.
In this lab, you will aggregate those links into a single logical channel (EtherChannel). You will use:
- Port Aggregation Protocol (PAgP) – Cisco’s EtherChannel negotiation protocol
- Link Aggregation Control Protocol (LACP) – open standard, IEEE 802.3ad
- Static EtherChannel – no negotiation
EtherChannel can bundle up to eight physical links into one logical link. In this lab, “EtherChannel” refers to the logical bundle; “Port-channel” refers to the virtual interface representing that bundle in Cisco IOS.
Before configuring EtherChannel, you will examine the Cisco-proprietary Dynamic Trunking Protocol (DTP), learn how to disable it, and understand why disabling automatic trunk formation is recommended.
Note: This lab is an exercise in deploying and verifying EtherChannel and does not necessarily reflect networking best practices.
Note: The switches used with CCNP hands-on labs are Cisco 9300L and 9200L with Cisco IOS XE release 17.12.05 (universalk9 image). Other routers and Cisco IOS versions can be used. Depending on the model and Cisco IOS version, the commands available and the output produced might vary from what is shown in the labs.
Note: Make sure that the switches have been erased and have no startup configurations
Required Resources - Sergio Jimenez's Version
- 2 Switches (Cisco 3560)
- 1 Switch (Cisco 2960CX)
- 1 PC (Choice of operating system with a terminal emulation program installed)
- Console cables to configure the Cisco IOS devices via the console ports
- Ethernet cables as shown in the topology
Instructions
Part 1: Build the Network and Explore Dynamic Trunking Protocol
In Part 1, you will set up the network topology and then examine how DTP works and how to manipulate it.
Step 1: Cable the network as shown in the topology
Attach the devices as shown in the topology diagram, and cable as necessary.
Step 2: Examine the default port status and manipulate DTP.
For this step, we will focus on the connections between D1 and A1.
-
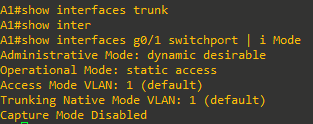
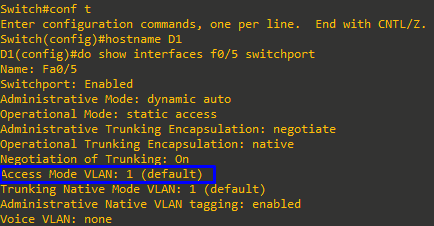
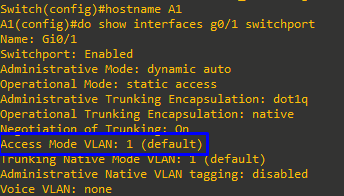
If the switches are in their default configuration, this connection between the two switches defaults to be an access port in VLAN 1, which can be seen in the output of show interfaces f0/5 switchport and show interfaces g0/1 switchport.
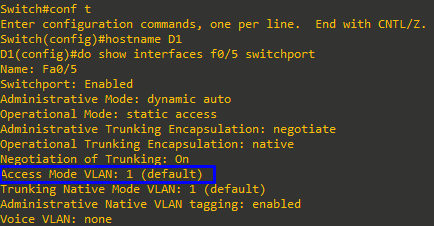
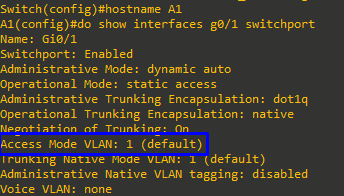
Carefully examining the output from the two switches, you see that the Administrative Mode is reported as Dynamic Auto on both sides. This mode is one of the options supported by DTP. Also note that the Automatic Negotiation of Trunking setting is On.
DTP is used by Cisco switches to automatically negotiate whether the port should be put into access or trunk mode and what trunking protocol (802.1Q or ISL) should be used. It is meant both to ease the initial deployment of a switched network and to minimize configuration errors that result from mismatched port configuration on an interconnection between two switches.
-
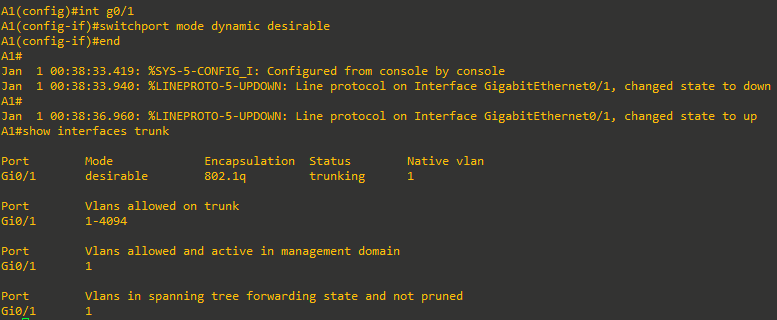
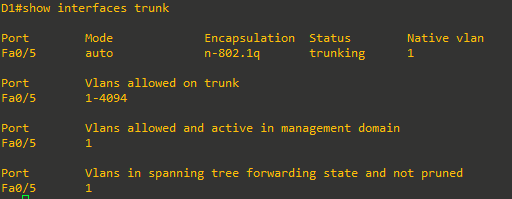
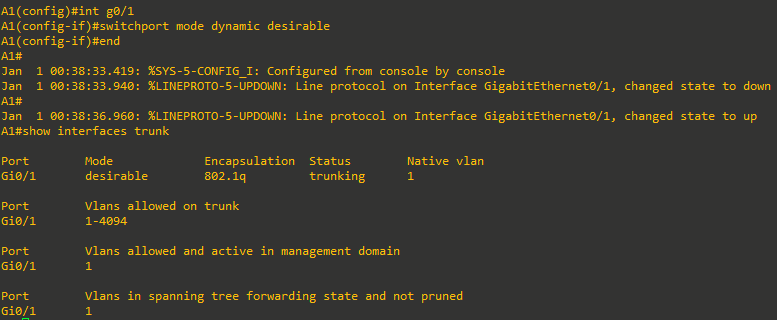
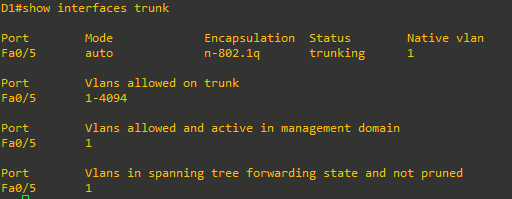
Change the administrative mode of interface G0/1 on A1 to Dynamic Desirable with the interface configuration command switchport mode dynamic desirable. After a few moments, check the interface switchport status and you will see that it is in trunk mode. The output of show interfaces trunk will show the protocol as desirable. The output of show interfaces trunk on D1 will show auto.
-
DTP messages continue to be sent if the port is set statically to trunk mode. However, if the port is set statically to the access mode, both sending and processing DTP messages on that port are deactivated. To see this, configure D1 interface f0/6 with the switchport mode trunk command.


After a few moments, you should once again see that A1 has automatically negotiated a trunk, this time between A1 G0/2 and D1 F0/6.
DTP is not secure. An attacker can send forged DTP packets that force a switch port into unauthorized trunk mode, exposing all VLANs permitted on that trunk. Best practice is to configure trunking statically and disable DTP with switchport nonegotiate (used only on trunk ports).
-
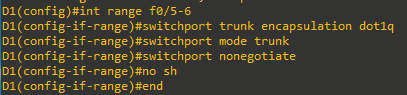
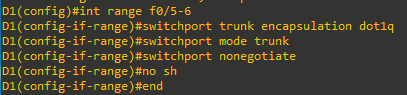
On A1, shutdown interfaces G0/1 and G0/2. Then go to D1 and configure interfaces F0/5 and F0/6 as trunks with the additional command switchport nonegotiate. A few moments after you re-enable the interfaces at A1, you will see that they do not form trunks with D1.

-
At each switch, issue the global configuration command default interface range first-int-id – last-int-id to reset the interfaces back to their defaults.


Use the show interfaces trunk command to verify that both switches are no longer trunk.



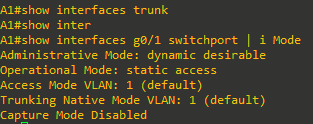


Step 3: Configure Basic Device Settings
-
Console into each switch, enter global configuration mode, and apply the basic settings using the following startup configurations for each device.
Switch D1hostname D1 banner motd # D1, Implement and Tune EtherChannel # line con 0 exec-timeout 0 0 logging synchronous exit interface range f0/1-6 switchport trunk encapsulation dot1q switchport mode trunk no shutdown exitSwitch D2
hostname D2
banner motd # D2, Implement and Tune EtherChannel #
line con 0
exec-timeout 0 0
logging synchronous
exit
interface range f0/1-6
switchport trunk encapsulation dot1q
switchport mode trunk
no shutdown
exit
Switch A1
hostname A1
banner motd # A1, Implement and Tune EtherChannel#
line con 0
exec-timeout 0 0
logging synchronous
exit
interface range g0/1-4
switchport mode trunk
no shutdown
exit
Part 2: Configure Static EtherChannel
In this part, you will configure an EtherChannel without a negotiation protocol. This is against best practices because there is no health check mechanism when the port-channel is statically set to on. The focus for this part is to establish the process for creating and modifying the EtherChannel bundle. For this part you will work with D2 and A1.
Step 1: Configure and verify trunking between D2 and A1
- Configure the ports interconnecting D2 and A1 as static trunk ports with the switchport nonegotiate command (the startup configuration has the commands to make them a trunk)


- Verify the trunks have formed
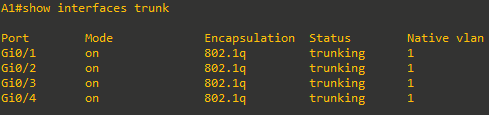


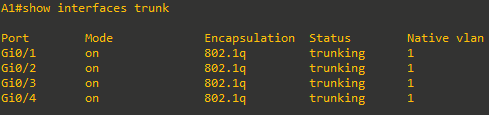
Step 2: Configure and verify a static EtherChannel link between D2 and A1
-
Add the command channel-group 1 mode on to all the trunk interfaces between D2 and A1.


-
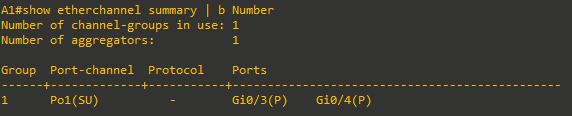
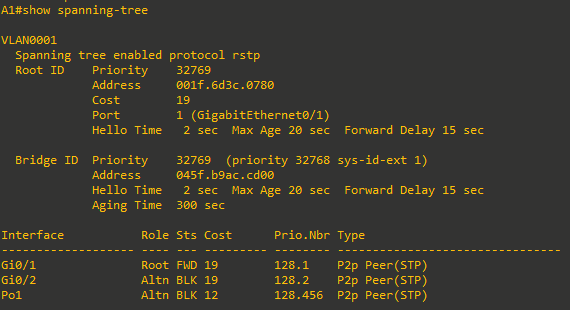
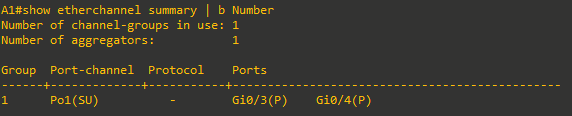
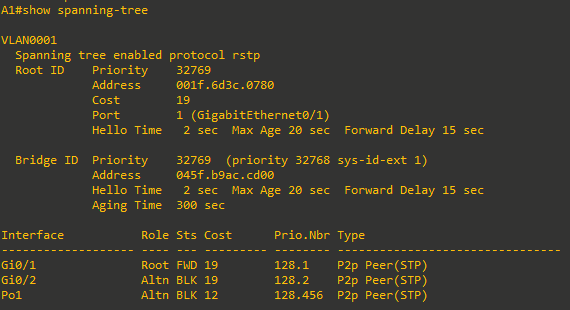
Verify the EtherChannel has formed by examining the output of the show etherchannel summary command. Also check the spanning tree status. You will see that there is a change to the topology because Po1 replaced interfaces G0/3 and G0/4 with a lower cost.


Step 3: Make a change to the EtherChannel
With very few exceptions, changes to the EtherChannel configuration (whether a negotiation protocol is used or not) must be made at the port-channel level. Changes you make directly to the member interfaces of a port-channel may create synchronization issues that will cause the group to fail or underperform.
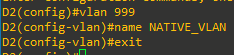
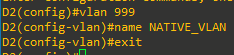
- On D2 and A1, create VLAN 999 with the name NATIVE_VLAN
-
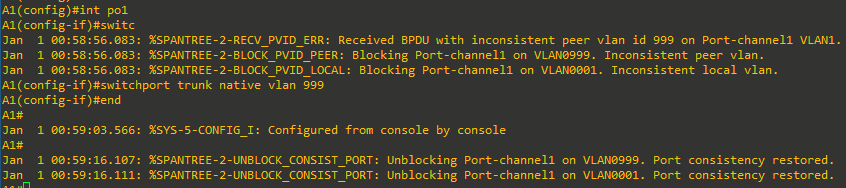
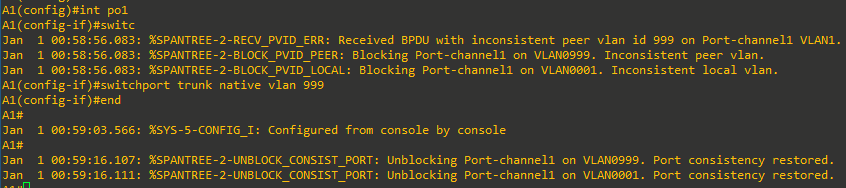
On D2 and A1, modify interface port-channel 1 so that it uses VLAN 999 as the native VLAN.

-
Verify the change has been applied by examining the output of show interfaces trunk.



Part 3: Implement EtherChannel Using PAgP
In this part, you will configure an EtherChannel using Cisco’s PAgP, which operates only between Cisco switches.
- Desirable: Actively attempts to form a bundle.
- Auto: Passively joins if the other side is Desirable.
If both sides are Auto, the bundle will not form.
PAgP also supports silent and non-silent operation. By default (silent), a switch can add links to a bundle without receiving PAgP packets. This is useful when connecting to devices that do not speak PAgP (for example, a file server). Between PAgP-capable devices, use non-silent so interfaces join only after PAgP is heard.
For this part you will work with D1 and A1.
Step 1: Configure and verify trunking between D1 and A1
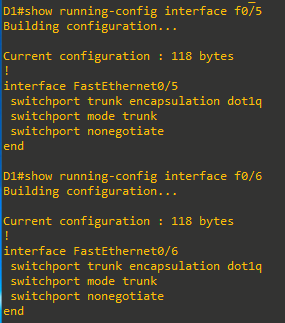
- Configure the ports interconnecting D1 and A1 as static trunk ports with the switchport nonegotiate command (the startup configuration has the commands to make them a trunk).
-
Verify the trunks are still working.

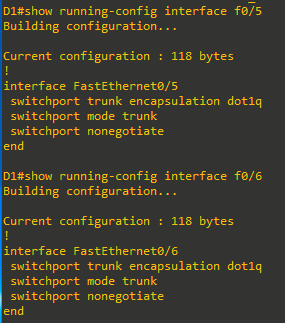

Step 2: Configure and verify EtherChannel using PAgP between D1 and A1
-
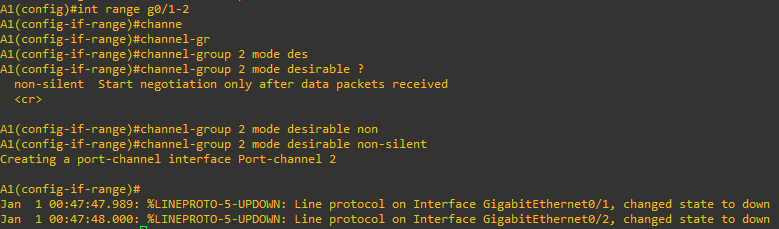
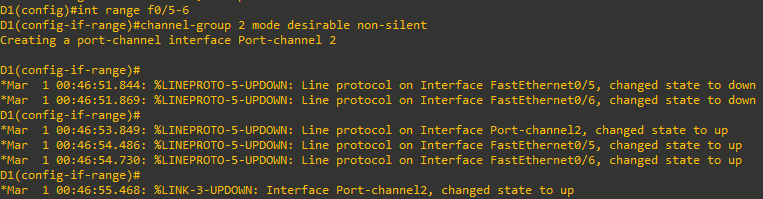
Add the command channel-group 2 mode desirable non-silent to all the trunk interfaces between D1 and A1.
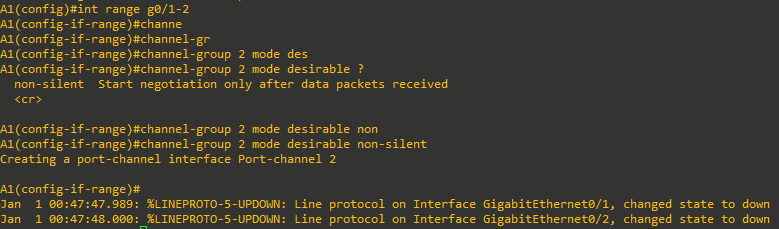
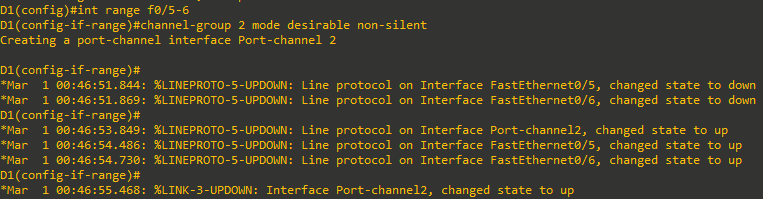
-
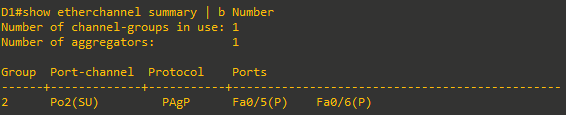
Verify the EtherChannel has formed by examining the output of the show etherchannel summary command.
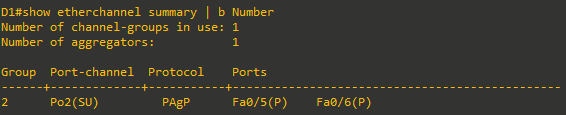
Step 3: Make a change to the EtherChannel
Recall that with very few exceptions, changes to the EtherChannel configuration must be made at the port-channel level. Changes you make directly to the member interfaces of a port-channel may create synchronization issues that will cause the group to fail or underperform.
-
On D1, create VLAN 999 with the name NATIVE_VLAN.

-
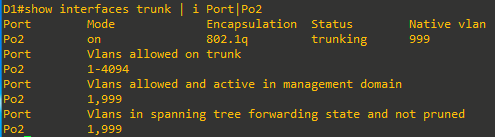
On D1 and A1, modify interface port-channel 2 so that it uses VLAN 999 as the native VLAN.

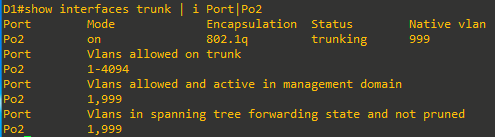
- Verify the change has been applied by examining the output of show interfaces trunk | i Port|Po2.


Part 4: Implement EtherChannel using LACP
In this part, you will configure an EtherChannel using the open standard LACP. This protocol also has two modes, Active and Passive. These modes work in a similar fashion to modes of PAgP; the Active mode actively communicates a desire to build an EtherChannel bundle, while the Passive mode passively agrees to a bundle if the switch at the other end initiates it. Therefore, if both ends are configured in passive mode, the bundle will not form.
For this part you will work with D1 and D2.
Step 1: Configure and verify trunking between D1 and D2.
- Configure the ports interconnecting D1 and D2 as static trunk ports with the switchport nonegotiate command (the startup configuration has the commands to make them a trunk).


-
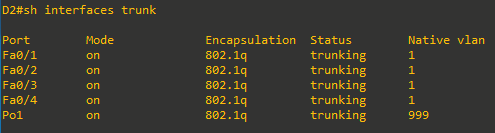
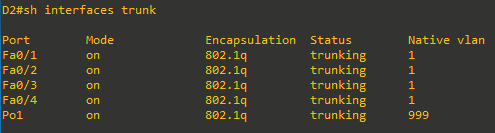
Verify the trunks are still operational.


Step 2: Configure and verify an EtherChannel using LACP between D1 and D2
-
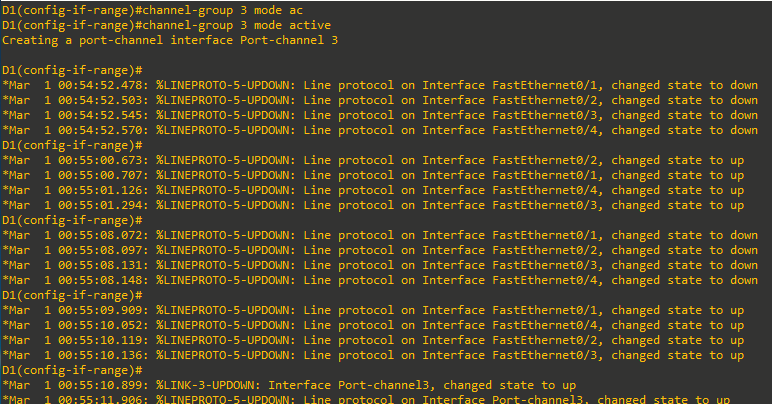
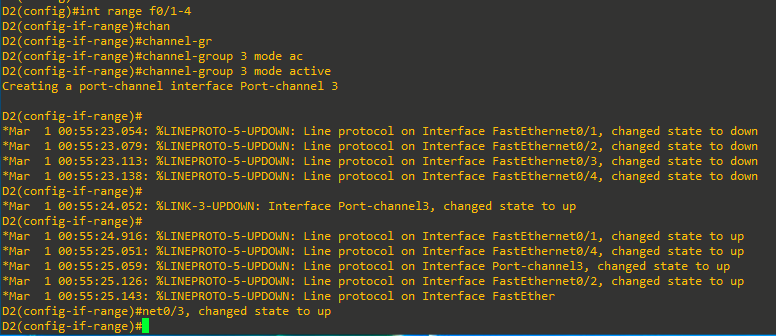
Add the command channel-group 3 mode active to all the trunk interfaces between D1 and D2.
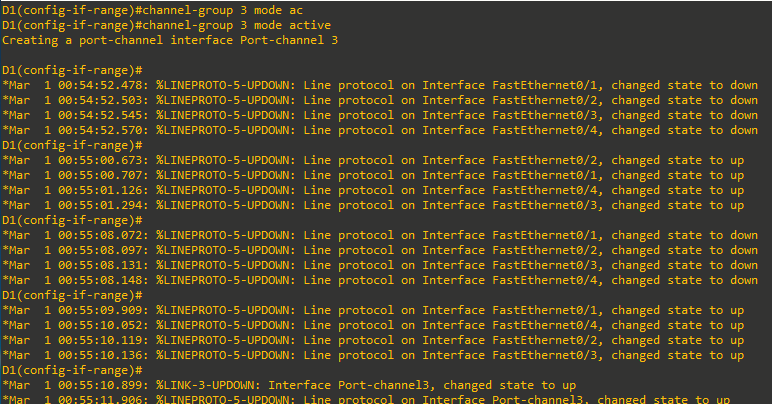
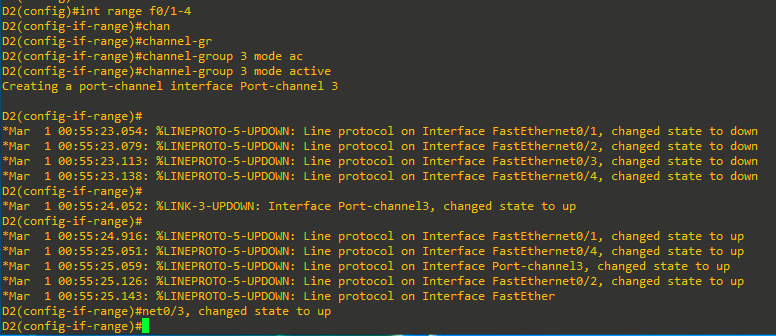
After configuring both D1 and D2, you should see Syslog messages that Port-channel3 is up.
-
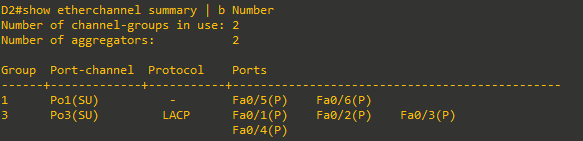
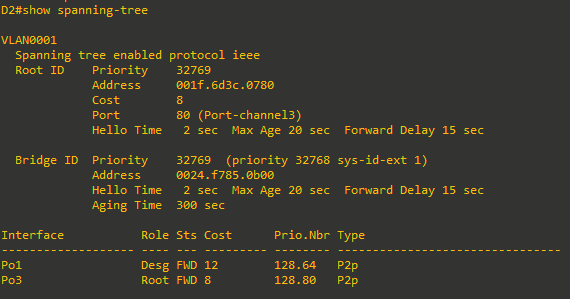
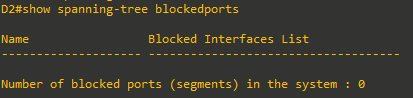
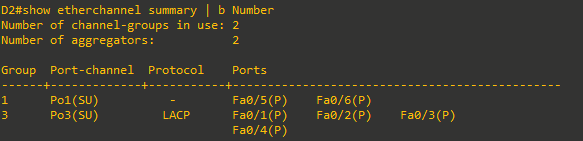
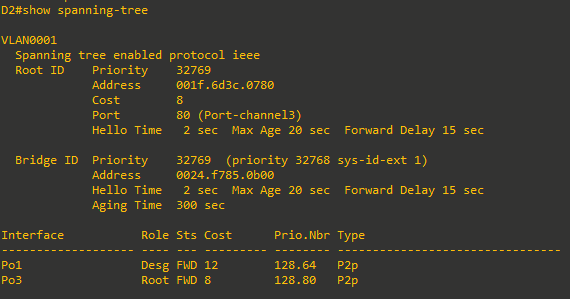
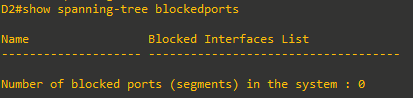
Verify the EtherChannel has formed by examining the output of the show etherchannel summary command. Also check the spanning tree status. You will see that the 4 interfaces are no longer referenced by Spanning Tree, but the port-channel is. Because there is only one (logical) trunk between D1 and D1, there are no Spanning Tree blocked ports.
Step 3: Make a change to the EtherChannel
Once again, it is important to understand that changes to the EtherChannel configuration must be made at the port-channel level. Changes you make directly to the member interfaces of a port-channel may create synchronization issues that will cause the group to fail or underperform.
-
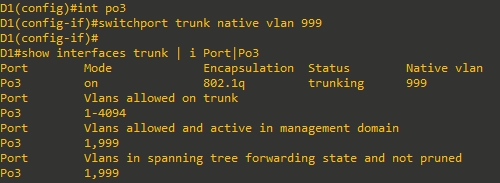
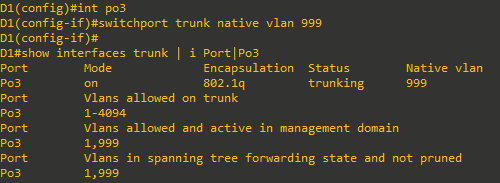
On D1 and D2, modify interface port-channel 3 so that it uses VLAN 999 as the native VLAN. Verify the change has been applied by examining the output of show interfaces trunk | i Port|Po3
Part 5: Tune LACP-based EtherChannels
An EtherChannel bundle using LACP can have up to 16 assigned ports, with 8 active ports carrying traffic and 8 in standby. The switches in the bundle negotiate a master/slave relationship, and the master switch decides which ports are active and which are in standby when there are more than 8 members. The minimum and maximum number of ports in a port channel can also be configured.
In this part, you will configure an EtherChannel bundle between D1 and D2 using LACP, setting the minimum to 2 links and the maximum to 3. You will also specify the master switch and enable LACP fast packets to reduce the timeout from 30 seconds to 1 second.
Step 1: Configure master switch criteria
Each switch connected using LACP has a system ID value. Those numbers are compared, and the switch with the lowest number is considered the master. The system ID value is a combination of a system priority that defaults to 32768 and the base MAC address. Unlike spanning tree, the priority value for LACP does not have to be scaled by multiples of 4096.
-
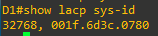
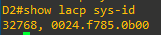
Use the show lacp sys-id privileged EXEC command to see what the sys-id value is for D1 and D2. Based on the output shown below, we can deduce that D1 would be the bundle master if all default values remained unchanged.
-
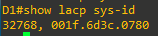
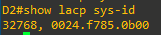
On D2, modify the LACP system ID by changing the system priority. Use the lacp system-priority value global configuration command to set the value to 1, and then verify that the value has been changed.


Step 2: Configure bundle size and member preferences
Cannot be done on 3560, lacp interface commands not supported.
By default, interfaces are selected to be included in the active bundle based on their interface id. For a given configuration, the lower numbered interfaces are added to the bundle until the bundle has reached its maximum size. Any interfaces that remain are put in hot standby mode.
-
Unbundle Port-Channel 3 on D1 and D2.
D2(config)# no interface port-channel 3 -
Issue the shutdown command for the interfaces connecting D1 and D2.
D2# config t Enter configuration commands, one per line. End with CNTL/Z. D2(config)# interface range g1/0/1-4 D2(config-if-range)# shutdown -
Configure the connections between D1 and D2 into a single LACP EtherChannel bundle. Use Channel Group number 12 and the Active mode. Configure the interfaces for LACP Fast.
D2(config-if-range)# channel-group 12 mode active Creating a port-channel interface Port-channel 12 D2(config-if-range)# lacp rate fast -
Issue the no shutdown command for the interfaces connecting D1 and D2. You should see Syslog messages that Port-channel 12 is up and up.
D2(config-if-range)# no shutdown
D2(config-if-range)# exit
-
On D1 and D2, configure the Port-channel 12 interface with a LACP minimum bundle size of 2 interfaces, and the maximum bundle size of 3 interfaces.
Note: The maximum value is only required on the master switch. Configuring it on both sides of the bundle is a best practice that may help with troubleshooting.D2(config)# interface port-channel 12 D2(config-if)# port-channel min-links 2 D2(config-if)# lacp max-bundle 3 D2(config-if)# end -
Verify that the EtherChannel bundle has formed and take note of the ports that are included versus the port that is in hot standby mode.
D2# show etherchannel summary Flags: D - down P - bundled in port-channel I - stand-alone s - suspended H - Hot-standby (LACP only) R - Layer3 S - Layer2 U - in use f - failed to allocate aggregator M - not in use, minimum links not met u - unsuitable for bundling w - waiting to be aggregated d - default port A - formed by Auto LAG Number of channel-groups in use: 1 Number of aggregators: 1 Group Port-channel Protocol Ports ------+-------------+---------+----------------------------------------------- 12 Po12(SU) LACP Gi1/0/1(P) Gi1/0/2(P) Gi1/0/3(P) Gi1/0/4(H) -
Verify the mode, state, and rate of LACPDU being sent for port members.
D2# show lacp internal

Flags: S - Device is requesting Slow LACPDUs
       F - Device is requesting Fast LACPDUs
       A - Device is in Active mode  P - Device is in Passive mode

Channel group 12

                   LACP port       Admin    Oper     Port     Port
Port        Flags  State  Priority Key      Key      Number   State
----------- ------ ------ -------- -------- -------- -------- --------
Gi1/0/1     FA     bndl   32768    0xC      0xC      0x102    0x3F
Gi1/0/2     FA     bndl   32768    0xC      0xC      0x103    0x3F
Gi1/0/3     FA     bndl   32768    0xC      0xC      0x104    0x3F
Gi1/0/4     FA     hot-sby 32768   0xC      0xC      0x105    0x0F
Part 6: Explore EtherChannel Load Balancing
The load balancing method used to send traffic through an EtherChannel is a global setting on the switch. All EtherChannels on a given switch will use the method selected for that switch. The load balancing methods used at either end of an EtherChannel bundle do not have to match.
The available methods, as well as the default method used, varies by hardware platform. By default, Cisco Catalyst 9300L and 9200L switches load-balance using the source MAC address.
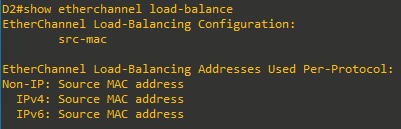
The full form of the command to show what interface the load-balancing algorithm will choose is show platform software fed etherchannel [switch switch-number] channel-group-number {group mask | loadbalance mac src-mac dst-mac [ip src-ip dst-ip [port src-port dst-port]]}. Select a channel-group and specify the source and destination address (in the form of a MAC, IP, or Port number) and the switch tells you what the exit port will be. The example that follows shows that traffic with the same source MAC always exits using the same interface.
Not supported on 3560s
D1# show platform software fed switch 1 etherchannel 12 load-balance mac
0050.0040.00af 0050.0040.00fa
Dest Port: : GigabitEthernet1/0/1

D1# show platform software fed switch 1 etherchannel 12 load-balance mac
0050.0040.00af 0050.0040.00fb
Dest Port: : GigabitEthernet1/0/1

D1# show platform software fed switch 1 etherchannel 12 load-balance mac
0050.0040.00bf 0050.0040.00fb
Dest Port: : GigabitEthernet1/0/2