
Lab - Implement CoPP
Topology
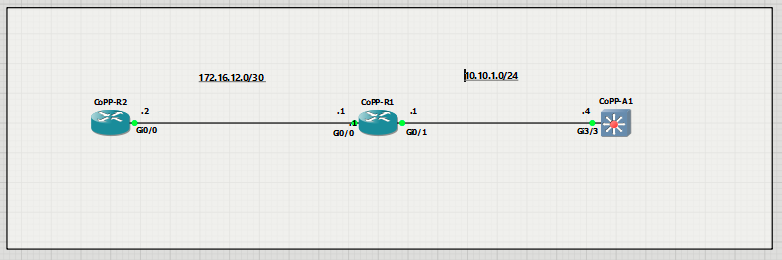
Addressing Table
| Device | Interface | IP Address | Subnet Mask |
| R1 | G0/0/0 | 172.16.12.1 | 255.255.255.252 |
| R1 | G0/0/1 | 10.10.1.1 | 255.255.255.0 |
| R2 | G0/0/0 | 172.16.12.2 | 255.255.255.252 |
| A1 | VLAN 1 | 10.10.1.4 | 255.255.255.0 |
Objectives
- Part 1: Build the Network and Configure Basic Device Settings
- Part 2: Verify Initial Connectivity
- Part 3: Implement a CoPP Policy on R1
- Part 4: Verify the CoPP Policy on R1
- Part 6: (Challenge) Further Classify Default Traffic
Background / Scenario
Control Plane Policing (CoPP) is a protection feature for the router’s control plane CPU. CoPP can granularly permit, drop, or rate-limit traffic to or from the CPU using a Modular QoS CLI (MQC) policy. The CoPP policy is applied to a dedicated control-plane interface which protects the CPU from unexpected extreme rates of traffic that could impact the stability of the router
CoPP handles all process-switched traffic, such as packets logged by an ACL or IP packets with header (TTL) options. Other types of traffic directed to the control plane include routing updates, (OSPF, EIGRP and BGP) as well as management traffic, including Telnet, SNMP, SSH, NTP, and HTTP etc.
The focus of this lab is using the Cisco IOS Modular QoS CLI (MQC) to implement CoPP.
Note: This lab is an exercise in configuring CoPP policies and does not necessarily reflect network best practices.
Required Resources - Sergio Jimenez's Version
For this lab I am using GNS3 where I have deployed:
- 2 IOSv 15.9(3)M9 routers
- 1 IOSvL2 15.2 switches
Instructions
Part 1: Configure basic settings for the routers and switches
CoPP-R1
hostname R1
no ip domain lookup
ip domain name Ccnp.CoPP.Lab
username admin privilege 15 algorithm-type scrypt secret cisco123
banner motd # R1, Control Plane Policing #
line con 0
exec-timeout 0 0
logging synchronous
exit
interface g0/1
ip address 10.10.1.1 255.255.255.0
no shutdown
exit
interface g0/0
ip address 172.16.12.1 255.255.255.252
no shutdown
exit
router eigrp 123
eigrp router-id 0.0.0.1
 network 172.16.12.0 0.0.0.3
 network 10.10.1.0 0.0.0.255
 exit
line vty 0 4
login local
transport input telnet ssh
exit
crypto key generate rsa modulus 2048
end
CoPP-R2
hostname R2
no ip domain lookup
ip domain name Ccnp.CoPP.Lab
username admin privilege 15 algorithm-type scrypt secret cisco123
banner motd # R2, Control Plane Policing #
line con 0
exec-timeout 0 0
logging synchronous
exit
interface g0/0
ip address 172.16.12.2 255.255.255.252
no shutdown
exit
router eigrp 123
 eigrp router-id 0.0.0.2
 network 172.16.12.0 0.0.0.3
 exit
line vty 0 4
login local
transport input telnet ssh
exit
crypto key generate rsa modulus 2048
end
CoPP-A1
hostname A1
no ip domain lookup
no ip routing
username admin privilege 15 algorithm-type scrypt secret cisco123
ip domain name Ccnp.COPP.LAB
banner motd # A1, Control Plane Policing #
spanning-tree mode rapid-pvst
line con 0
exec-timeout 0 0
logging synchronous
exit
line vty 0 15
login local
transport input telnet ssh
interface range g3/3
switchport mode access
no shutdown
exit
interface vlan 1
ip address 10.10.1.4 255.255.255.0
no shut
exit
ip default-gateway 10.10.1.1
crypto key generate rsa modulus 1024
end
Part 2: Verify Initial Connectivity
It is always advisable to test network connectivity and services before applying any policies. This ensures that
the network is fully functional, and that the loss of connectivity or functionality is due to the applied policy and
not a pre-existing network issue.
When testing TCP connectivity, some services will prompt for a username/password. The pre-configured username is admin and password is cisco123
Step 1: Test Telnet connectivity
From A1, test Telnet connectivity to R1 and R2. When prompted for a username / password use admin and cisco123. You should be successful. Troubleshoot as needed.
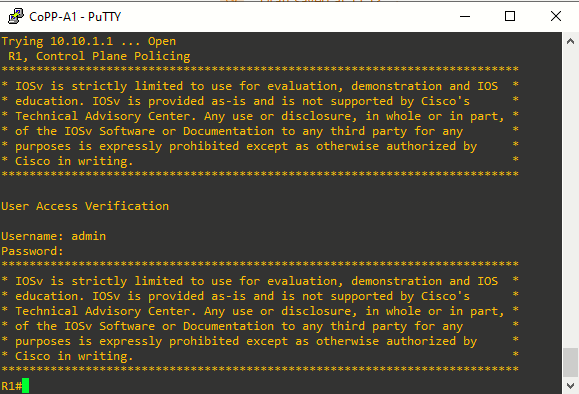
Step 2: Test SSH connectivity
From A1, test SSH connectivity to R1 and R2. When prompted for a username / password use admin and cisco123. You should be successful. Troubleshoot as needed.
Part 3: Implement a CoPP Policy on R1
In this part, you will configure ACLs to identify traffic flows. You will then use these ACLs in class maps to classify the traffic for CoPP. Next, you will bind the class maps to a CoPP policy map. This policy map will apply the policing and actions to take for each class map. Finally, you will apply the policy map to the control plane.
Step 1: Configure named ACLs to identify traffic flows.
Accurate traffic classification begins with understanding the types of traffic that need to be identified. This can be determined through network protocol analysis. Cisco NetFlow and Embedded Packet Capture (EPC) are useful tools for analyzing and classifying network traffic.
Once traffic types are identified, you can create named ACLs to match the specific traffic. Defining these ACLs is a critical step in the CoPP process. The MQC uses these ACLs to define traffic classes. The more granular the classification of protocols within these ACLs, the better the protection of the control plane CPU
- Configure an extended ACL using the name TELNET to identify Telnet traffic.

- Configure an extended ACL using the name EIGRP to identify all EIGRP traffic.

- Configure an extended ACL using the name SSH to identify all SSH traffic.

- Configure an extended ACL using the name ICMP to identify ICMP traffic.


Note: Any packets that do not match a permit statement in these ACLs will still be processed by the
control plane CPU on R1.
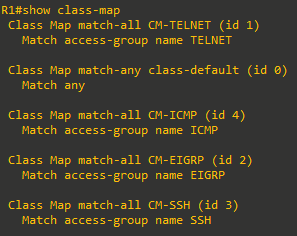
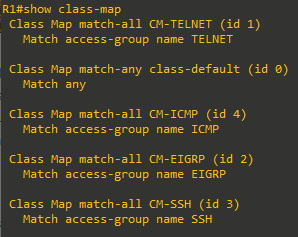
Step 2: Configure class maps for CoPP on R1
Class maps are used to classify traffic for CoPP based on previously defined ACLs. The ACLs created in Step 1 identify the specific traffic flows, and class maps bind those ACLs to logical traffic classes. This mapping completes the traffic classification portion of the CoPP configuration.
Although class maps support multiple matching criteria, this configuration uses a single match condition for simplicity and basic functionality.
- Configure a class map named CM-TELNET to match IP packets that should be dropped and never reach the control plane CPU.
- Configure a class map named CM-EIGRP to match EIGRP packets. This will allow you to apply a policy to these routing packets. The same could be done for OSPF or BGP packets if those routing protocols were active.
- Configure a class map named CM-SSH to match IP packets in the ACL named SSH. These IP packets are SSH packets destined to the management plane.
- Configure a class map named CM-ICMP to match IP packets in the ACL named ICMP. These IP packets are ICMP packets destined to the router.

Step 3: Configure a policy map for CoPP on R1
A policy map defines the baseline service policy for each previously classified traffic type. It applies CoPP rates and actions to ensure the router’s control plane CPU remains protected from excessive or malicious traffic.
Correctly setting policing rates is critical; too restrictive and you risk impacting vital traffic, too permissive and you lose protection.
- For critical traffic classes, it is best to initially set the exceed-action to transmit to avoid stability issues.
- Once tested and confirmed effective, you can convert unnecessary transmit actions to drop for enhanced security.
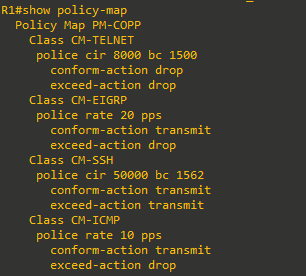
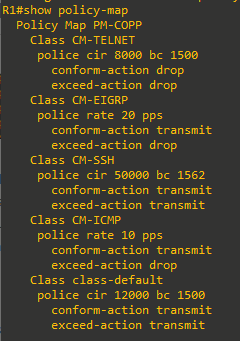
- Create a policy map named PM-COPP on R1.
R1(config)# policy-map PM-COPP - Associate the traffic class maps to the policy map and configure the following policing and action policies:
- For Telnet packets, configure policing at 8 kbps. Then set the conform action to drop and the exceed action to drop. This will effectively drop all Telnet packets that match the class map.
- For EIGRP packets, configure policing at 20 packets per second (pps). Then set the conform action to transmit and the exceed action to drop.
- For SSH packets, configure the policing at 50 kbps, set the conform action to transmit and the exceed action to transmit. This will effectively transmit all SSH packets that match the class map.
- For SSH packets, configure the policing at 50 kbps, set the conform action to transmit and the exceed action to transmit. This will effectively transmit all SSH packets that match the class map.

- Associate the default class map with the traffic policy. Set the class to class-default and configure policing at 12 kbps. Then set the conform action to transmit and the exceed action to transmit.

Note: The class class-default is automatically placed at the end of the policy map. By the nature of CoPP matching mechanisms, certain traffic types will always end up falling into the default class. This includes Layer 2 keepalives and non-IP traffic. Because these traffic types are required to maintain the network control plane, the class-default should never be policed with both conform and exceed actions set to drop.

Step 4: Apply the CoPP policy to the control plane virtual interface on R1.
The policy map is applied to the control plane virtual interface in the inbound direction using the service-policy command. Only traffic destined for the router’s control plane will be affected by the CoPP policy. Enter control plane configuration mode to apply a CoPP policy. Next, attach the policy map to the control plane interface using the service-policy input command and specify the policy map named PM-COPP on the control plane virtual interface.

Part 4: Verify the CoPP Policy on R1.
Within a few moments of the CoPP policy being applied, dynamic information can be seen about the actual policy including rate information and the number of bytes and packets that conformed to or exceeded the configured policies
There are a few show commands we can use here:
|
|
|
|
|
|
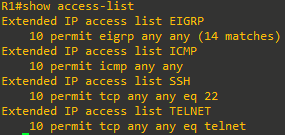
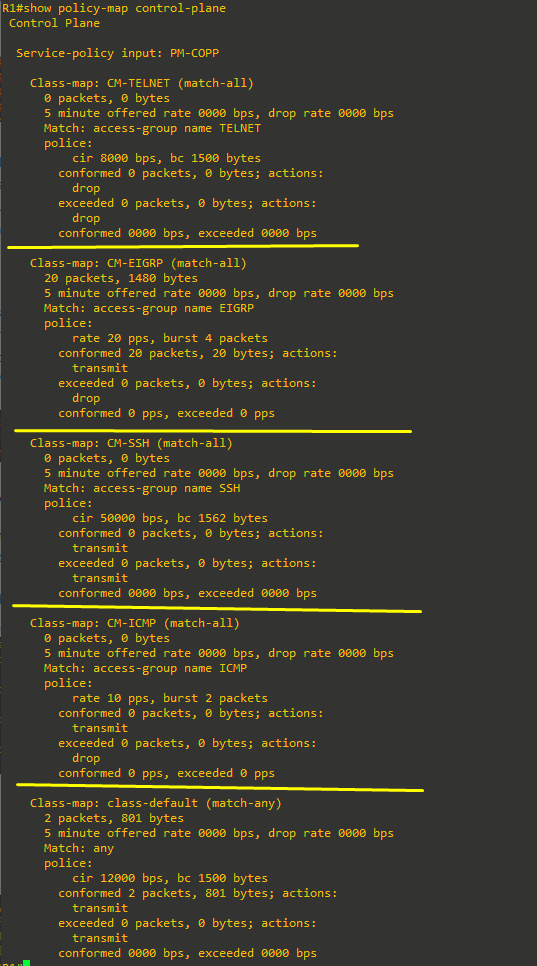
- The show access-list command identifies specific traffic for each ACL.
- The only class maps configured are those used for CoPP. Notice the match-any statement under the class-default class map. The match statement was automatically added when the class map was included in the policy map configuration.
- Notice the policy map shows the policing rates that were configured for each class map, including the class-default class map.
- show policy-map control-plane: This is the most useful command for verifying CoPP functionality. Notice that the EIGRP packets conform to the policing rule. Because no packets exceeded the defined rates for the EIGRP class map, all packets are transmitted to the control plane for processing. Note that your packet count will vary from the example below.
Step 5: From R2, ping R1
From R2, use the command ping 172.16.12.1 repeat 20 to simulate a DoS attack on the control plane on R1. Notice the success rate of 70 percent and the failed pings as indicated by the period symbol (.) among the (successful) exclamation marks. From the output above, this indicates that R1 is dropping every third ICMP packet, based on the policy for rate limiting ICMP traffic to the control plane on R1.

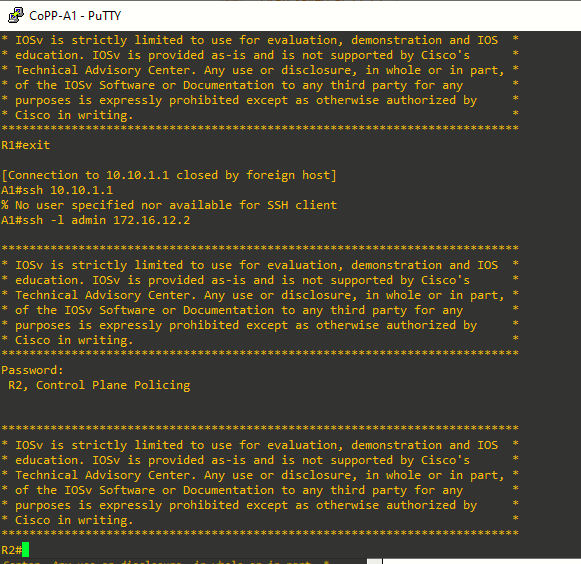
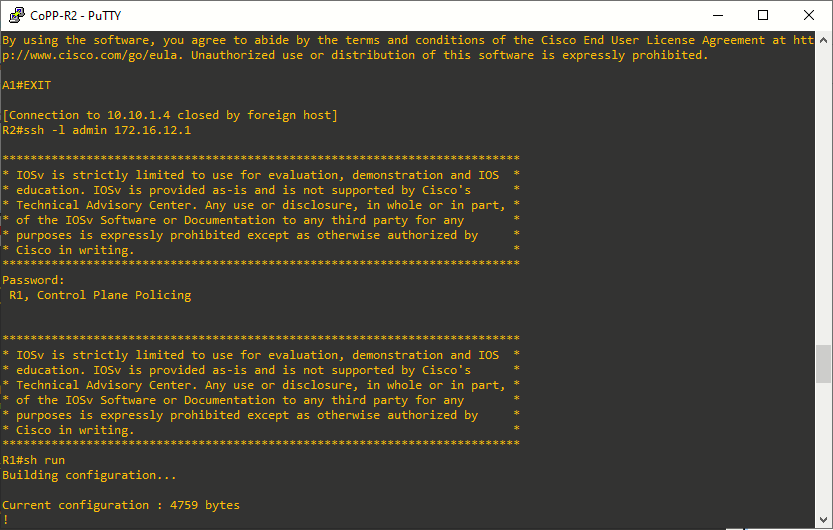
Step 6: From R2, access R1 via Telnet.
From R2 enter the telnet 172.16.12.1 command. Notice that all Telnet traffic to R1 is not successful. This is because our policy is to drop all Telnet traffic directed to the control plane on R1.

Step 7: From R2, access A1 via Telnet
From R2, enter the telnet 10.10.1.4 command. When prompted for a username / password enter admin and cisco123. Notice that Telnet traffic from R2 through R1 to A1 is successful.

Step 8: SSH from R2 to R1
From R2 SSH into R1 using the ssh -l admin 172.16.12.1 command. When prompted for a password enter cisco123. Then enter the show running-config command to generate SSH packets.
Step 9: Investigate the CoPP policy on R1.
- On R1, repeat the show policy-map control-plane command to investigate policing of ICMP, Telnet, SSH, EIGRP and other packets.
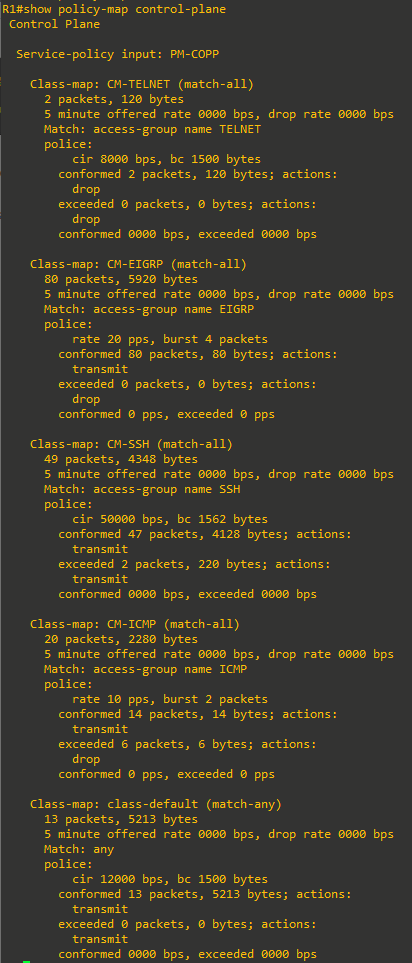
- From the output above note the following:
- Notice that all four Telnet packets were dropped.
- All EIGRP packets conform to the policing rule and are forwarded the control plane for processing.
- All SSH packets also conform to the policing rule and are forwarded to the control plane for processing.
- Ping packets are rate limited to 10 pps. This allows a “burst” of two packets, with every third packet being dropped.

Part 5: (Challenge) Further Classify Default Traffic
Notice in the output of the show policy-map control-plane command that there is a substantial number of packets that are being matched to the class-default class map. One solution to help identify the source of these packets would be to configure a “CATCH-ALL” class map. This new class map would collect any remaining traffic that have not matched previous class maps and are destined to the device’s control plane. This CATCH-ALL class would prevent packets from ending up in the class-default class map. For example, an ACL called CATCH-ALL could be defined as follows:
R1(config)# ip access-list extended CATCH-ALL
R1(config-ext-nacl)# permit icmp any any
R1(config-ext-nacl)# permit udp any any
R1(config-ext-nacl)# permit tcp any any
R1(config-ext-nacl)# permit ip any any
R1(config-ext-nacl)# exit
This ACL could be matched to a class map called CM-CATCH-ALL that could be policed to 50 kbps with a confirm action of transmit and an exceed action of drop.
Implement this new class map in your policy map, repeat the verifications in Part 4, and then view the output of the show policy-map control-plane command to see where this default traffic is classified.
Reflection Questions
- Why is R2 able to use Telnet through R1 to A1?
Because that traffic is not destined to R1 control plane hence it's not policed, it's just passthrough traffic. It is data plane traffic, not control plane (from R1 POV). - When initially deploying CoPP, how can you prevent disruption of legitimate control plane traffic?
By setting both conform-action and exceed-action to transmit.