
Lab - Implement Multiarea OSPFv3 [Pending]
Topology
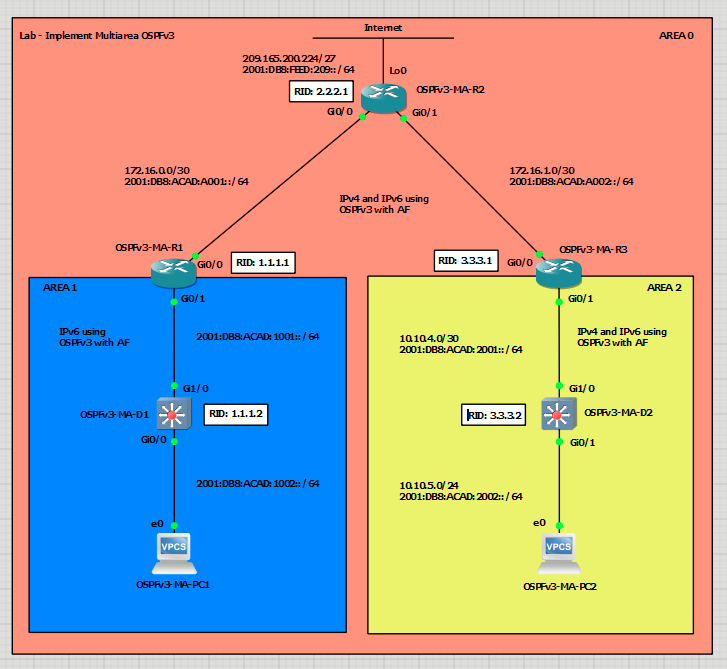
Addressing Table
| Device | Interface | IPv4 Address | IPv6 Address | IPv6 Link-Local |
| R1 | G0/0/0 | 172.16.0.2/30 | 2001:db8:acad:a001::2/64 | fe80::1:2 |
| R1 | G0/0/1 | 10.10.0.1/30 | 2001:db8:acad:1001::1/64 | fe80::1:1 |
| R2 | Lo0 | 209.165.200.225/27 | 2001:db8:feed:209::1/64 | fe80::2:3 |
| R2 | G0/0/0 | 172.16.0.1/30 | 2001:db8:acad:a001::1/64 | fe80::2:1 |
| R2 | G0/0/1 | 172.16.1.1/30 | 2001:db8:acad:a002::1/64 | fe80::2:2 |
| R3 | G0/0/0 | 172.16.1.2/30 | 2001:db8:acad:a002::2/64 | fe80::3:2 |
| R3 | G0/0/1 | 10.10.4.1/30 | 2001:db8:acad:2001::1/64 | fe80::3:1 |
| D1 | G1/0/11 | N/A | 2001:db8:acad:1001::2/64 | fe80::d1:2 |
| D1 | G1/0/23 | N/A | 2001:db8:acad:1002::1/64 | fe80::d1:1 |
| D2 | G1/0/11 | 10.10.4.2/30 | 2001:db8:acad:2001::2/64 | fe80::d2:2 |
| D2 | G1/0/23 | 10.10.5.1/24 | 2001:db8:acad:2002::1/64 | fe80::d2:1 |
Objectives
- Part 1: Build the Topology and Configure Basic Device Settings and IP Addressing
- Part 2: Configure Traditional OSPFv3 for IPv6 on D1
- Part 3: Configure OSPFv3 for Address Families (AF) IPv4 and AF IPv6
- Part 4: Verify OSPFv3 AF
- Part 5: Tune OSPFv3 AF
Background / Scenario
In this lab, you will configure the network with multiarea OSPFv3 routing using the AF feature for both IPv4 and IPv6 in OSPF areas 0, 1 and 2. This lab was specifically designed to use three routers and two Layer 3 switches that support OSPFv3 using AF.
It should be noted that OSPFv3 runs on top of IPv6 and uses IPv6 link local addresses for OSPFv3 control packets. Therefore, it is required that IPv6 be enabled on an OSPFv3 link, although the link may not be participating in any IPv6 AFs. Additionally, OSPFv3 AF for IPv4 unicast is not backwards compatible with OSPFv2.
Required Resources - Sergio Jimenez's Version
For this lab I am using GNS3 where I have deployed:
- 3 IOSv 15.9(3)M9 routers
- 2 IOSvL2 15.2 switches
- 2 VPCs
Instructions
Part 1: Configure basic settings for the routers and switches
OSPFv3-MA-R1
hostname R1
no ip domain lookup
line con 0
logging sync
exec-time 0 0
exit
interface g0/0
ip add 172.16.0.2 255.255.255.252
ipv6 add 2001:db8:acad:a001::2/64
ipv6 add fe80::1:2 link-local
no shut
exit
interface GigabitEthernet0/1
ipv6 add 2001:db8:acad:1001::1/64
ipv6 add fe80::1:1 link-local
no shut
exit
OSPFv3-MA-R2
hostname R2
no ip domain lookup
line con 0
logging sync
exec-time 0 0
exit
interface g0/0
ip add 172.16.0.1 255.255.255.252
ipv6 add 2001:db8:acad:a001::1/64
ipv6 add fe80::2:1 link-local
no shut
exit
interface GigabitEthernet0/1
ip address 172.16.1.1 255.255.255.252
ipv6 add 2001:db8:acad:a002::1/64
ipv6 add fe80::2:2 link-local
no shut
exit
int lo0
ip add 209.165.200.225 255.255.255.224
ipv6 add 2001:db8:feed:209::1/64
ipv6 add fe80::2:3 link-local
exit
OSPFv3-MA-R3
hostname R3
no ip domain lookup
line con 0
logging sync
exec-time 0 0
exit
interface g0/0
ip add 172.16.1.2 255.255.255.252
ipv6 add 2001:db8:acad:a002::2/64
ipv6 add fe80::3:2 link-local
no shut
exit
interface GigabitEthernet0/1
ip address 10.10.4.1 255.255.255.252
ipv6 add 2001:db8:acad:2001::1/64
ipv6 add fe80::3:1 link-local
no shut
exit
OSPFv3-MA-D1
hostname D1
no ip domain lookup
line con 0
exec-timeout 0 0
logging synchronous
exit
interface g1/0
no switchport
ipv6 add 2001:db8:acad:1001::2/64
ipv6 add fe80::d1:2 link-local
no shutdown
exit
interface g0/0
no switchport
ipv6 add 2001:db8:acad:1002::1/64
ipv6 add fe80::d1:1 link-local
no shutdown
exit
OSPFv3-MA-D2
hostname D2
no ip domain lookup
line con 0
logging sync
exec-time 0 0
exit
interface g1/0
no switchport
ip address 10.10.4.2 255.255.255.252
ipv6 add 2001:db8:acad:2001::2/64
ipv6 add fe80::d2:2 link-local
no shut
exit
interface g0/1
no switchport
ip address 10.10.5.1 255.255.255.0
ipv6 add 2001:db8:acad:2002::1/64
ipv6 add fe80::d2:1 link-local
no shut
exit
Part 2: Configure Traditional OSPFv3 for IPv6 on D1
Step 1: Configure traditional OSPFv3 on D1
Traditional OSPFv3 implements OSPF routing for IPv6. In this part of the lab, you will configure traditional OSPFv3 for routing IPv6 on D1, which is in the IPv6-only area
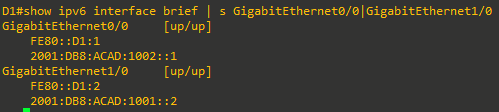
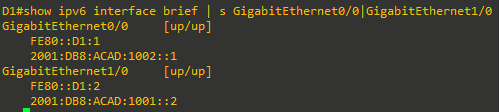
- OSPFv3 messages are sourced from the router’s IPv6 link-local address. Earlier in this lab, IPv6 GUA and link-local addresses were statically configured on each router’s interface. The link-local addresses were statically configured to make these addresses more recognizable than being automatically created using EUI-64. Issue the show ipv6 interface brief command to verify the GUA and link-local addresses on the router’s interfaces.
-
IPv6 routing is disabled by default. Enable IPv6 routing using the ipv6 unicast-routing command in global configuration mode.

- Most Cisco IOS versions have IPv6 CEF enabled by default when IPv6 routing is enabled. Use the show ipv6 cef command to verify whether IPv6 CEF is enabled. If you need to enable IPv6 CEF, use the ipv6 cef command. If IPv6 CEF is disabled you will see an IOS message similar to “%IPv6 CEF not running".
- Configure the OSPFv3 process on D1. Similar to OSPFv2, the process ID does not have to match other routers to form neighbor adjacencies, although that is considered best practice. Configure the 32-bit OSPFv3 router ID on each router. Enable OSPFv3 directly on the interfaces using the interface ipv6 ospf pid area area command.
- The show ipv6 ospf command can be used to verify the OSPF router ID. If the OSPFv3 router ID is uses a 32-bit value other than the one specified by the router-id command, you can reset the router ID by using the clear ipv6 ospf pid process command and re-verify using the command show ipv6 ospf.
- The show ipv6 protocols command can be used to verify general OSPFv3 information such as areas and enabled interfaces.

Part 3: Configure OSPFv3 for AF IPv4 and AF IPv6
OSPFv3 with the address family (AF) unifies OSPF configuration for both IPv4 and IPv6. Each OSPFv3 AF is a single process, so you may have two processes per interface, but only one process per AF. OSPFv3 messages are sent over IPv6 which requires that IPv6 routing is enabled and that the interface has a linklocal IPv6 address. This is the requirement even if only the IPv4 AF is configured.
In this section you will configure OSPFv3 with AF for the IPv4 and IPv6 address families on R1, R2, R3, D1 and D2.
Step 1: Configure OSPFv3 with AF on R1
- After enabling IPv6 unicast routing, configure OSPFv3 with AF on R1 using the router ospfv3 pid command. Use the ? to see the address families available.
- Next, specify the AF for IPv4 and use the ? to see the available options.
- Enter the AF for IPv4 unicast using the command address-family ipv4 unicast. Use the ? to examine the options in AF configuration mode. Some of the more common configuration commands are highlighted. Use the router-id command to configure the router ID for the IPv4 AF.
- Exit the IPv4 AF configuration mode and enter the AF IPv6 configuration mode. The exit-address-family (or a shorter version of exit) command is used exit address family configuration mode. Issue the address-family ipv6 unicast command to enter the IPv6 AF. For the IPv6 AF, use the router-id command to configure the router ID. It isn’t necessary to configure a different router ID for IPv6 AF but it is a valid option. The exit command is used to return to global configuration mode.
- OSPFv3 is enabled directly on the interfaces for both IPv4 and IPv6 AFs using the ospfv3 pid [ ipv4 | ipv6 ] area area-id interface command. Use this command to enable OSPFv3 on both of R1’s interfaces.
Step 2: Configure OSPFv3 with AF IPv4 and AF IPv6 on R2.
Enable IPv6 unicast routing and configure the OSPFv3 with AF for both IPv4 and IPv6 on R2, similar to the configuration for R1.
Step 3: Configure OSPFv3 with IPv4 AF and IPv6 AF on R3.
Enable IPv6 unicast routing and configure the OSPFv3 with AF for both IPv4 and IPv6 on R3, similar to the configurations for R1 and R2. On R3, set the router ID for both IPv4 AF and IPv6 AF with a single command as shown.
Step 4: Configure OSPFv3 with AF on D2.
- Enter the following command to enable routing for IPv4. (This may not be required on depending on model and IOS.)
- Enter the following command to enable routing for IPv6. (This may not be required on depending on model and IOS.)
- Configure the OSPFv3 with AF for both IPv4 and IPv6 on D2, similar to the configurations for R1, R2 and R3.
Part 4: Configure OSPFv3 for AF IPv4 and AF IPv6
The commands to verify traditional OSPFv3 and OSPFv3 with AF may differ. This is because OSPFv3 with AF commands include information for both IPv4 and IPv6 address families, whereas traditional OSPFv3 is for IPv6 only.
Step 1: Verifying neighbor adjacencies.
- Use the show ipv6 ospf neighbor command on D1 to display OSPFv3 neighbors. This is a command used for routers configured with traditional OSPFv3. The equivalent command for OSPFv2 would be show ip ospf neighbor
- This same command on a router running OSPFv3 with AF would generate similar output. For example, on R1 issue the same show ipv6 ospf neighbor command. Notice the output is only OSPFv3 for the IPv6 AF
- Now, issue the show ospfv3 neighbor command on R1. This is a command used for routers configured for OSPFv3 with AF. Notice the output includes neighbors for both IPv4 and IPv6 address families.
Traditional OSPFv3 commands are similar to those for OSPFv2, except ipv6 is used as an argument instead of ip, for example show ip ospf neighbor and show ipv6 ospf neighbor. OSPFv3 with AF uses the argument ospfv3 which includes both OSPF for IPv4 and IPv6 AFs. For example, show ospfv3 neighbor.
Traditional OSPFv3 commands can be used when a router is configured for OSPFv3 with AF, but the OSPFv3 AF router will only show OSPF for IPv6 AF information. OSPFv3 with AF commands cannot be used on routers configured with traditional OSPFv3.
To summarize the show command arguments:-
- OSPFv2: Use show ip ospf (IPv4 only)
- Traditional OSPFv3: Use show ipv6 ospf (IPv6 only)
- OSPFv3 with AF: Use show ospfv3 (IPv4 and IPv6 AF) or show ipv6 ospf (IPv6 only)
- OSPFv2: Use show ip ospf (IPv4 only)
-
Why does the show ipv6 ospf neighbor command only display OSPFv3 neighbors in the IPv6 AF?
Step 2: Examining the IP routing tables.
- Use the show ipv6 route ospf command on D1 to display OSPFv3 routing entries in the IPv6 routing table.
Display the routes using the show ip route ospf. Why are there no routes displayed using this command? - Understanding the difference between commands associated with OSPFv2 and OSPFv3 can seem challenging at times. The show ip route ospfv3 command is used to view OSPFv3 routes in the IPv4 routing table. The show ipv6 route ospf command is used to view OSPFv3 routes in the IPv6 routing table. The show ipv6 route ospf command is the same command used with traditional OSPFv3 for IPv6.
Why doesn’t the show ip route ospf command display any routes on R1?
Step 3: Examining the OSPF LSDB.
- D1 is running traditional OSPFv3. The show ipv6 ospf database command is used to display a summary of the OSPFv3 LSDB.
- R1 is running OSPFv3 with AF. The show ospfv3 database command is used to display a summary of the OSPFv3 LSDB for both the IPv4 and IPv6 AFs.
What would the show ipv6 ospf database command display on R1, if anything?
Part 5: Tune OSPFv3
Step 1: Configuring a passive interface.
- To configure a passive interface in traditional OSPFv3, use the passive-interface command in OSPFv3 router mode.
- To configure a passive interface in OSPFv3 with AF, you can use the passive-interface command in OSPFv3 router mode to configure the passive interface for both IPv4 and IPv6 AFs.
- As an alternative, you can use the passive-interface command within AF configuration mode to configure the passive interface for a specific AFs.
Step 2: Configuring summarization.
- The area area range ipv6-summary-address command is used to summarize prefixes from one area into another. The area is the area from which the prefixes are summarized.
- Notice that R2 is now receiving the summarized prefixes.
Why is prefix summarization considered desirable? How does it stabilize routing?
Step 3: Modifying the network type.
- OSPFv3 supports the same network types as OSPFv2. Notice that the Ethernet interfaces between R2 and R1, and R2 and R3, elect a DR and a BDR. This is because Ethernet is a multiaccess network. However, these are point-to-point links and there is no need for a DR or BDR.
Note: Your DR and BDR may be different. - These connections can be changed to point-to-point using the ospfv3 network point-to-point interface command. This command needs to be configured one both sides of the point to point interface.
- Notice that the links have now change to P2P.
What is the effect on the state of the interface when changing a broadcast network to point-to-point?
Step 4: Advertising a default route.
- Like OSPFv2, an ASBR in OSPFv3 advertises using the default-information command. Configure a static default route for IPv4 and IPv6 on R2.
Note: Without a default route in the routing table, OSPF would require the default-information originate always command to advertise a default route. - Verify D1 is receiving an IPv6 default route via OSPFv3.
- Verify D2 is receiving an IPv4 default route via OSPFv3.