
Lab 6-7: Quality of Service (QoS)
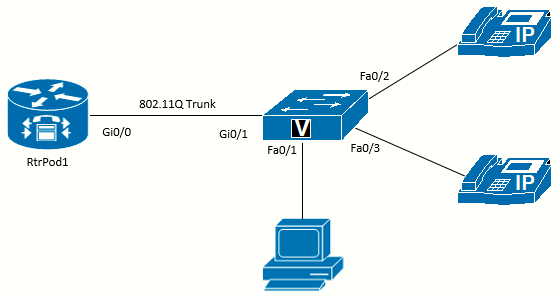 Topology diagram
Equipment Required
- Cisco 2821 router
- Cisco 3560 switch
- Lab configuration from Lab 6-2
- One or more IP Phones
Objectives
- Understand the reasons for Quality of Service (QoS).
- Understand QoS mechanisms.
- Configure AutoQoS on Cisco routers and switches
Scenario
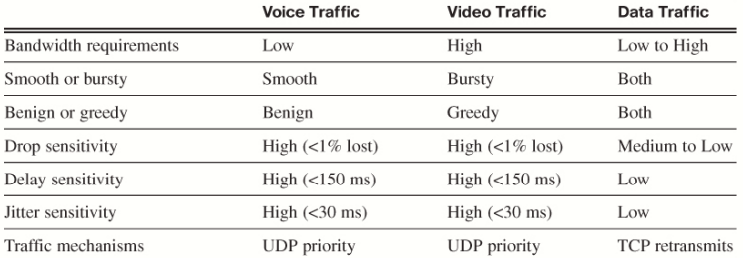
Jimenez Research Inc. (JRI) understands that mixing voice traffic with data can cause problems for the voice traffic. This is one reason the voice traffic is in a separate VLAN. However, there are plenty of places in a network where the voice and data traffic are not separated (such as soft phones on the PC). If real-time video traffic is added to the network, the demands for quality of service (QoS) become even greater. The first step to QoS is to understand the requirements of different categories of traffic. The most basic division of traffic is voice, video, and data. Data traffic can be further divided into a variety of categories, such as business-critical, transactional, network management, bulk, and so on.
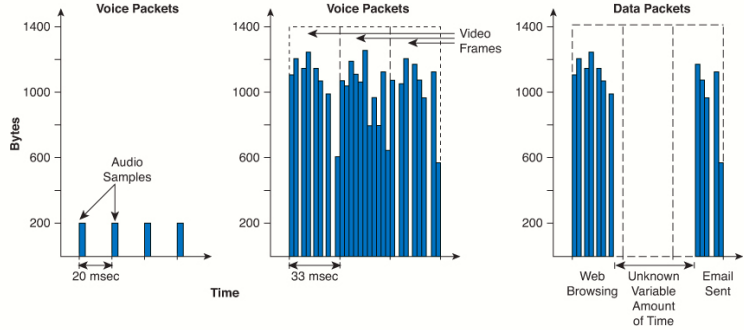
As shown in the following figure, voice traffic consists of small regular frames, while video traffic takes up large amounts of bandwidth and data traffic can be highly variable.
The following table lists the requirements of each traffic category. Knowing the requirements is critical to creating an appropriate QoS policy.
There are three main QoS mechanisms:
- Best Effort: No special QoS considerations.
- Integrated Services (IntServ): Uses the Resource Reservation Protocol (RSVP) to reserve bandwidth prior to the traffic flow
starting. - Differentiated Services (DiffServ): The most common method for QoS. With DiffServ, each device can be configured to respond to traffic using a variety of mechanisms and separate traffic into various classes.
DiffServ QoS Mechanisms
The main tools of DiffServ QoS are:
- Classification: Each packet examined by a QoS mechanism needs to be classified. Classes of traffic can be as simple as bronze, silver, or gold or as detailed as necessary.
- Marking: Closely linked to classification is marking. Ideally, packets are marked once based on classification, and then only the marking needs to be examined by devices farther along the data path. Of course, later devices can remark the traffic based on their own classification. Marking can be done in the L2 frame or the L3 packet (or both).
- Congestion management: Each interface needs a queuing mechanism for prioritizing the packets. There are a variety of queuing mechanisms, some of which depend on the IOS version, type of device, and interface protocol.
- Congestion avoidance: By dropping low-priority traffic (especially TCP traffic), interfaces can avoid overflowing their buffers.
- Traffic policing and shaping: Enforces a rate limit by dropping (policing) or delaying (shaping) traffic that exceeds limits.
- Link efficiency: Improves bandwidth efficiency through compression, link fragmentation, and interleaving. Mostly used for slower-speed interfaces and WAN links.
Queuing Mechanisms (Congestion Management)
Each interface has to prepare packets or frames to be sent out. The mechanisms used to hold the data before transmission vary, but here are the basics of the most common ones:
-
-
- First-In, First-Out (FIFO): The default for all interfaces with speeds greater than 2 Mbps. This provides no prioritization of traffic.
- Weighted Fair Queuing (WFQ): The default for all interfaces with speeds less than 2 Mbps. Traffic is automatically put into different queues before going to the exit interface. Because all the traffic from the same flow will end up in the same queue, traffic flows with high bandwidth will fill the queue and not impact other traffic in other queues. One downside of this mechanism is the lack of control over the traffic allocation.
- Class-Based Weighted Fair Queuing (CBWFQ): This mechanism allows user-defined classes of traffic to be put into queues. Thus, voice traffic can be separated from data traffic; however, it still can have unacceptable delay and jitter.
- Low Latency Queuing (LLQ): Adds a priority queue on top of CBWFQ. This gives traffic like voice (and video) priority over data traffic, providing low latency and minimizing jitter. Data traffic goes into the CBWFQ mechanism. LLQ is the Cisco preferred queuing mechanism when voice and video traffic are present.
- Weighted Round Robin (WRR) and Shaped Round Robin (SRR): Common methods on Cisco switches that match a set number of hardware queues to prioritizing traffic.
-
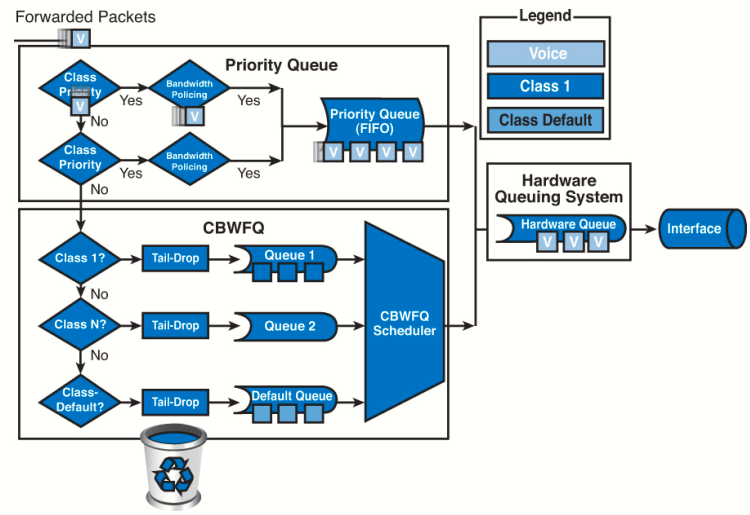 LLQ Architecture
Trust Boundaries
The ideal scenario involves classifying and marking traffic as close to the point of entry to the network as possible. The other devices upstream can queue traffic based on the trusted markings and not have to classify every time. This involves creating a "trust boundary".
For example, as shown in the following figure, if a Cisco IP Phone has a computer connected to it, we want the switch to trust the markings from the phone (discovered through CDP), so the phone remarks any traffic from the PC. If the PC is connected directly to the switch, the markings should not be trusted and the switch should remark traffic.

AutoQos
Correctly implementing QoS can be a difficult task. Luckily, Cisco has created an easier way to implement QoS called AutoQoS. AutoQoS applies a template based on the best practices Cisco has found for QoS. Even if you want to design a custom QoS solution, starting with AutoQoS can standardize the starting configuration, and the configuration from AutoQoS can be easily modified to fit the desired goal. Technically, there are two types of AutoQos: AutoQoS for VoIP and AutoQoS for Enterprise. This lab will only focus on the AutoQoS for VoIP.
Task 1: Questions
Q: Both voice and video traffic have constant, smooth streams of packets, while data traffic is bursty in nature.
- False: Voice traffic consists of small regular frames, while video traffic takes up large amounts of bandwidth and data traffic can be highly variable.
Q: End-to-end packet delay for voice needs to be less than 30 ms:
- False: Less than 150 ms.
Q: Congestion avoidance aims to drop packets to prevent interface queues from filling up.
- True.
Task 2: AutoQoS on a Switch
The results of AutoQoS vary greatly based on the type and model of device, interface applied to, and IOS version. The following
output might not match what you see on your equipment.
Configure a Port for a Cisco Phone
As mentioned previously, establishing a trust boundary is important. Cisco switches have an AutoQoS configuration that uses CDP to detect whether a Cisco phone is connected and trust the markings, but not if a PC is attached. Use the auto qos voip cisco-phone command on an interface where a Cisco phone is connected.

Configure a Port for PC with Cisco IP Communicator
If a PC running the Cisco IP communicator is connected to a switchport, the soft phone also installs a CDP driver. However, the phone traffic will be on the same VLAN as the data traffic, not isolated like the Cisco desk phone. Cisco has a variation on the AutoQoS configuration for this situation: the auto qos voip cisco-softphone command.
Configure the Uplink to the Router
Any port that is connected to a trusted device (for example, the router or another switch) should be configured to trust the QoS markings. This is done with the auto qos voip trust command. This will trust all marking on packets from the router.
At this point, all other switch ports are untrusted. The auto qos voip cisco-phone command is commonly applied to all end-user interfaces, because it trusts a Cisco phone but does not trust a PC directly connected to the switch port.
Examine the Changes to the Switch Config
There are two main changes to the switch.
First are the commands that configure global settings. The switch will use Shaped Round Robin (SRR) queuing:
mls qos map policed-dscp  0 10 18 24 46 to 8
mls qos map cos-dscp 0 8 16 24 32 46 48 56
mls qos srr-queue input bandwidth 70 30
mls qos srr-queue input threshold 1 80 90
mls qos srr-queue input priority-queue 2 bandwidth 30
mls qos srr-queue input cos-map queue 1 threshold 2 3
mls qos srr-queue input cos-map queue 1 threshold 3 6 7
mls qos srr-queue input cos-map queue 2 threshold 1 4
mls qos srr-queue input dscp-map queue 1 threshold 2 24
mls qos srr-queue input dscp-map queue 1 threshold 3 48 49 50 51 52 53 54 55
mls qos srr-queue input dscp-map queue 1 threshold 3 56 57 58 59 60 61 62 63
mls qos srr-queue input dscp-map queue 2 threshold 3 32 33 40 41 42 43 44 45
mls qos srr-queue input dscp-map queue 2 threshold 3 46 47
mls qos srr-queue output cos-map queue 1 threshold 3 4 5
mls qos srr-queue output cos-map queue 2 threshold 1 2
mls qos srr-queue output cos-map queue 2 threshold 2 3
mls qos srr-queue output cos-map queue 2 threshold 3 6 7
mls qos srr-queue output cos-map queue 3 threshold 3 0
mls qos srr-queue output cos-map queue 4 threshold 3 1
mls qos srr-queue output dscp-map queue 1 threshold 3 32 33 40 41 42 43 44 45
mls qos srr-queue output dscp-map queue 1 threshold 3 46 47
mls qos srr-queue output dscp-map queue 2 threshold 1 16 17 18 19 20 21 22 23
mls qos srr-queue output dscp-map queue 2 threshold 1 26 27 28 29 30 31 34 35
mls qos srr-queue output dscp-map queue 2 threshold 1 36 37 38 39
mls qos srr-queue output dscp-map queue 2 threshold 2 24
mls qos srr-queue output dscp-map queue 2 threshold 3 48 49 50 51 52 53 54 55
mls qos srr-queue output dscp-map queue 2 threshold 3 56 57 58 59 60 61 62 63
mls qos srr-queue output dscp-map queue 3 threshold 3 0 1 2 3 4 5 6 7
mls qos srr-queue output dscp-map queue 4 threshold 1 8 9 11 13 15
mls qos srr-queue output dscp-map queue 4 threshold 2 10 12 14
mls qos queue-set output 1 threshold 1 100 100 50 200
mls qos queue-set output 1 threshold 2 125 125 100 400
mls qos queue-set output 1 threshold 3 100 100 100 400
mls qos queue-set output 1 threshold 4 60 150 50 200
mls qos queue-set output 1 buffers 15 25 40 20
mls qos

class-map match-all AUTOQOS_VOIP_DATA_CLASS
  match ip dscp ef
class-map match-all AUTOQOS_DEFAULT_CLASS
  match access-group name AUTOQOS-ACL-DEFAULT
class-map match-all AUTOQOS_VOIP_SIGNAL_CLASS
  match ip dscp cs3
!
policy-map AUTOQOS-SRND4-CISCOPHONE-POLICY
 class AUTOQOS_VOIP_DATA_CLASS
   set dscp ef
  police 128000 8000 exceed-action policed-dscp-transmit
 class AUTOQOS_VOIP_SIGNAL_CLASS
   set dscp cs3
  police 32000 8000 exceed-action policed-dscp-transmit
 class AUTOQOS_DEFAULT_CLASS
   set dscp default
  police 10000000 8000 exceed-action policed-dscp-transmit
Second are the commands for the individual interfaces. In each interface you can see the type of AutoQoS configured:
interface FastEthernet0/1
 switchport access vlan 10
 switchport mode access
 switchport voice vlan 15
 srr-queue bandwidth share 1 30 35 5
 priority-queue out
 mls qos trust device cisco-phone
 mls qos trust cos
 auto qos voip cisco-phone
 spanning-tree portfast
 service-policy input AUTOQOS-SRND4-CISCOPHONE-POLICY
!
interface FastEthernet0/2
 switchport access vlan 10
 switchport mode access
 switchport voice vlan 15
 srr-queue bandwidth share 1 30 35 5
 priority-queue out
 mls qos trust device cisco-phone
 mls qos trust cos
 auto qos voip cisco-phone
 spanning-tree portfast
 service-policy input AUTOQOS-SRND4-CISCOPHONE-POLICY

interface GigabitEthernet0/1
 switchport trunk encapsulation dot1q
 switchport mode trunk
 srr-queue bandwidth share 1 30 35 5
 priority-queue out
 mls qos trust cos
 auto qos trust
Verify the QoS Operation
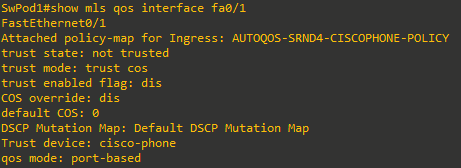
To see that AutoQoS properly detects and trusts the Cisco phones, first connect a PC to Fa0/1 and issue the command show mls qos interface fa0/1 command to view the QoS status. In this case, the PC is not trusted:
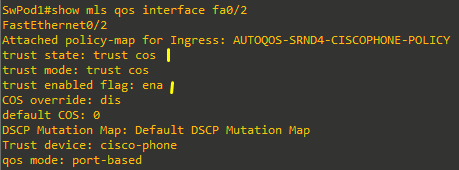
Now, if the command is issued on port Fa0/2 where an actual Cisco IP phone is connected, the output is as follows:
Task 3: AutoQoS on a Router
The results of AutoQoS vary greatly based on the type and model of device, interface applied to, and IOS version. The following
output might not match what you see on your equipment.
Configure the Port Connected to the Switch
In the same way that the switch was configured to trust the markings from the router, the router should be set to trust the markings from the switch. The same auto qos voip trust command is used. The router’s built-in interfaces do not have the cisco-phone or cisco-softphone options.
Cisco 2821 router running 12.4(24)T2: cannot enable auto qos on GigabitEthernet interfaces, but can i.e apply to Serial interface. Hence following code/examples are just for reference.
RtrPod1(config)# interface Gi0/0
RtrPod1(config-if)# auto qos voip trust
Verify the QoS Configuration
RtrPodx# show auto qos
!
policy-map AutoQoS-Policy-Trust
 class AutoQoS-VoIP-RTP-Trust
   priority percent 70
 class AutoQoS-VoIP-Control-Trust
   bandwidth percent 5
 class class-default
   fair-queue
!
class-map match-any AutoQoS-VoIP-RTP-Trust
 match ip dscp ef
!
class-map match-any AutoQoS-VoIP-Control-Trust
 match ip dscp cs3
 match ip dscp af31
!
rmon event 33333 log trap AutoQoS description “AutoQoS SNMP traps for Voice Drops”
 owner AutoQoS
rmon alarm 33333 cbQosCMDropBitRate.34.5364641 30 absolute rising-threshold 1 33333
 falling-threshold 0 owner AutoQoS
rmon alarm 33334 cbQosCMDropBitRate.50.14618161 30 absolute rising-threshold 1 33333
 falling-threshold 0 owner AutoQoS

interface GigabitEthernet0/0
 service-policy output AutoQoS-Policy-Trust
Sources
CiscoIPCommunicatorSetup.exe
https://drive.google.com/file/d/1AhgJO3S81Z_o6Tv2KwZG-byIBImySXeC/view
Fun with Cisco’s IP Communicator softphone application
https://community.freepbx.org/t/fun-with-ciscos-ip-communicator-softphone-application/102436/1