
Lab 6-1: Configuring Analog Interfaces
Labs in previous chapters established the ability to call between phones in your company. Now it is time to establish connections to allow phone calls to the public switched telephone network (PSTN) and branch offices. The main focus of this chapter is constructing dial peers (the process of routing phone calls) and exploring quality of service (QoS) concepts and mechanisms.
There are two types of dial peers: Voice over Internet Protocol (VoIP) and Plain Old Telephone Service (POTS). Implementing VoIP dial peers only requires an IP connection between two routers. Implementing POTS dial peers requires either analog or digital interfaces. The first two labs are optional and introduce configuring analog and digital interfaces.
Both analog and digital interfaces require Digital Signal Processor (DSP) resources on the router to function.
 Topology diagram
Equipment Required
- Cisco 2821 router
- Cisco 3560 switch
- Lab configuration from Lab 5-3
- Two or more IP Phones
- Analog Foreign eXchange Station (FXS) card
- Analog Foreign eXchange Office (FXO) card
- Digital Signal Processor (DSP) resources in the router, which are packet voice DSP modules (PVDM) modules to enable the FXS or FXO ports.
Objectives
- Configure the basics of analog FXS interfaces
- Configure the basics of analog FXO interfaces
Scenario
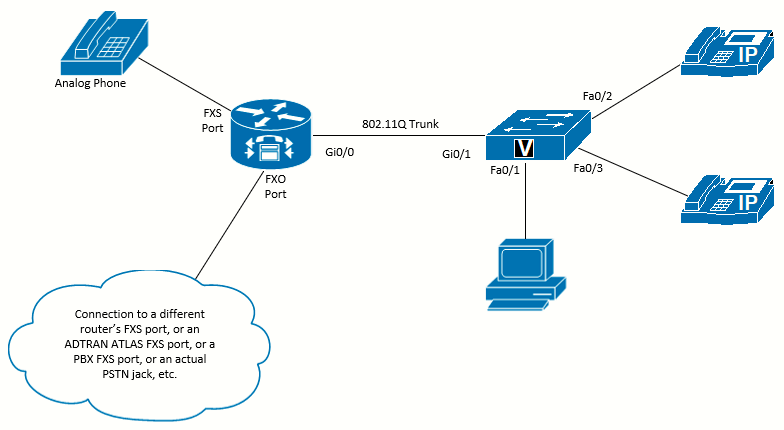
Jimenez Research Inc. (JRI) wants to use devices with analog connections, such as analog phones, alarm systems, fax machines, modems, and so on. Connecting analog devices to the router will require either FXS ports in the router or an analog telephone adapter (such as a Cisco SPA122). This lab will focus on FXS and FXO ports in the router. FXS ports allow the router to act like a central office switch or PBX and provide service to analog phones, including power, collecting dialed digits, responding with call progress tones, and so on.
JRI also wants to connect the system to make and receive phone calls from the PSTN. Analog FXO ports allow the router to act like an analog phone. The router expects to receive power and signaling from the other end and can answer calls, dial digits, and so on.
Task 1: Load Prior Configurations
This lab is based on the configuration from Lab 5-3. If necessary, load the configuration for both the switch and router. Connect a PC to the switch and verify that it can ping the router and switch management addresses. Connect the VoIP phones and verify that you can call between them. Troubleshoot if necessary.
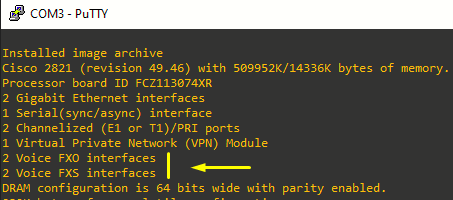
Task 2: Examine the Interfaces in the Router
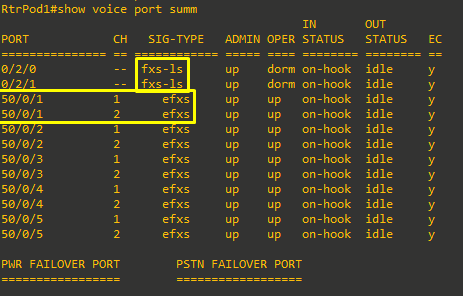
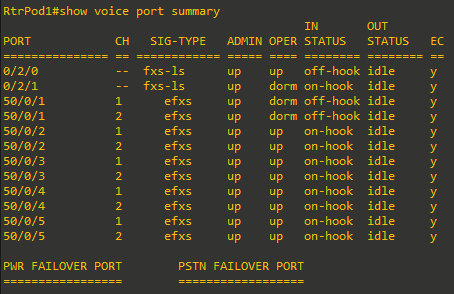
Use the show voice port summary command to examine the interfaces available in your router. In the output shown, there are two FXS interfaces (in ports 0/2/0 and 0/2/1). Notice that every ephone-dn created also shows in the output as an EFXS with a virtual port number. The highlighted DN on virtual port 50/0/1 has two channels (because the DN was created as dual-line). CUCME automatically creates virtual voice ports for every ephone-dn.
Task 3: Configuring FXS Ports
In most cases the default options for FXS ports will be fine, but you might want to change some of them. The settings are applied to the
individual voice ports. All the commands in the steps for this task demonstrate an FXS port configured in voice port 0/2/0. Change the port number as needed to fit your hardware configuration.
Call Signaling Selection
The default signaling for FXS ports is loop start (most common analog devices use loop-start signaling). However, if you need to change the signaling to ground start, you would use the signal command in the voice-port configuration:
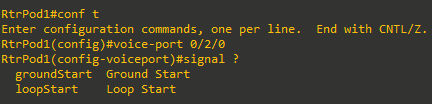
In this case, we will work with the default signal loopstart.
Connect an Analog Phone and Make a Call
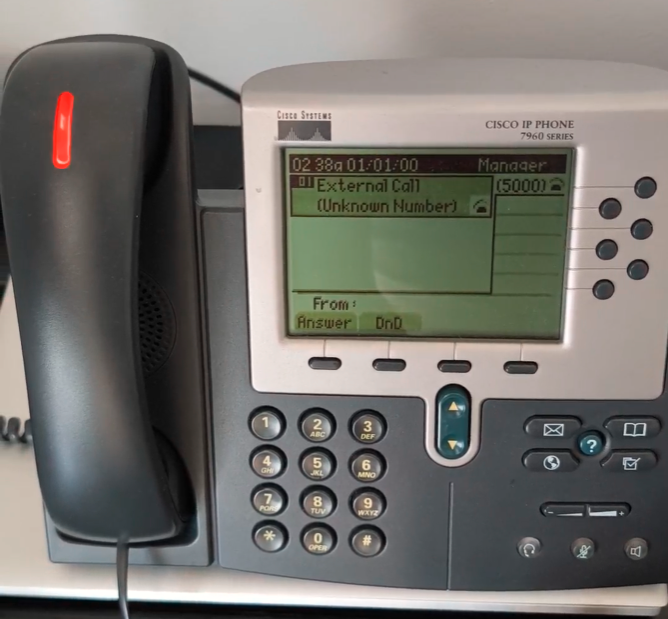
At this moment, I will connect an analog phone to the voice port 0/2/0. If I lift the receiver, I should hear a dial tone. Even without any configuration, the analog phone can make calls. From the analog phone, call the extension of a VoIP phone (x5000 i.e). The VoIP should ring and show "From Unknown Number" on the display. Answer the call to verify that it works as expected. At this point, there is no way for the VoIP phones to call the analog phone.
|
|
|
|

Call Progress Tones
If you have never left your home country, it might surprise you to learn that the familiar call signaling for things like dial tone and busy signal are not standardized worldwide. The FXS ports default to the standard used in the United States, but they can be changed to match the standard in any country using the cptone command in the voice-port configuration.
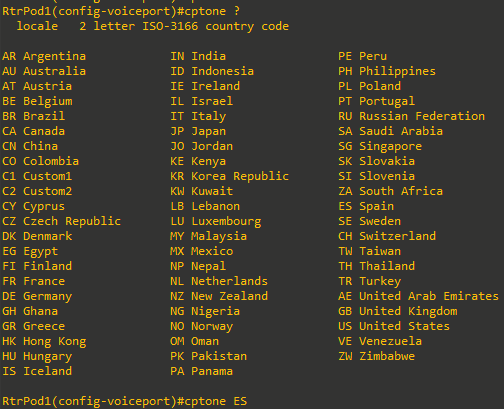
You might want to try CN (China), DE (Germany), FI (Finland), IN (India), VE (Venezuela), and ZW (Zimbabwe) to hear some of the
differences.
Description Information
While the description command should be familiar to anyone who has CCNA-level knowledge, it can be easy to forget. A good use of the description command is to indicate the location of the analog device.
RtrPod1(config-voiceport)#description Manager Office - Analog Phone (SJ)Caller ID Information
The most common commands needed for FXS ports are those for Caller ID information. The station-id name and station-id number commands configure the information for use with Caller ID.

Now that Caller ID information is assigned, call from the analog phone to the VoIP phone again. This time, the name and number will show. Despite the Caller ID number showing on the display, there is still no way for the VoIP phones to call the analog phone. To make such calls work requires dial peers, which are discussed in Lab 6-3.

Examine Interface Status
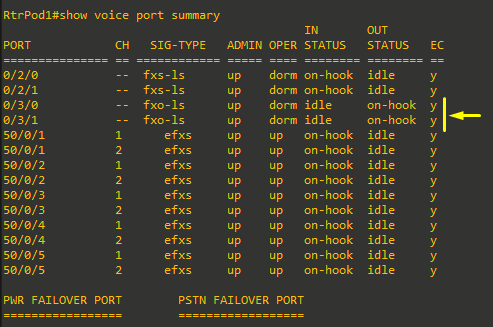
Call from the analog phone to the VoIP phone again, and issue the show voice port summary command before hanging up. From the output, you can see that both the analog and VoIP phones are off-hook and in a call. But from the output shown, you cannot tell that they are talking to each other.
Automatically Dialing Phones
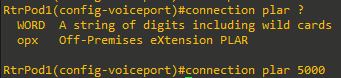
In some cases, it is desirable to have a phone automatically call a preconfigured number when the receiver is lifter. Emergency phones and loading dock and lobby phones that connect to after-hours security are examples of this. The ability to forward the calls is configured with the connection plar command (PLAR stands for Private Line Automatic Ringdown).
RtrPod1(config)#voice-port 0/2/0
RtrPod1(config-voiceport)#connection plar 5000
When the receiver of the analog phone if lifted (i.e the handset), the VoIP phone will start ringing. When you are done testing, to avoid unexpected outcomes later, remove the connection plar command (no connection plar).
Task 4: Configuring FXO Ports
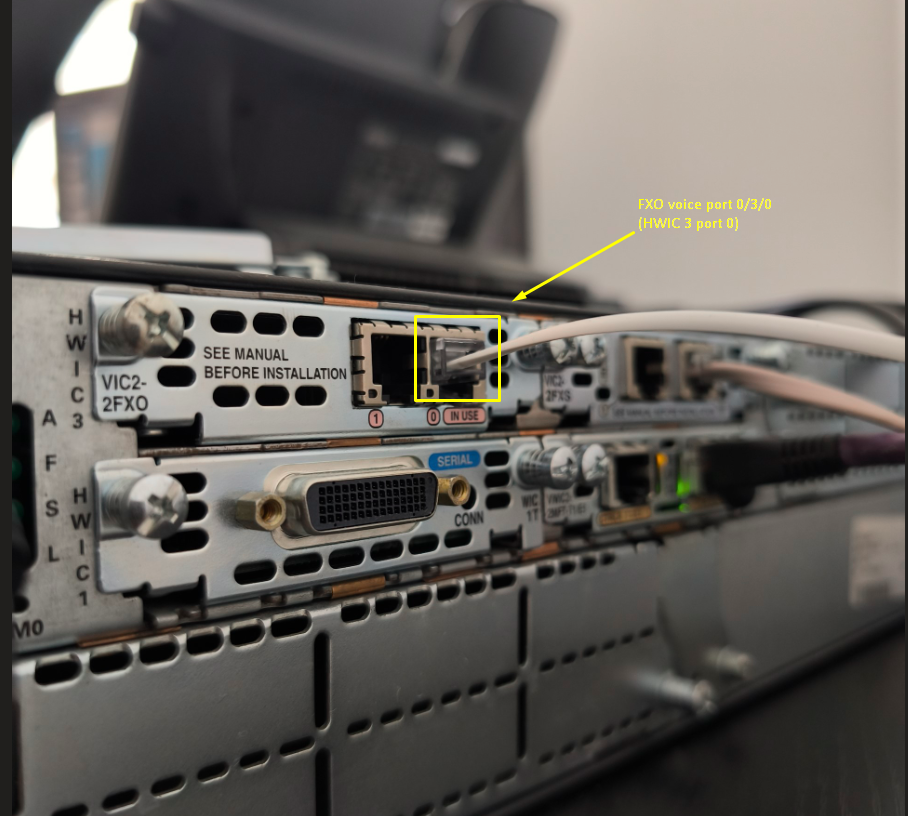
In most cases, the default options for FXO ports will be fine, but you might want to change some of them. All the commands in the steps for this task demonstrate an FXO port configured in voice port 0/3/0.
|
|
 |
RtrPod1(config)#voice-port 0/3/0
RtrPod1(config-voiceport)#?
Voice-port configuration commands:
  ani                  ANI
  battery-reversal     Enable FXO battery-reversal detection
  bearer-cap           Specify the bear capability
  busyout              Configure busyout trigger event & procedure
  caller-id            Configure port caller id parameters
  comfort-noise        Use fill-silence option
  compand-type         The companding type for this voice port
  connection           Specify Trunking Parameters
  cptone               Configure voice call progress tone locale
  default              Set a command to its defaults
  description          Description of what this port is connected to
  dial-type            Configure type of dialer for voice
  disc_pi_off          close voice path when disconnect with PI received
  echo-cancel          Echo-cancellation option
  esco-code            Emergency Services Central Office Code
  exit                 Exit from voice-port configuration mode
  groundstart          Enable Ground Start Auto Tip
  impedance            Specifies the terminating impedance of the interface
  info-digits          info digits prepended to calling number
  input                Configure input gain for voice
  music-threshold      Threshold for Music on Hold
  no                   Negate a command or set its defaults
  non-linear           Use non-linear processing during echo cancellation
  output               Configure output attenuation for voice
  playout-delay        Configure voice playout delay buffer
  pre-dial-delay       FXO Pre-dial Delay
  ring                 Number of rings
  shutdown             Take voice-port offline
  signal               The signaling type for the interface FXS or FXO
  snmp                 Modify SNMP voice port parameters
  soft-offhook         enable stepped offhook resistance during seizure
  station-id           Configure station ID
  supervisory          Configure answer + disconnect supervision options
  threshold            Threshold [noise] for voice port
  timeouts             Configure voice timeout parameters
  timing               Configure voice timing parameters
  translate            Translation rule
  translation-profile  Translation profile
  trunk-group          Configure interface to be in a trunk group
  voice-class          Set voiceport voice class control parameters
Configure Dial Type
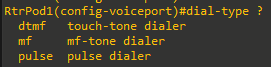
In most cases, the router will be connected to systems supporting dual-tone multifrequency (DTMF) for dial tones. However, the PSTN in some parts of the world, or a port on a PBX system, might only work with pulse dialing. Most analog phones sold today still have a tone/pulse switch on them for this reason. The dial-type command allows you to change the default of dtmf to pulse:
Configure Ring Number
The router defaults to answering on the first ring. If necessary, this can be changed using the ring number command to increase the number of rings before the router answers.

Description Information
A good use of the description command might include identifying information for the connection, such as carrier ID, circuit ID, and phone number. This information will help if it is necessary to contact the carrier for troubleshooting.

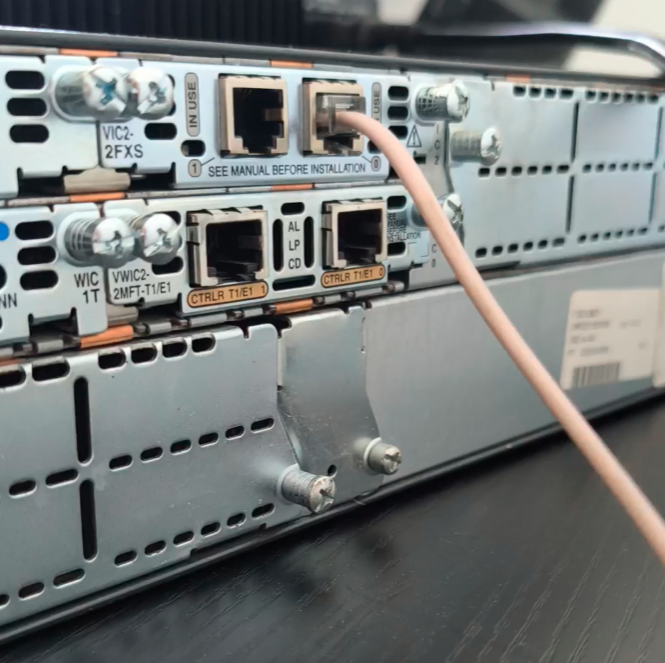
Connect the FXO Port
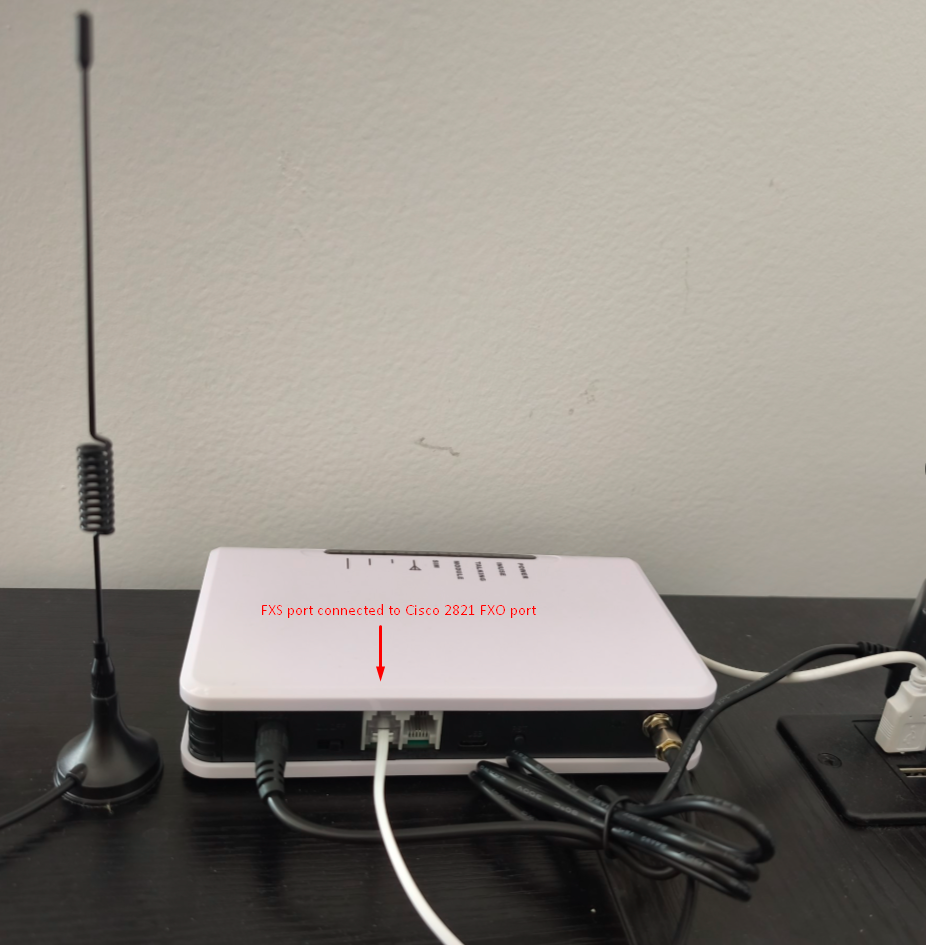
Using an FXO port is harder to in a lab (at this point) because the port needs to receive services from another device. You could connect the FXO port of this router to the FXS port of another router. We would need another router FXS port that is preconfigured so we can send calls to that port.
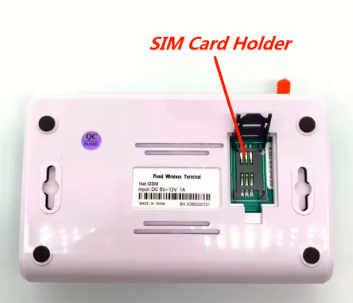
So what I will do at this point, is to use a Fixed Wireless Terminal (FWT) acting as a PSTN gateway. This is a simple device where you can insert a SIM (from Movistar in my case), with an antenna attached, and two FXS ports to connect analog phones or, as we will do in this example, the Cisco 2821 router's FXO port.
|
|
|
Now, if we make a call to the SIM number, without any configuration done to the voice port 0/3/0 (FXO port on the router) we will hear almost no tone if the router is configured with the default ring number, as in this video:
And if we configure the connection plar 5000 we can see how it is redirected automatically to x5000:
If you call the number that is connected to the FXO port, the router will answer and play no dial tone. This might seem odd, but from the router's perspective, the phone rang and it answered the call. Unlike a person, the router is unable to say "Hello! Who would you like to speak to?". This can be fixed with the connection plar command as we did on the test above. Information for reference is just below.
Redirect Incoming Calls
The solution we applied to redirect the incoming call at the FXO router's port is to tell the router to redirect the call to another number. This number could be the company recepcionist, a call center, or an automated attendant that can respond appropriately ("Welcome to Jimenez Research Incorporated. If you know the extension of your party, you can dial it at any time; otherwise press 1 for the company directory, press 2 for...").
The ability to forward the calls is configured with the same connection plar command used with FXS ports.
Now any call to the FXO port will be redirected, and the VoIP phone will start ringing as saw on the video above.