
Proxmox VE 9.0 - Optimizing Network Interfaces Configuration
Introduction
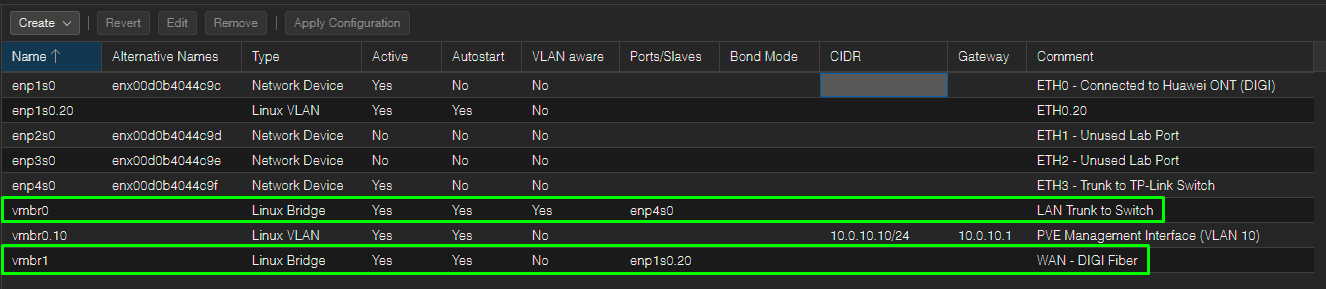
After going through what is described on the previous pages, I have the following network interfaces configuration at Proxmox:
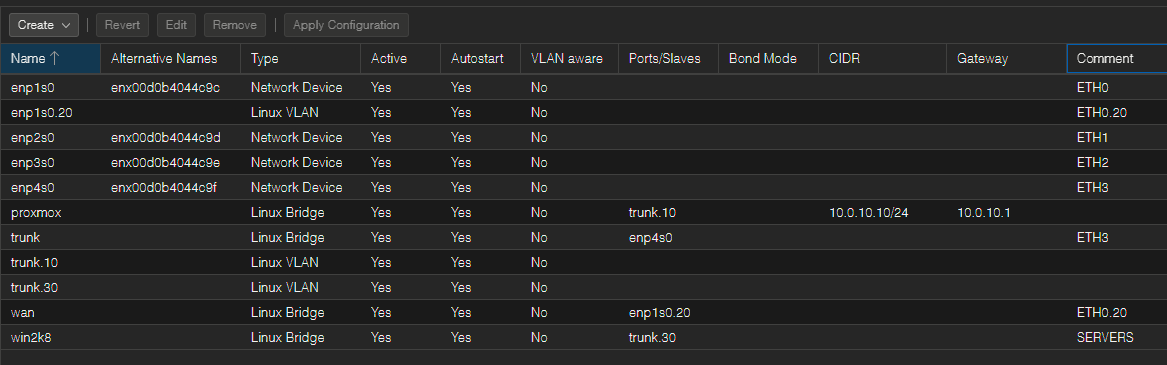
That said, seeing all this mess is what they call "bridge explosion." I have a mix of traditional Linux bridges, host-level VLAN subinterfaces, and a legacy naming convention that doesn't scale well.
We can absolutely streamline this layout, reduce the host-level configuration footprint, and make the whole environment much more elegant by migrating to a VLAN-Aware Bridge model.
The Cheat Sheet: Virtual to Physical Terms
Virtual networking can be a total brain-melter because you can't physically trace where the copper cables are going.
To map this to real-world hardware, let's pretend the Proxmox miniPC is a literal server rack, and inside it, we are installing physical switches, crimping patch cables, and plugging things into ports:
-
Linux Bridge (
vmbr/trunk/wan): This is a Physical Switch inside the server. If you have three bridges, you have three separate hardware switch boxes sitting in your rack.-
VLAN-Aware Bridge: A Managed Switch. It is smart. It understands 802.1Q VLAN tags (10, 30, 20) and can pass multiple VLANs down a single wire or isolate them on specific ports.
- Subinterface (
enp1s0.20orvmbr0.10): An Access Port on a switch that is hard-coded to strip the tag off a specific VLAN and hand you clean, untagged traffic.
- Subinterface (
-
Standard Bridge (Non-VLAN-Aware): A Dumb / Unmanaged Switch. It doesn't understand tags. If tagged traffic enters it, it either drops it or treats it like generic background noise.
-
The Current Pain Points
The Subinterface & Bridge Cascading: Right now, every time I want to introduce a new VLAN to the virtual environment, I am forced to create a host-level Linux VLAN interface (like trunk.30) and then stack a completely separate Linux Bridge on top of it (like win2k8). This creates an unnecessary layer of clutter.
The Legacy Naming Quirk: The bridge for the 10.0.30.0/24 server network is named win2k8. This should be changed ASAP... running modern Linux containers like Technitium, Uptime Kuma, and Nginx Proxy Manager on a bridge called win2k8 creates unnecessary cognitive load when troubleshooting.
The "Before" Setup: The Dumb Switch Chaos
In the current configuration, the miniPC is running a mountain of separate, cheap unmanaged switches stacked on top of each other, held together by a mess of virtual patch cables.
-
The WAN Switch (
wan): A dedicated unmanaged switch. I ran a cable from the Digi ONT into a special adapter that stripped away everything except VLAN 20 (enp1s0.20), then plugged that clean wire into this switch. The OPNsense WAN port plugged in here. -
The Core Switch (
trunk): Another separate unmanaged switch. I ran a physical network cable fromenp4s0straight to the TP-Link switch. -
The Looping Splitters (
trunk.10andtrunk.30): Because thetrunkswitch was dumb, it couldn't split VLANs natively. So, I virtually plugged two "VLAN splitter boxes" into it. -
The Management Switch (
proxmox): A fourth physical switch box. I ran a patch cable from the VLAN 10 splitter (trunk.10) into this switch just so the Proxmox host could have its10.0.10.10management IP. -
The Server Switch (
win2k8): A fifth physical switch box. I ran a patch cable from the VLAN 30 splitter (trunk.30) into this switch. Every single one of the containers (Technitium, Uptime Kuma, etc.) and the Windows Server had to plug their cables into this specific box.
Why it was risky: If any of those cascading virtual cables or subinterfaces glitched, the whole stack collapsed.
The Solution: A Single VLAN-Aware Bridge
Instead of creating distinct bridges for every single broadcast domain, we can leverage Proxmox native VLAN Aware feature. This allows a single Linux Bridge to handle all tagging natively, mimicking how a physical managed switch behaves.
Here is how we can refactor the infrastructure into two clean blocks: a dedicated WAN Bridge and a single VLAN-Aware LAN Bridge.
| Current Interface / Bridge | New Optimized Component | Role / Function |
enp1s0.20 + wan |
vmbr1 (Traditional Bridge) |
WAN: Slaved directly to enp1s0.20. OPNsense net0 stays here to swallow the raw ISP internet feed. |
enp4s0 + trunk |
vmbr0 (VLAN Aware: Yes) |
LAN Trunk: Slaved directly to enp4s0. Connects to Port 6 of the physical TP-Link switch. |
trunk.10 + proxmox |
vmbr0.10 (VLAN Interface) |
Host Management: Gets Proxmox host IP (10.0.10.10/24) and gateway (10.0.10.1). |
trunk.30 + win2k8 |
Deleted ❌ | No longer needed. |
The resulting /etc/network/interfaces file (before / after):
|
|
The "After" Setup: The Enterprise Clean-up
We went into the virtual server rack, threw all those tiny, unmanaged desktop switches into the trash, and replaced them with exactly two clean pieces of hardware.
      [ DIGI Fiber ONT ]
               │ (VLAN 20)
       ┌───────▼───────────────────────────────────┐
       │  vmbr1 (Dedicated WAN Switch)             │
       └───────┬───────────────────────────────────┘
               │ (Clean WAN Traffic)
       ┌───────▼───────────────────────────────────┐
       │  OPNsense VM (Router / Firewall)          │
       └───────┬───────────────────────────────────┘
               │ (All LAN Trunk Traffic)
┌──────────────▼────────────────────────────────────────────────────────┐
│ vmbr0 (The Big Smart Managed Switch - VLAN Aware)                     │
├──────────────┬──────────────────┬──────────────────┬──────────────────┤
│ Access Port  │ Access Port      │ Access Port      │ Trunk Port       │
│  (VLAN 10)   │  (VLAN 30)       │  (VLAN 30)       │ (VLANs 2-4094)   │
└──────┬───────┴──────┬───────────┴──────┬───────────┴──────┬───────────┘
       │              │                  │                  │
 [Proxmox Host]   [Win2K8 VM]     [Linux Containers]   [Real-World Switch]
 (10.0.10.10)
1. Switch A (vmbr1 - The Internet Box)
This is a tiny, isolated 2-port unmanaged switch.
-
Port 1: Wired directly to Digi Fiber ONT line (
enp1s0.20). -
Port 2: Wired directly to OPNsense VM's WAN port.
-
Result: Completely isolated internet traffic. Nothing else in the lab can touch this switch.
2. Switch B (vmbr0 - The Enterprise Managed Switch)
This is the game-changer. It is one big, high-end, VLAN-aware managed switch. It natively understands tags, so we don't need separate hardware boxes for different networks anymore. Everything connects directly to this one switch:
-
-
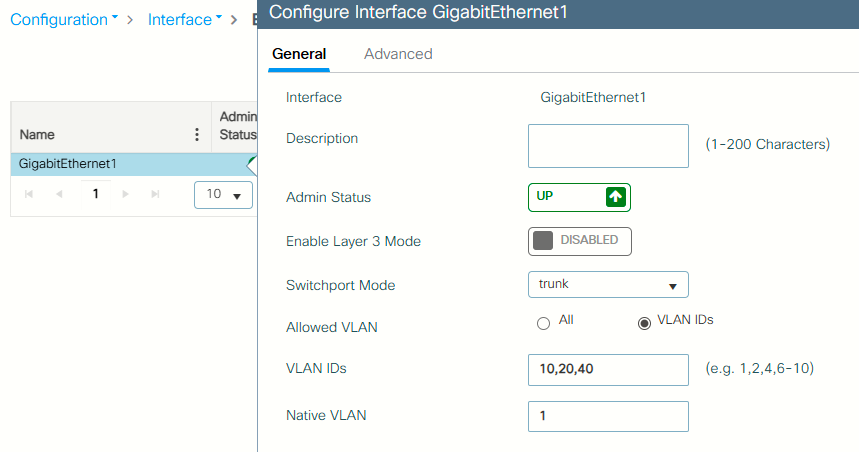
The Trunk Uplink: We assigned the physical network port
enp4s0to this switch. It acts as a massive trunk pipe, carrying all the VLANs directly down to the real, physical TP-Link switch. -
The Proxmox Host Management (
vmbr0.10): Instead of giving Proxmox a separate switch, we told the host to take its management leg and plug it directly into a virtual port on Switch B pre-configured for VLAN 10. -
The Servers & Containers (Win2K8, Technitium, etc.): Instead of plugging into a separate
win2k8bridge box, they now plug their virtual cables straight into Switch B. In their settings, we simply set their virtual switch port to VLAN Tag: 30. Switch B handles the isolation internally.
-
|
|
|
|
|
|

The OPNsense Case
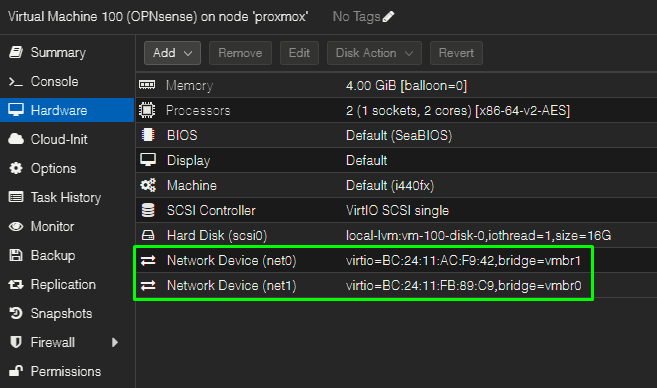
Because we left the VLAN tags completely blank in the Proxmox settings for the OPNsense VM, Proxmox treats both of those network adapters (net0 and net1) as raw, transparent physical wires.
Inside OPNsense, those wires show up as vtnet0 and vtnet1. Because Proxmox isn't touching or restricting the packets, OPNsense can handle them exactly like a physical corporate router would.
Here is exactly how those two adapters are acting:
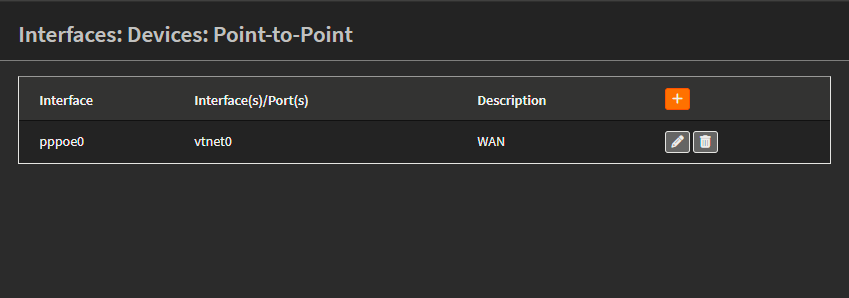
Adapter 1 (vtnet0) — The Dedicated Internet Pipe
In Proxmox, net0 is plugged directly into the isolated internet switch, Switch A (vmbr1).
-
The Physical Mapping:
vmbr1is tied toenp1s0.20. This means the Proxmox host handles stripping the DIGI VLAN 20 tag off the incoming fiber line before it passes it along. -
What OPNsense Sees: By the time the internet traffic travels down the virtual wire to
vtnet0, it is completely untagged, clean ISP traffic. -
The Config: Because it's a flat, clean wire, OPNsense doesn't need to build any VLAN subinterfaces on it. It just logs directly into the parent interface using your DIGI credentials via PPPoE (
pppoe0 (vtnet0)).
|
|
|

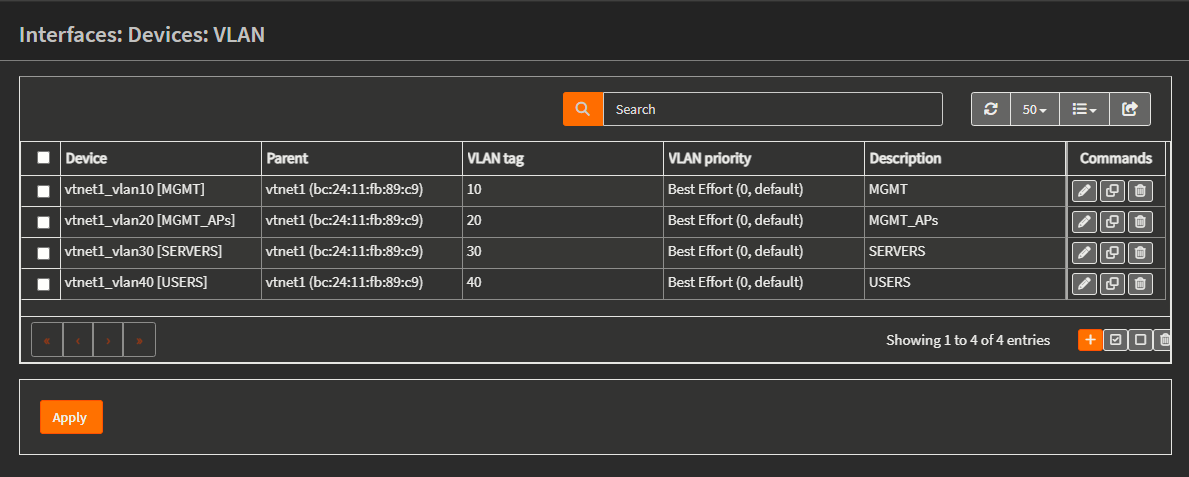
Adapter 2 (vtnet1) — The Smart Inside Trunk
This is where the magic happens. In Proxmox, net1 is plugged into the big, smart, VLAN-aware switch, Switch B (vmbr0) with the tag left blank.
-
What OPNsense Sees:
vtnet1is acting as a Physical Trunk Port. Every single packet passing through Home 2 with a VLAN tag (10, 20, 30, 40) flows down this single virtual wire completely untouched. -
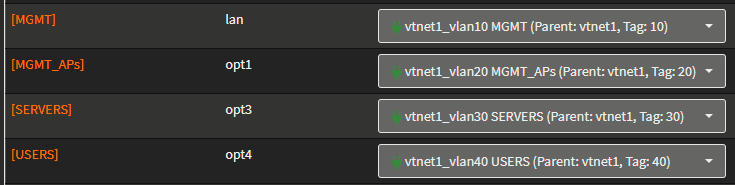
The Inside Config: Instead of just assigning an IP to
vtnet1, I told the OPNsense operating system to slice that single wire into four virtual interfaces:-
vtnet1_vlan10for your Management network. -
vtnet1_vlan20for your Access Points. -
vtnet1_vlan30for your Server network. -
vtnet1_vlan40for your Users.
-
|
|
|
The WLC 9800 Case
The reason there is no VLAN tag on the Cisco 9800-CL inside Proxmox is because the 9800-CL is an enterprise Cisco device that handles the VLAN tagging entirely by itself. To map this to physical gear, let's look at the difference between how Proxmox treats a Blank VLAN box versus a Numbered VLAN box:
When you connect a VM or Container to a VLAN-aware bridge (vmbr0), Proxmox looks at that VLAN Tag field to decide what kind of physical switch port it should mimic:
1. Typing a Number (e.g., Tag: 30) = An "Access Port"
This tells Proxmox: "The virtual machine inside here is a regular device (like a Windows desktop or a lightweight Linux container). It has no idea what a VLAN is." * What Proxmox does: Proxmox acts as the smart switch. When traffic leaves that VM, Proxmox slaps a VLAN 30 sticker on it. When traffic comes back from the network with a VLAN 30 sticker, Proxmox rips the sticker off before handing the clean, untagged packet to the VM.
-
The Setup: This is how our containers (Technitium, Uptime Kuma) work. They just see a regular flat network, while Proxmox does the tagging behind their backs.
2. Leaving it BLANK = A "Trunk Port"
This tells Proxmox: "The machine inside here is a highly intelligent network device (like a router or a switch). Stand back and get out of its way."
-
What Proxmox does: Proxmox stops touching the packets. It acts as a pure, transparent physical wire. It passes all tags (10, 20, 30, 40, etc.) straight through into the VM completely untouched, with their original 802.1Q headers intact.
Looking at the Cisco WLC screenshot, because the Cisco software is configured as a trunk, it is actively listening for multiple streams of data wrapped in different VLAN stickers. It wants to receive VLAN 10 for management, VLAN 20 for one SSID, and VLAN 40 for another SSID.
If I were to go into Proxmox and force a VLAN Tag: 10 on the 9800-CL's hardware settings, Proxmox would strip away all other VLANs and only deliver untagged VLAN 10 traffic to the Cisco VM. The Cisco 9800-CL would instantly drop the packets because it expects a tagged trunk link, not an access link.
By leaving it blank in Proxmox, I am running a virtual trunk cable from the Proxmox Switch B straight into the Cisco virtual switch interface. The two systems speak the exact same 802.1Q trunk language, allowing the 9800-CL to sort out the VLANs internally just like a physical Catalyst switch would on a real server rack.