
Converting a Cisco Lightweight Access Point Back to Autonomous Mode
Introduction
The AP used in this lab is a Cisco Aironet 1700i Series AP, an AIR-CAP1702I-E-K9.
Suppose this AP was bought second-hand and comes with some non-default configuration (including a username/password console CLI access combination we don't know).
We do not want to connect this AP to an WLC to be managed as a lightweight access point (LAP). Instead, we want this AP to be used as an autonomous AP, operating independently and standalone.
 AIR-CAP1702I-E-K9
Deleting the AP existing configuration
Follow the reset procedure explained on my following page: Reset Cisco Aironet 1700 Series AP to factory defaults. For this tutorial to work, we are assuming the AP comes preconfigured to be used as a LAP with non-default configuration.
Getting data about the current AP image
Once we have gained access to the CLI, issuing a show version command outputs the following data about the current image the AP is using:

As we can see from the above image:
- The AP is running a Cisco IOS Software image named (ap3g2-k9w8-m)
- The version of this image is 15.3
- The image is located at
flash:/ap3g2-k9w8-mx.ap_umr8_esc.202212141728/ap3g2-k9w8-xx.ap_
From the image name, we can get some facts. We just have to mind the following rules:
- The AP image names include the following components: platform-featureset
- In our case, we have the following data:
- platform: ap3g2
- featureset: k9w8
- ap3g2 means the image platform is a Cisco Aironet 3700/3600/2700/2600/1700 Series
- k9w8 means this is a full lightweight IOS
This makes sense since this is an AP that was being used as a WLC-joined LAP by its previous owner.
Downloading the latest autonomous AP image
At this point, we can begin with the tutorial to convert the AP to an autonomous AP. But first of all, we need the autonomous AP image.
We know from the naming convention discussed early, that a featureset of k9w8 means the image is a full lightweight IOS.
Now we need to search for an autonomous AP image, whose featureset is named k9w7.
A quick search at software.cisco.com will get us to the following point:


Note how we have searched for the available downloads for the Aironet 1700i Access Points. Now, we can go to the Autonomous AP IOS Software section.

You can see from the red-highlighted section of the latest release image, that the featureset part of the image is in effect k9w7, confirming this is the autonomous AP image required.
The file itself is a .tar file containing a folder with a lot of files:

The AP IOS is always distributed as a .tar file. The .tar file contains, in addition to the proper IOS image, the radio firmware files, the HTML GUI files (if present), and various other files, as you can see on the above image.
Loading the image onto the AP
To copy the image to the AP, TFTP must be used; so a TFTP server must be set up. For this lab, I will use SolarWinds' TFTP Server on a Windows machine.
I will bind the IP on the TFTP server to the network adapter connected to the same LAN as the AP. My topology looks as follows:
 My topology for this lab
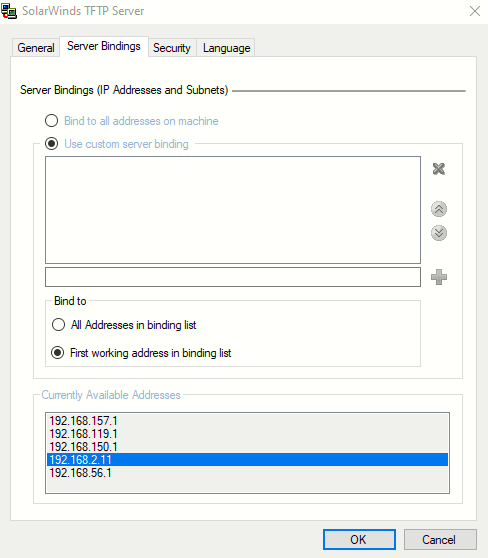
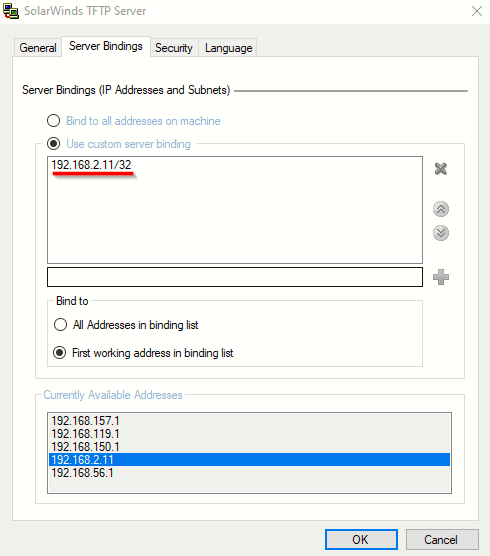
To bind the IP address on the TFTP server I will go to File > Configure and on the new window that appears, go to Server Bindings. On this window I will select the Use custom server binding and First working address in binding list. After that I will double click the selected address to add it to the list of bindings:
 |
|
Then I will go to File > Configure and on the window that appears, on the General tab, go to the Storage section and select a folder as the TFTP Server Root Directory and paste there the previously downloaded image:

Make sure the file ap3g2-k9w7-tar.153-3.JPQ1.tar exists on the folder selected as the TFTP Server Root Directory
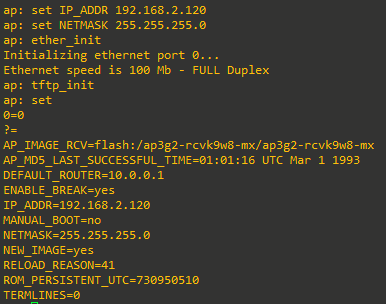
Next step is to boot the AP to ROMMON mode. Once in ROMMON mode, we need to initialize the TFTP file system and the Ethernet port. Assuming we are at the ROMMON ap: prompt, enter the following commands:
| set IP_ADDR 192.168.2.120 | This is a fixed IP address not in use, on the same LAN as the Windows workstation. |
| set NETMASK 255.255.255.255 | Mask address of the LAN (/24) |
| ether_init | To initialize the Ethernet port with the previous parameters. |
| tftp_init | To enable the TFTP filesystem and be able to copy the new image from the PC. |
| set | To see the current variables/parameters and its value. |
Since we may not have sufficient space for this new AP image on the flash: filesystem, I will format it with the format flash: command:
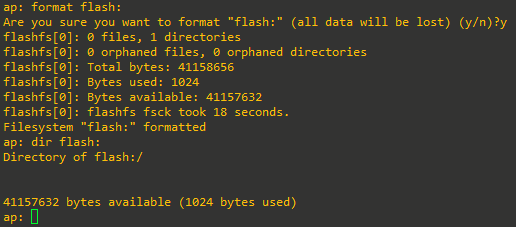 Flash formatting. This will take a few minutes.
After we confirm the parameters have the right value and that the flash: filesystem is formatted, we are ready to copy the image from the PC issuing the following comand:
tar -xtract tftp://192.168.2.11/ap3g2-k9w7-tar.153-3.JPQ1.tar flash:The file transfer will begin (we can check on the TFTP server log also):
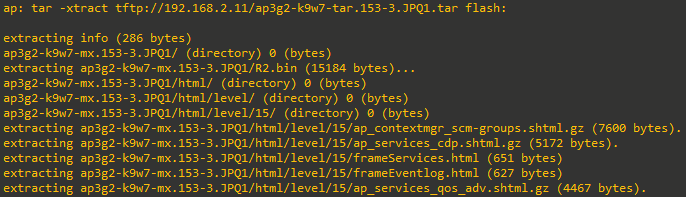
After the transfer is complete we are brought at the ROMMON prompt again and we should see the following files/directories present on the flash: filesystem:

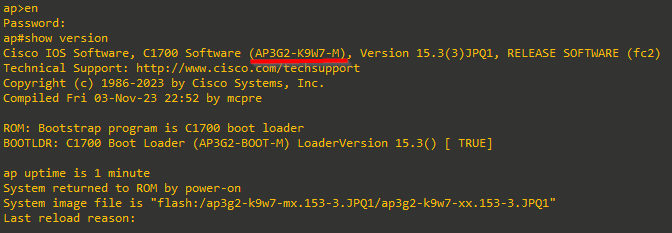
We can now reboot the AP as an autonomous AP. After the AP has booted, we will be given CLI access with an ap> prompt (confirming the AP is now running as an autonomous AP). The enable password is still Cisco. The show version commands output confirms we are using the right image:
From the console logs I see the AP has got a DHCP IP of 192.168.2.17:

We can now enable the HTTP/HTTPS server an begin configuring the autonomous AP via CLI from a web browser, but that will be explored on the following page: Configuring an autonomous Cisco 1700 Series AP via CLI
Sources:
Software Download - Cisco Systems
https://software.cisco.com/download/home/286281141/type/284180979/release/15.3.3-JPQ1
Release Notes for Cisco Access Points and Bridges for Cisco IOS Release 15.3(3)JPQ and 15.3(3)JPQ1 - Cisco
https://www.cisco.com/c/en/us/td/docs/wireless/access_point/ios/release/notes/aap-rn-17_12.html
Understanding Access Point OS Images - Cisco Community
https://community.cisco.com/t5/wireless-mobility-knowledge-base/understanding-access-point-os-images/ta-p/3123952
Lightweight to Autonomous (vice versa) Conversion… | mrn-cciew
https://mrncciew.com/2012/10/20/lightweight-to-autonomous-conversion/
AP Conversion using MODE Button | mrn-cciew
https://mrncciew.com/2013/12/13/ap-conversion-using-mode-button/
AP1520 Image Recovery
https://www.cisco.com/web/software/Wireless/Deferral/AP1520_Image_Recovery.htm