
Lab - Implement MP-BGP
Topology
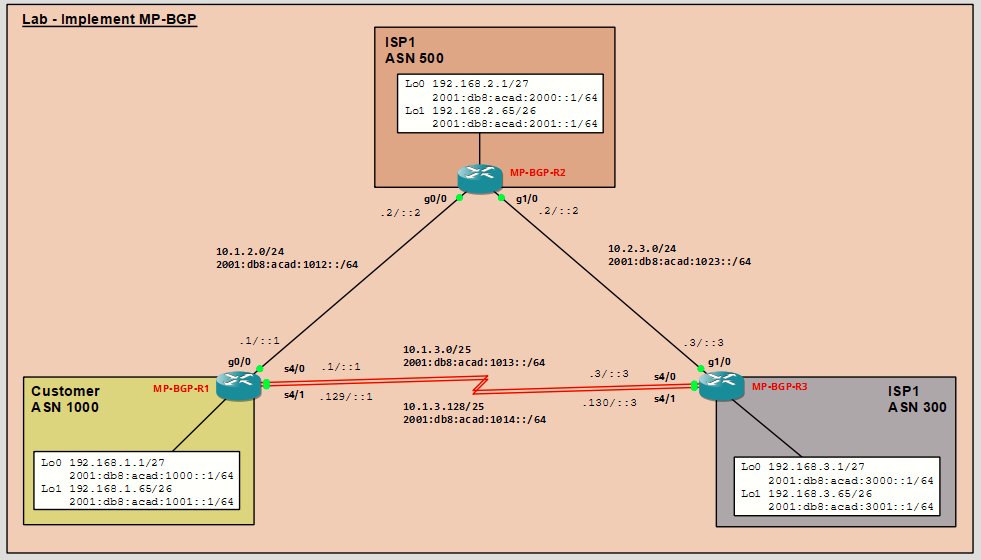
Addressing Table
|
Device |
Interface |
IPv4 Address |
IPv6 Address |
IPv6 Link-Local |
|---|---|---|---|---|
|
MP-BGP-R1 |
G0/0 |
10.1.2.1/24 |
2001:db8:acad:1012::1/64 |
fe80::1:1 |
|
S4/0 |
10.1.3.1/25 |
2001:db8:acad:1013::1/64 |
fe80::1:2 |
|
|
S4/1 |
10.1.3.129/25 |
2001:db8:acad:1014::1/64 |
fe80::1:3 |
|
|
Loopback0 |
192.168.1.1/27 |
2001:db8:acad:1000::1/64 |
fe80::1:4 |
|
|
Loopback1 |
192.168.1.65/26 |
2001:db8:acad:1001::1/64 |
fe80::1:5 |
|
|
MP-BGP-R2 |
G0/0 |
10.1.2.2/24 |
2001:db8:acad:1012::2/64 |
fe80::2:1 |
|
G1/0 |
10.2.3.2/24 |
2001:db8:acad:1023::2/64 |
fe80::2:2 |
|
|
Loopback0 |
192.168.2.1/27 |
2001:db8:acad:2000::1/64 |
fe80::2:3 |
|
|
Loopback1 |
192.168.2.65/26 |
2001:db8:acad:2001::1/64 |
fe80::2:4 |
|
|
MP-BGP-R3 |
G1/0 |
10.2.3.3/24 |
2001:db8:acad:1023::3/64 |
fe80::3:1 |
|
S4/0 |
10.1.3.3/25 |
2001:db8:acad:1013::3/64 |
fe80::3:2 |
|
|
S4/1 |
10.1.3.130/25 |
2001:db8:acad:1014::3/64 |
fe80::3:3 |
|
|
Loopback0 |
192.168.3.1/27 |
2001:db8:acad:3000::1/64 |
fe80::3:4 |
|
|
Loopback1 |
192.168.3.65/26 |
2001:db8:acad:3001::1/64 |
fe80::3:5 |
Objectives
In this lab, you will learn how to use policy-based routing to influence path section.
- Part 1: Configure Basic Device Settings and Interface Addressing
- Part 2: Configure MP-BGP on all Routers
- Part 3: Verify MP-BGP
- Part 4: Configure and Verify IPv6 Summarization
Background / Scenario
In this lab, you will configure MP-BGP, BGP for IPv4 and IPv6 using address families.
Note: This lab is an exercise in developing, deploying, and verifying various path manipulation tools for BGP, and does not reflect networking best practices.
Required Resources - Sergio Jiménez's Version
For this lab I am using GNS3, where I have deployed:
- 3 Routers (Cisco 7200)
Instructions
Part 1: Configure Basic Device Settings and Interface Addressing
MP-BGP-R1
conf t
hostname MP-BGP-R1
no ip domain lookup
line con 0
 logging sync
 exec-time 0 0
exit
!
interface Loopback0
 ip address 192.168.1.1 255.255.255.224
 ipv6 address FE80::1:4 link-local
 ipv6 address 2001:DB8:ACAD:1000::1/64
 no shut
!
interface Loopback1
 ip address 192.168.1.65 255.255.255.192
 ipv6 address FE80::1:5 link-local
 ipv6 address 2001:DB8:ACAD:1001::1/64
 no shut
!
interface GigabitEthernet0/0
 ip address 10.1.2.1 255.255.255.0
 ipv6 address FE80::1:1 link-local
 ipv6 address 2001:DB8:ACAD:1012::1/64
 no shut
!
interface Serial4/0
 ip address 10.1.3.1 255.255.255.128
 ipv6 address FE80::1:2 link-local
 ipv6 address 2001:DB8:ACAD:1013::1/64
 no shut
!
interface Serial4/1
 ip address 10.1.3.129 255.255.255.128
 ipv6 address FE80::1:3 link-local
 ipv6 address 2001:DB8:ACAD:1014::1/64
 no shut
!
end
wr mem
!
MP-BGP-R2
conf t
hostname MP-BGP-R2
no ip domain lookup
line con 0
 logging sync
 exec-time 0 0
exit
!
interface Loopback0
 ip address 192.168.2.1 255.255.255.224
 ipv6 address FE80::2:3 link-local
 ipv6 address 2001:DB8:ACAD:2000::1/64
 no shut
!
interface Loopback1
 ip address 192.168.2.65 255.255.255.192
 ipv6 address FE80::2:4 link-local
 ipv6 address 2001:DB8:ACAD:2001::1/64
 no shut
!
interface GigabitEthernet0/0
 ip address 10.1.2.2 255.255.255.0
 ipv6 address FE80::2:1 link-local
 ipv6 address 2001:DB8:ACAD:1012::2/64
 no shut
!
interface GigabitEthernet1/0
 ip address 10.2.3.2 255.255.255.0
 ipv6 address FE80::2:2 link-local
 ipv6 address 2001:DB8:ACAD:1023::2/64
 no shut
!
end
wr mem
!
MP-BGP-R3
conf t
hostname MP-BGP-R3
no ip domain lookup
line con 0
 logging sync
 exec-time 0 0
exit
!
interface Loopback0
 ip address 192.168.3.1 255.255.255.224
 ipv6 address FE80::3:4 link-local
 ipv6 address 2001:DB8:ACAD:3000::1/64
 no shut
!
interface Loopback1
 ip address 192.168.3.65 255.255.255.192
 ipv6 address FE80::3:5 link-local
 ipv6 address 2001:DB8:ACAD:3001::1/64
 no shut
!
interface GigabitEthernet1/0
 ip address 10.2.3.3 255.255.255.0
 negotiation auto
 ipv6 address FE80::3:1 link-local
 ipv6 address 2001:DB8:ACAD:1023::3/64
 no shut
!
interface Serial4/0
 ip address 10.1.3.3 255.255.255.128
 ipv6 address FE80::3:2 link-local
 ipv6 address 2001:DB8:ACAD:1013::3/64
 no shut
!
interface Serial4/1
 ip address 10.1.3.130 255.255.255.128
 ipv6 address FE80::3:3 link-local
 ipv6 address 2001:DB8:ACAD:1014::3/64
 no shut
!
end
wr mem
!
Part 2: Configure MP-BGP on all Routers
Step 1: Implement eBGP and neighbor relationships on R1 for IPv4 and IPv6.
- Enable IPv6 routing.
- Enter BGP configuration mode from global configuration mode, specifying AS 1000 and configure the router ID.
- Based on the topology diagram, configure all the designated IPv4 neighbors for R1.
- Based on the topology diagram, configure all the designated IPv6 neighbors for R1.
- Enter address family configuration mode for IPv4 and activate each of the IPv4 neighbors.
- Enter address family configuration mode for IPv6 and activate each of the IPv6 neighbors.
Step 2: Implement eBGP and neighbor relationships on R2 for IPv4 and IPv6.
- Enable IPv6 routing.
- Enter BGP configuration mode from global configuration mode, specifying AS 500 and configure the router ID.
- Based on the topology diagram, configure all the designated IPv4 neighbors for R1.
- Based on the topology diagram, configure all the designated IPv6 neighbors for R1.
- Enter address family configuration mode for IPv4 and activate each of the IPv4 neighbors.
- Enter address family configuration mode for IPv6 and activate each of the IPv6 neighbors.
Step 3: Implement eBGP and neighbor relationships on R3 for IPv4 and IPv6.
- Enable IPv6 routing.
- Enter BGP configuration mode from global configuration mode, specifying AS 300 and configure the router ID.
- Based on the topology diagram, configure all the designated IPv4 neighbors for R1.
- Based on the topology diagram, configure all the designated IPv6 neighbors for R1.
- Enter address family configuration mode for IPv4 and activate each of the IPv4 neighbors.
- Enter address family configuration mode for IPv6 and activate each of the IPv6 neighbors.
Step 4: Advertise IPv4 and IPv6 prefixes on R1.
- Enter address family configuration mode for IPv4 and advertise the IPv4 prefixes.
- Enter address family configuration mode for IPv6 and advertise the IPv6 prefixes.
Step 5: Advertise IPv4 and IPv6 prefixes on R2.
- Enter address family configuration mode for IPv4 and advertise the IPv4 prefixes.
- Enter address family configuration mode for IPv6 and advertise the IPv6 prefixes.
Step 6: Advertise IPv4 and IPv6 prefixes on R3.
- Enter address family configuration mode for IPv4 and advertise the IPv4 prefixes.
- Enter address family configuration mode for IPv6 and advertise the IPv6 prefixes.
Note: Notice that the networks between the routers are not being advertised in eBGP. Typically, only the prefixes of the AS need to be advertised in eBGP. eBGP neighbors are typically directly connected and therefore will be able to form an adjacency. There is typically no need to advertise and inject the directly connected prefixes into the BGP routing table.
Part 3: Verify MP-BGP
Step 1: Display detailed neighbor adjacency information.
Use the show bgp all neighbors command on R2 to display detailed information about BGP connections to neighbors for all (IPv4 and IPv6) address families. Each neighbor shows that it is in the “Established” state. This indicates that the router can send and receive BGP messages. R2 has two neighbor addresses, R1 and R3, for each address family, IPv4 and IPv6.
Note: Most information displayed using show bgp all neighbors command has been omitted for brevity. The command show bgp neighbors is used to display only BGP for IPv4 adjacencies. To display the same information for only IPv6 neighbors, use the command show bgp ipv6 neighbors.
What is the BGP state for each neighbor adjacency?
How often are BGP keepalives sent?
How many seconds will a BGP session remain open if no further keepalive messages are received?
Step 2: Display summary neighbor adjacency information.
Use the show bgp ipv4 unicast summary and show bgp ipv6 unicast summary commands on R2 to display a summary of IPv4/IPv6 peering information with R1 and R3. The information displayed using the show bgp ipv4 unicast summary is a subset of show ip all bgp command.
What is the difference between the "local AS number" and the "AS" number displayed in the list of BGP neighbors?
Step 3: Verify BGP tables for IPv4 and IPv6.
- Use the show bgp ipv4 unicast command on R2 to display its IPv4 BGP table. This command is equivalent to the show ip bgp command and either command can be used. Notice that R1 shows six IPv4 networks in its IPv4 BGP table. Each network is valid “*” and has one path which is the best path “>”. Amongst other information, the next hop IPv4 address and the AS path are included.
- Use the show bgp ipv6 unicast command on R2 to display similar information for its IPv6 BGP table.
In the first output show bgp ipv4 unicast, why is 10.1.2.1 the preferred next hop address for 192.168.1.0 instead of 10.2.3.3?
Why do some entries in the show bgp ipv6 unicast output include a next hop address of "::"?
Step 4: Viewing explicit routes and path attributes.
- Use the show bgp ipv4 unicast ipv4-prefix subnet-mask command on R2 to display all the paths for a specific route and BGP path attributes for that route.
The show bgp ipv6 unicast ipv6-prefix prefix-length command displays similar information for IPv6 prefixes.
Why does the output for the show bgp ipv6 unicast command include the link-local address following the global unicast address? - Use the show bgp ipv4 unicast neighbors ipv4-prefix advertised-routes command on R2 to display IPv4 routes advertised to a specific neighbor.
- Use the show bgp ipv6 unicast ipv6-prefix prefix-length command to display similar information for IPv6 advertised routes.
Why do some entries in the show bgp ipv4 unicast neighbors output include a next hop address of 0.0.0.0 and the show bgp ipv6 unicast neighbors output includes a next hop address of "::"?
Step 5: Verifying the IP routing tables for IPv4 and IPv6.
- By examining the IPv4 and IPv6 routing tables on R2, you can verify that BGP is receiving the IPv4 and IPv6 prefixes from R1 and R3.
Part 4: Configure and Verify IPv6 Route Summarization
Summarizing prefixes conserves router resources and accelerates best-path calculation by reducing the size of the table. Summarization can be configured either for prefixes originated by the AS or prefixes received from downstream providers. Summarization also provides the benefits of stability by hiding flapping routes or having to install new prefixes when they are contained within a summary.
- Verify R2 and R3 are receiving 2001:db8:acad:1000::/64 and 2001:db8:acad:1001::/64 from R1.
- Although AS 1000 only has two IPv6 prefixes - 2001:db8:acad:1000::/64 and 2001:db8:acad:1001::/64, this customer has been allocated the entire 2001:db8:acad:1000::/52 prefix (2001:db8:acad:1xxx).
R1 is configured using the aggregate-address command in IPv6 AF mode to summarize its IPv6 prefixes. This is known as a summary route or aggregate route. The summary-only option suppresses the more specific prefixes from also being advertised. - Verify that R2 and R3 are now receiving the aggregate route and installing it in the IPv6 BGP table.
- Verify that R2 and R3 are now receiving the aggregate route and it is installed in the IPv6 routing table.
If R1's 2001:db8:acad:1000::/64 network went down, what would be the effect, if any, on the routing tables of R2 and R3? Explain.