
Lab - Implement a DMVPN Phase 3 Hub-to-Spoke Topology
Topology
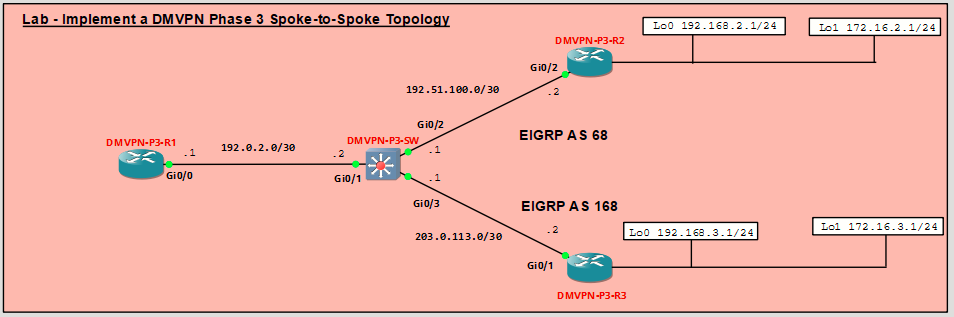
Addressing Table
|
Device |
Interface |
IPv4 Address |
|---|---|---|
|
DMVPN-P3-R1 |
Gi0/0 |
192.0.2.1/30 |
|
Tunnel 1 |
100.100.100.1/29 |
|
|
DMVPN-P3-R2 |
Gi0/2 |
198.51.100.2/30 |
|
Loopback 0 |
192.168.2.1/24 |
|
|
Loopback 1 |
172.16.2.1/24 |
|
|
Tunnel 1 |
100.100.100.2/29 |
|
|
DMVPN-P3-R3 |
Gi0/1 |
203.0.113.2/30 |
|
Loopback 0 |
192.168.3.1/24 |
|
|
Loopback 1 |
172.16.3.1/24 |
|
|
Tunnel 1 |
100.100.100.3/29 |
|
|
DMVPN-P3-SW |
Gi0/1 |
192.0.2.2/30 |
|
Gi0/2 |
198.51.100.1/30 |
|
|
Gi0/3 |
203.0.113.1/30 |
Objectives
In this lab, you will create a Dynamic Multipoint Virtual Private Network (DMVPN) that consists of a hub router with two spokes. You will implement a DMVPN Phase 3 spoke-to-spoke topology.
- Part 1: Build the Network and Configure Basic Device Settings
- Part 2: Configure DMVPN Phase 3
- Part 3: Verify DMVPN Phase 3
Background / Scenario
In this lab, you will modify a DMVPN Phase 1 network to create Phase 3 spoke-to-spoke network. The configuration from the previous Phase 1 lab are required as the starting point for this lab. They are provided under Initial Configurations if you no longer have them.
Phase 3 improved upon Phase 2 by using a different mechanism for routing between destinations in spoke-tospoke tunnels. Because of this, Phase 3 can be seen as superseding Phase 2. For that reason, there is no Phase 2 lab.
In DMVPN Phase 3, the spoke routers create routing table entries in which NHRP manipulates the routing information for tunnel destinations by overriding the next hop that was determined by the routing protocol. NHRP provides the actual destination network as the next hop. This enables the distribution of route summaries from the hub router to the spokes. Finally, Phase 3 enables a hierarchical tree-based VPN architecture in which central hub routers connect other, regional hubs and their spokes. This allows for the establishment of tunnels between routers that are not connected to the same regional hub.
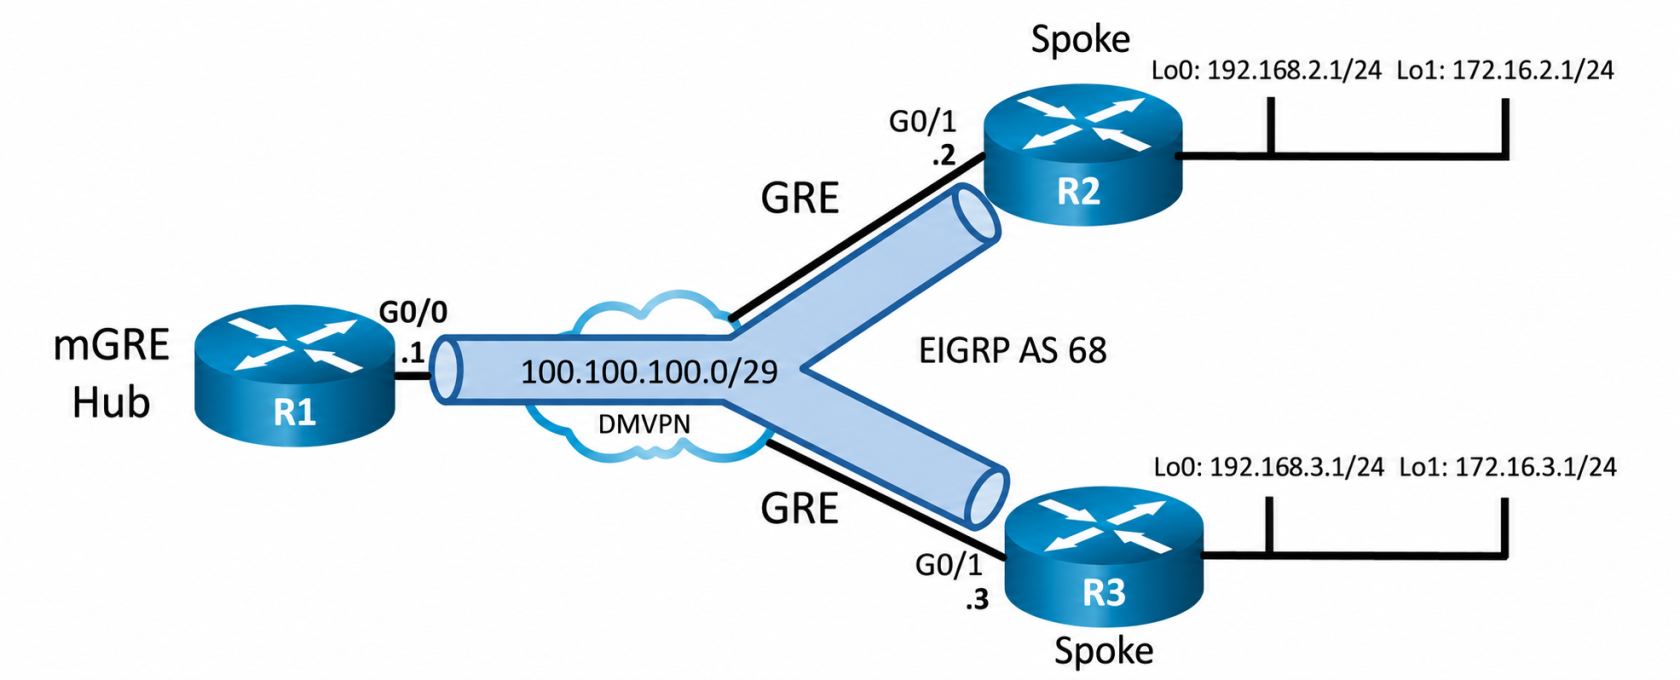
In Phase 1 DMVPN, all spoke router traffic must pass through the hub router, as shown in the topology diagram.
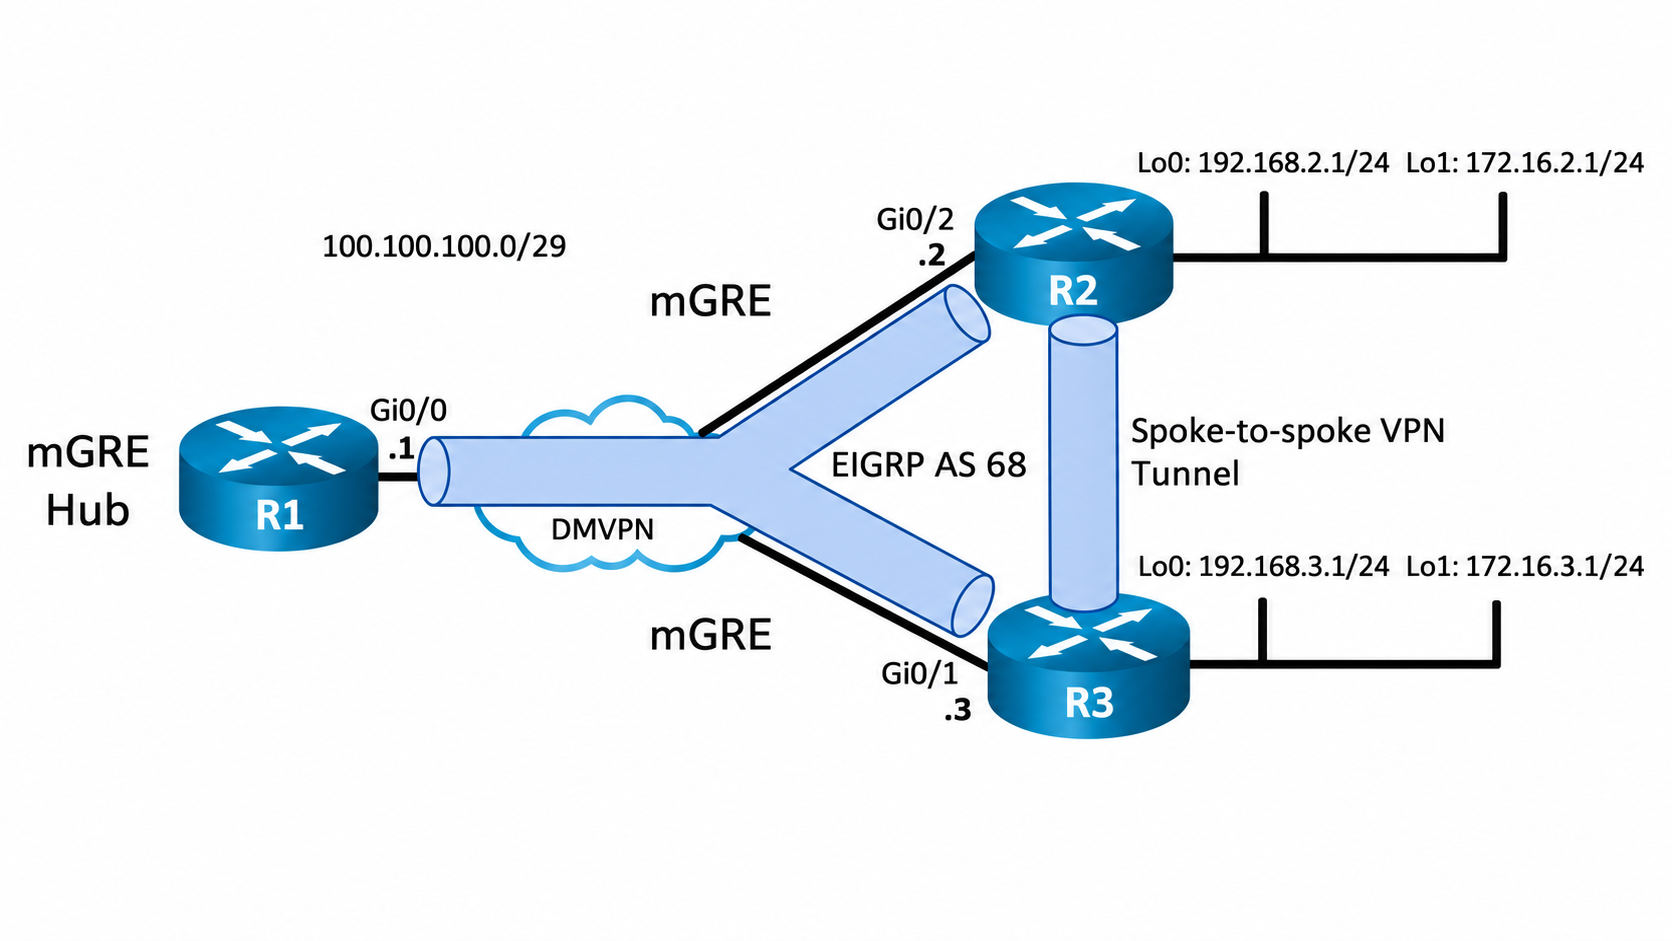
In a Phase 3 spoke-spoke DMVPN, traffic initially travels to the hub. The traffic then travels directly between the spoke routers over the spoke-to-spoke tunnel.
Note: This lab does not include the configuration of IPSec to secure the tunnels. This essential procedure willbe covered in a later lab.
Note: This lab is an exercise in configuring and verifying various implementations of DMVPN topologies and does not reflect networking best practices.
Required Resources - Sergio Jiménez's Version
For this lab I am using GNS3, where I have deployed:
- 3 Routers (Cisco IOSv)
- 1 Switch (Cisco IOSvL2)
Instructions
Part 1: Configure Basic Device Settings and Verify Connectivity
Console into each device, enter global configuration mode, and apply the basic settings. The startup configurations for each device are provided below.
DMVPN-P3-R1 (Hub Router)
conf t
hostname DMVPN-P3-R1
no ip domain lookup
banner motd # DMVPN-P3-R1, Implement DMVPN Hub #
line con 0
 exec-timeout 0 0
 logging synchronous
 exit
line vty 0 4
 privilege level 15
 password cisco123
 exec-timeout 0 0
 logging synchronous
 login
 exit
interface g0/0
 ip address 192.0.2.1 255.255.255.252
 no shutdown
 exit
interface tunnel 1
 tunnel mode gre multipoint
 tunnel source g0/0
 tunnel key 999
 ip address 100.100.100.1 255.255.255.248
 ip nhrp network-id 1
 ip nhrp authentication NHRPauth
 ip nhrp map multicast dynamic
 bandwidth 4000
 ip mtu 1400
 ip tcp adjust-mss 1360
 exit
router eigrp DMVPN_TUNNEL_NET
 address-family ipv4 unicast autonomous-system 68
  eigrp router-id 1.1.1.1
  network 100.100.100.0 255.255.255.248
  af-interface tunnel 1
   no split-horizon
  exit-af-interface
 exit-address-family
 exit
router eigrp DMVPN_TRANS_NET
 address-family ipv4 unicast autonomous-system 168
  eigrp router-id 10.1.1.1
  network 192.0.2.0 255.255.255.252
 exit-address-family
 exit
end
wr mem
!
DMVPN-P3-R2 (Spoke 1)
conf t
hostname DMVPN-P3-R2
no ip domain lookup
banner motd # DMVPN-P3-R2, Implement DMVPN Spoke 1 #
line con 0
 exec-timeout 0 0
 logging synchronous
 exit
line vty 0 4
 privilege level 15
 password cisco123
 exec-timeout 0 0
 logging synchronous
 login
 exit
interface g0/2
 ip address 198.51.100.2 255.255.255.252
 no shutdown
 exit
interface loopback 0
 ip address 192.168.2.1 255.255.255.0
 no shutdown
 exit
interface loopback 1
 ip address 172.16.2.1 255.255.255.0
 no shutdown
 exit
interface tunnel 1
 tunnel mode gre ip
 tunnel source loopback 0
 tunnel destination 192.0.2.1
 tunnel key 999
 ip address 100.100.100.2 255.255.255.248
 ip nhrp network-id 1
 ip nhrp authentication NHRPauth
 ip nhrp nhs 100.100.100.1
 ip nhrp map multicast 192.0.2.1
 ip nhrp map 100.100.100.1 192.0.2.1
 ip mtu 1400
 ip tcp adjust-mss 1360
 exit
router eigrp DMVPN_TUNNEL_NET
 address-family ipv4 unicast autonomous-system 68
  eigrp router-id 2.2.2.2
  network 100.100.100.0 255.255.255.248
  network 172.16.2.0 255.255.255.0
  eigrp stub connected
 exit-address-family
 exit
router eigrp DMVPN_TRANS_NET
 address-family ipv4 unicast autonomous-system 168
  eigrp router-id 20.2.2.2
  network 198.51.100.0 255.255.255.252
  network 192.168.2.0 255.255.255.0
 exit-address-family
 exit
end
wr mem
!
DMVPN-P3-R3 (Spoke 2)
conf t
hostname DMVPN-P3-R3
no ip domain lookup
banner motd # DMVPN-P3-R3, Implement DMVPN Spoke 2 #
line con 0
 exec-timeout 0 0
 logging synchronous
 exit
line vty 0 4
 privilege level 15
 password cisco123
 exec-timeout 0 0
 logging synchronous
 login
 exit
interface g0/1
 ip address 203.0.113.2 255.255.255.252
 no shutdown
 exit
interface loopback 0
 ip address 192.168.3.1 255.255.255.0
 no shutdown
 exit
interface loopback 1
 ip address 172.16.3.1 255.255.255.0
 no shutdown
 exit
interface tunnel 1
 tunnel mode gre ip
 tunnel source loopback 0
 tunnel destination 192.0.2.1
 tunnel key 999
 ip address 100.100.100.3 255.255.255.248
 ip nhrp network-id 1
 ip nhrp authentication NHRPauth
 ip nhrp nhs 100.100.100.1
 ip nhrp map multicast 192.0.2.1
 ip nhrp map 100.100.100.1 192.0.2.1
 ip mtu 1400
 ip tcp adjust-mss 1360
 exit
router eigrp DMVPN_TUNNEL_NET
 address-family ipv4 unicast autonomous-system 68
  eigrp router-id 3.3.3.3
  network 100.100.100.0 255.255.255.248
  network 172.16.3.0 255.255.255.0
  eigrp stub connected
 exit-address-family
 exit
router eigrp DMVPN_TRANS_NET
 address-family ipv4 unicast autonomous-system 168
  eigrp router-id 30.3.3.3
  network 203.0.113.0 255.255.255.252
  network 192.168.3.0 255.255.255.0
  eigrp stub connected
 exit-address-family
 exit
end
wr mem
!
DMVPN-P3-SW (Layer 3 Switch)
conf t
hostname DMVPN-P3-SW
no ip domain lookup
ip routing
banner motd # DMVPN-P3-SW, DMVPN cloud switch #
line con 0
 exec-timeout 0 0
 logging synchronous
 exit
line vty 0 4
 privilege level 15
 password cisco123
 exec-timeout 0 0
 logging synchronous
 login
 exit
interface g0/1
 no switchport
 ip address 192.0.2.2 255.255.255.252
 no shutdown
 exit
interface g0/2
 no switchport
 ip address 198.51.100.1 255.255.255.252
 no shutdown
 exit
interface g0/3
 no switchport
 ip address 203.0.113.1 255.255.255.252
 no shutdown
 exit
router eigrp DMVPN_TRANS_NET
 address-family ipv4 unicast autonomous-system 168
  eigrp router-id 40.4.4.4
  network 192.0.2.0 255.255.255.252
  network 198.51.100.0 255.255.255.252
  network 203.0.113.0 255.255.255.252
 exit-address-family
 exit
end
wr mem
!
From R1, ping the loopback interfaces of R2 and R3. All pings should be successful. This verifies that full connectivity exists in the underlay, or transport, network.
From R2 traceroute to the Loopback 1 interface of R3. You should see the following output. Note that traffic from the R2 spoke router travels through the R1 hub router to reach R3. This is the DMVPN Phase 1 traffic flow. Repeat the traceroute to verify this result.
On the spoke routers, issue the show ip route command. Note that EIGRP shows the next hop for the Loopback 1 networks to be the R1 tunnel interface address. That is, both spoke routers will use R1 to send traffic on the overlay network to the LANs.
Part 2: Configure DMVPN Phase 3
In this part of the lab, you will configure DMVPN Phase 3 to create DMVPN tunnels between the spoke routers. Initially, the services of the hub are required to begin data transfer over the VPN. However, the humultipoint tunnel interface detects that traffic is “hairpinning,” or exiting the interface on which it was received. The hub router sends redirect messages to the two spoke routers that are communicating. The spoke routers use the redirect messages to dynamically create a tunnel to connect to each other. In this way, the hub router does not need to forward spoke-to-spoke traffic after the setup of the spoke-to-spoke tunnel.
Step 1: Modify the tunnel interfaces on the spoke routers.
This lab builds on the Phase 1 lab that was previously completed. On the spoke routers R2 and R3, modify
the configurations of the Tunnel 1 interfaces. The network will essentially be configured for DMVPN Phase 2
at the conclusion of this step
- On R2, set the tunnel mode to mGRE. You will see an error message that states that point-to-multipoint tunnels can not have static tunnel destinations configured.
- Remove the tunnel destination configuration. You will see the interface go down and the EIGRP adjacency with the hub router be lost. Reconfigure the tunnel mode as GRE multipoint. You will see the interface come back up and the EIGRP adjacency will be restored.
- Repeat this process for the R3 tunnel interface. At this point, you have essentially configured DMVPN Phase 2. You may want to verify the R1 can ping R2 and R3 loopbacks again.
- Verify the tunnel interface configuration is now using mGRE with the show interface tunnel 1 command.
Step 2: Modify the configuration on the spoke routers to enable NHRP routing shortcuts.
Configure the spoke router interfaces on R2 and R3 to enable NHRP to add spoke networks as next hops in the EIGRP routing table. The hub router will send NHRP redirect messages to the spokes. NHRP uses information in the redirect messages to manipulate the EIGRP routing table and create the next hop shortcuts.
Step 3: Modify the configuration of hub router to send NHRP redirect messages.
The Tunnel 1 interface of the hub router needs to be configured to send NHRP redirect messages to the spokes when it detects spoke-to-spoke traffic. Issue the ip nhrp redirect command on R1.
Part 3: Verify DMVPN Phase 3
Now that DMVPN Phase 3 is complete, you can test dynamic spoke-to-spoke tunnel creation.
Step 1: Observe dynamic tunnel creation.
- Return to R2. Initiate a traceroute to the simulated LAN interface on R3. The path will pass through R1 as it does in DMVPN Phase 1. But you will see console messages indicating that a dynamic tunnel was established and NHRP resolution occurred between the DMVPN peers (R2 and R3) during the trace.
- Issue the traceroute command again. You will now see that R1 has enabled direct spoke-to-spoke communication between R2 and R3. This tunnel will expire after ten minutes by default. The tunnel dynamically reopens after data is sent to the spoke router again.
- Repeat the traceroute commands on R3 to 172.16.2.1. Do the trace twice because R3 does not automatically create its own NHRP mapping for R2 just because R2 initiated a connection. The NHRP cache and tunnel establishment are triggered by outgoing traffic.
Step 2: View the routing table.
- On R2, use the command to view EIGRP routes in the routing table and compare it with the DMVPN Phase 1 routing from earlier in this lab. You should observe that the EIGRP route to the 172.16.3.0 network still shows the same next hop interface, but it is now flagged with a % symbol, indicating that NHRP has overridden the next hop entry with its own value. Additionally, a new NHRP route now appears in the routing table, showing that R3's tunnel interface is considered directly connected by NHRP, which enables more efficient spoke-to-spoke communication.
Note: You may need to reissue the traceroute commands from the previous step if the NHRP mappings expired on R2. - View the value that is actually used for the next hop address. It is marked with NHO for next hop override. This indicates that the next hop to 172.16.3.0 is R3 through the spoke-to-spoke tunnel.
Step 3: Verify the DMVPN.
- View the DMVPN information with the spoke-to-spoke tunnel open. The first entry in the table is the static tunnel between R2 and the hub router. The DLX flag indicates that the entry is the local network. The DT1 entry is the route through the overlay network, and the DT2 entry the next hop override to the target network. If the spoke-to-spoke tunnel has closed, generate traffic to reopen it with traceroute.
- Repeat this command on R3. Again, you may need to reissue the traceroute command to R2 to bring the tunnel backup.
Step 4: View NHRP Mappings
Note: If it has been more than 10 minutes since you completed your traceroutes, repeat them now to reestablish the spoke-to-spoke tunnels.
- On R2 and R3, issue the show ip nhrp detail command to view the NHRP information for the routers. Note the correspondence between the entries in the output of this command with the output from the show dmvpn detail command. The first entry is the static entry to the hub router. The second entry is the local route, corresponding to the DTX entry in output above. The third entry corresponds to the DT1 entry and is flagged with router nhop rib. This indicates that the router has an explicit method to reach the tunnel IP address using an NBMA address and has an associated route installed in the routing table.
The flag rib nho indicates that the router has found an identical route in the routing table that belongs to a different protocol (EIGRP in this case.). NHRP has overridden the other protocol’s next-hop entry for the network by installing a next-hop shortcut in the routing table. This corresponds to the DT2 entry in the show dmvpn detail output. - You have successfully configured a DMVPN Phase 3 network.