
Lab - Implement a DMVPN Phase 1 Hub-to-Spoke Topology
Topology
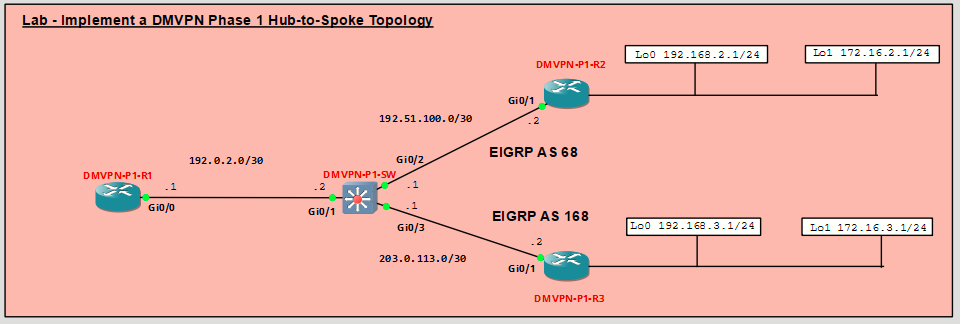
Addressing Table
|
Device |
Interface |
IPv4 Address |
|---|---|---|
|
DMVPN-P1-R1 |
Gi0/0 |
192.0.2.1/30 |
|
Tunnel1 |
100.100.100.1/29 |
|
|
DMVPN-P1-R2 |
Gi0/1 |
198.51.100.2/30 |
|
Loopback0 |
192.168.2.1/24 |
|
|
Loopback1 |
172.16.2.1/24 |
|
|
Tunnel1 |
100.100.100.2/29 |
|
|
DMVPN-P1-R3 |
Gi0/1 |
203.0.113.2/30 |
|
Loopback0 |
192.168.3.1/24 |
|
|
Loopback1 |
172.16.3.1/24 |
|
|
Tunnel1 |
100.100.100.3/29 |
|
|
DMVPN-P1-HUB |
Gi0/1 |
192.0.2.2/30 |
|
Gi0/2 |
198.51.100.1/30 |
|
|
Gi0/3 |
203.0.113.1/30 |
Objectives
- Part 1: Build the Network and Configure Basic Device Settings
- Part 2: Configure and Verify DMVPN Phase 1
- Part 3: Configure EIGRP Routing for the Tunnel Networks
Background / Scenario
Dynamic Multipoint VPN (DMVPN) is a Cisco IOS Software solution for building scalable IPsec Virtual Private Networks. It uses a centralized architecture to simplify deployment and management for diverse user communities, including mobile workers, telecommuters, and extranet users. In this design, one or more routers act as multipoint GRE (mGRE) hubs, connecting spoke (branch) routers to VPN services.
How It Works
DMVPN enables branch locations to communicate directly over the public WAN or internet. For example, Voice over IP (VoIP) between two branch offices can use direct spoke-to-spoke communication without permanent site-to-site VPNs. DMVPN supports dynamic IPsec deployment and improves performance by reducing latency and jitter while optimizing headquarters bandwidth.
DMVPN combines GRE tunnels, IPsec encryption, and Next Hop Resolution Protocol (NHRP). With mGRE, a single physical hub interface supports tunnels from multiple spokes, providing the scale needed to connect many locations to a single hub. Crypto profiles secure the VPN without static crypto maps, enabling dynamic discovery of tunnel endpoints. DMVPN also supports on-demand establishment and teardown of spoke-tospoke tunnels; this feature will be covered in a subsequent lab.
DMVPN Phases
Phase 1: Establishes the spoke-to-hub topology using NHRP and mGRE. Spokes register with the hub, which dynamically creates spoke-to-hub tunnels over a single physical interface. mGRE is configured only on the hub, while spokes form GRE tunnels to the hub. This phase supports spoke-to-hub communication only, so inter-spoke traffic traverses the hub and effectively passes through two tunnels.
Phase 2: Adds dynamic spoke-to-spoke tunnels that form as needed based on traffic. Spokes must support multiple tunnels on a single physical interface and are configured with mGRE like the hub. The hub orchestrates the dynamic establishment of spoke-to-spoke tunnels.
Phase 3: Refines spoke-to-spoke setup by using NHRP redirection. Instead of forwarding NHRP resolution messages, the hub sends a redirection to the initiating spoke, which then sends its NHRP resolution request directly to the target spoke. This allows spokes to create routing entries for spoke-to-spoke networks, enables route summaries from the hub to spokes, and supports a hierarchical, tree-based VPN where central hubs connect regional hubs and their spokes, allowing tunnels across different regional hubs.
In this lab, you will create a DMVPN with one hub router and two spokes using a Phase 1 hub-to-spoke topology.
Note: This lab does not include the configuration of IPSec to secure the tunnels. This essential procedure will be covered in a later lab.
Note: This lab is an exercise in configuring and verifying various implementations of DMVPN topologies and does not reflect networking best practices.
Required Resources - Sergio Jiménez's Version
For this lab I am using GNS3, where I have deployed:
- 3 Routers (Cisco IOSv)
- 1 Switch (Cisco IOSvL2)
Instructions
Part 1: Configure Basic Device Settings
Console into each device, enter global configuration mode, and apply the basic settings. The startup configurations for each device are provided below.
DMVPN-P1-R1 (Hub Router)
conf t
hostname DMVPN-P1-R1
no ip domain lookup
banner motd # DMVPN-P1-R1, Implement a DMVPN hub #
line con 0
 exec-timeout 0 0
 logging synchronous
 exit
line vty 0 4
 privilege level 15
 password cisco123
 exec-timeout 0 0
 logging synchronous
 login
 exit
ip route 0.0.0.0 0.0.0.0 g0/0
interface g0/0
 ip address 192.0.2.1 255.255.255.252
 no shutdown
 exit
end
wr mem
!
DMVPN-P1-R2 (Spoke 1)
conf t
hostname DMVPN-P1-R2
no ip domain lookup
banner motd # DMVPN-P1-R2, Implement DMVPN Spoke 1 #
line con 0
 exec-timeout 0 0
 logging synchronous
 exit
line vty 0 4
 privilege level 15
 password cisco123
 exec-timeout 0 0
 logging synchronous
 login
 exit
ip route 0.0.0.0 0.0.0.0 g0/1
interface g0/1
 ip address 198.51.100.2 255.255.255.252
 no shutdown
 exit
interface loopback 0
 ip address 192.168.2.1 255.255.255.0
 no shutdown
 exit
interface loopback 1
 ip address 172.16.2.1 255.255.255.0
 no shutdown
 exit
end
wr mem
!
DMVPN-P1-R3 (Spoke 2)
conf t
hostname DMVPN-P1-R3
no ip domain lookup
banner motd # DMVPN-P1-R3, Implement DMVPN Spoke 2 #
line con 0
 exec-timeout 0 0
 logging synchronous
 exit
line vty 0 4
 privilege level 15
 password cisco123
 exec-timeout 0 0
 logging synchronous
 login
 exit
ip route 0.0.0.0 0.0.0.0 g0/1
interface g0/1
 ip address 203.0.113.2 255.255.255.252
 no shutdown
 exit
interface loopback 0
 ip address 192.168.3.1 255.255.255.0
 no shutdown
 exit
interface loopback 1
 ip address 172.16.3.1 255.255.255.0
 no shutdown
 exit
end
wr mem
!
DMVPN-P1-SW (Layer 3 Switch)
conf t
hostname DMVPN-P1-SW
no ip domain lookup
ip routing
banner motd # DMVPN-P1-SW, DMVPN cloud switch #
line con 0
 exec-timeout 0 0
 logging synchronous
 exit
line vty 0 4
 privilege level 15
 password cisco123
 exec-timeout 0 0
 logging synchronous
 login
 exit
interface g0/1
 no switchport
 ip address 192.0.2.2 255.255.255.252
 no shutdown
 exit
interface g0/2
 no switchport
 ip address 198.51.100.1 255.255.255.252
 no shutdown
 exit
interface g0/3
 no switchport
 ip address 203.0.113.1 255.255.255.252
 no shutdown
 exit
ip route 192.168.2.0 255.255.255.0 g0/2
ip route 172.16.2.0 255.255.255.0 g0/2
ip route 192.168.3.0 255.255.255.0 g0/3
ip route 172.16.3.0 255.255.255.0 g0/3
end
wr mem
!
Part 2: Configure and Verify DMVPN Phase 1
In this part of the lab, you will configure DMVPN Phase 1 to create DMVPN tunnels between the spoke routers R2 and R3, and the hub router, R1. DMVPN is very flexible and there are many options for implementation beyond what is being done in this lab.
In Phase 1 DMVPN, all spoke router traffic must pass through the hub router as shown in the topology diagram.
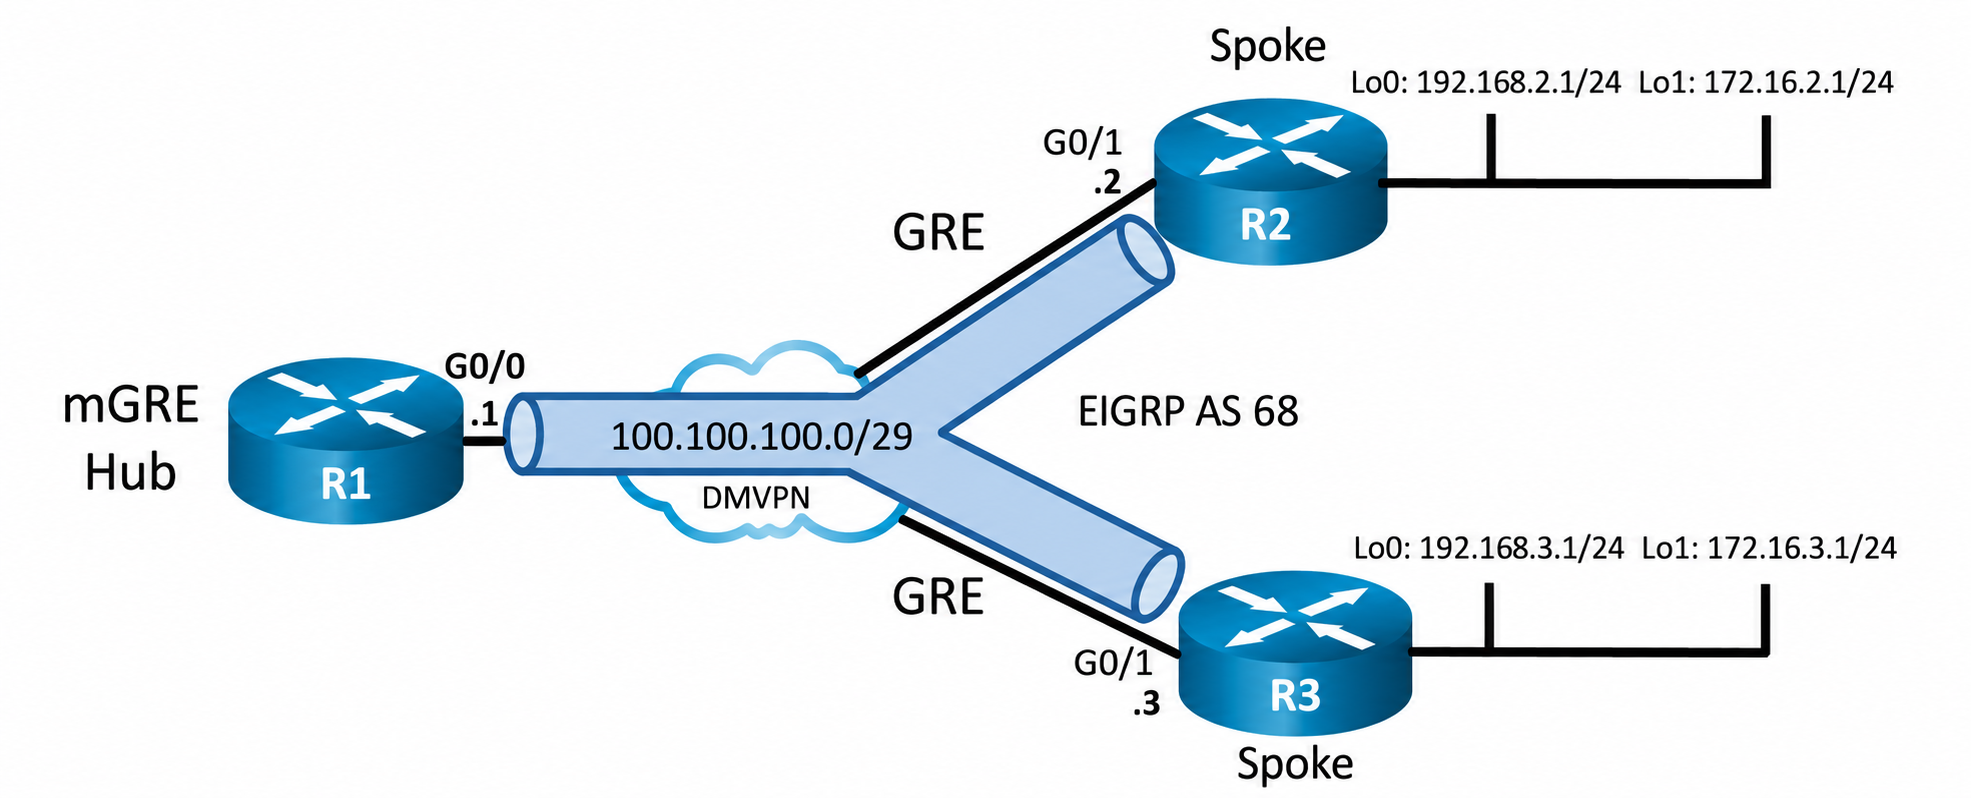
Note: In this lab, you will need to change the configuration of the DMVPN Layer 3 switch. Normally, you would not need to configure this device. The DMVPN switch is simulating the ISP transport network.
Step 1: Verify connectivity in the underlay network.
From R1, ping the Loopback 0 interfaces of R2 and R3.
Step 2: Configure the tunnel interface on the hub router.
DMVPN requires configuration of tunnel interfaces like GRE. In fact, DMVPN Phase 1 uses GRE and mGRE mode tunnels. The hub router tunnel interface will use mGRE. This will enable it to create multiple tunnels on a single interface.
- On R1, create the tunnel interface, set the tunnel mode to mGRE, and establish the tunnel source as Loopback 0. For DMVPN Phase 1, a tunnel key is also required when multiple tunnels will be established from a single interface. Finally, address the interface on the 100.100.100.0/29 network. The overlay network will use this subnet for all members of the DMVPN network. The hub router interface does not require a tunnel destination because it is a multipoint interface.
- Configure the hub router as a NHRP server (NHS). NHRP enables DMVPN to dynamically learn the NBMA physical addresses of devices in the network. The NHRP network ID must be consistent between the hub and spokes in the DMVPN network. You configure authentication to add a layer of security. Finally, configure the interface as multicast dynamic, which enables the hub to dynamically add spoke routers to the NHRP table when spokes initiate a tunnel. This enables the use of dynamic routing protocols between the hub and spoke routers.
- Because DMVPN networks add information to packet headers, the interface should be fine-tuned to participate in the DMVPN network. In addition, configure the interface bandwidth so that routing protocols that use bandwidth values will function properly.
- Verify the tunnel interface configuration with the show interface tunnel 1 command.
Step 3: Configure the R2 and R3 spoke router tunnel interfaces.
In contrast to NHS interfaces, configuration of the NHRP client (NHC) tunnel interfaces uses regular GRE and also requires the configuration of a tunnel destination address.
- On R2, create the tunnel interface and configure the GRE tunnel parameters. Set the tunnel destination as the address of the GigabitEthernet 0/0/1 interface of the hub router. Configuring the tunnel source as the Loopback 0 interface provides a stable source for the tunnel. The tunnel key must match the key that is configured on the hub router. Finally, configure the overlay network IP address for the tunnel interface.
- Configure the tunnel interface as an NHRP client. You will need to designate the underlay address of the NHRP server and map the NHRP server underlay address to its overlay address.
- Adjust settings on the interface to accommodate the GRE packet overhead.
- Repeat this configuration on router R3 using the commands above and information from the addressing table.
- Verify your configurations with the show interface command. If your configurations are correct, you should be able to successfully ping the interface addresses of the overlay network (100.100.100.0/29) from each router.
- View the status of DMVPN with the show dmvpn and show dmvpn detail commands. Become familiar with the output of each. The output from the hub router is shown.
The output shows the status of the tunnel, the tunnel address and the tunnel source address. The table shows the NBMA (underlay) addresses of the known DMVPN peers. That address is derived from the tunnel source addresses that you configured on R2 and R3. The tunnel source is the Loopback 0 interface address. The overlay network peer tunnel interface addresses are also shown. The state of the entries in the table must be UP in order for data to travel on the tunnels. If configured, the crypto settings for the tunnel would be shown. You will secure the tunnels in a later lab.
Repeat this command on the spoke routers so that you become familiar with the command output. - Verify the status of NHRP by viewing the contents of the NHRP with the show ip nhrp detail command. Output is shown for the hub router. Note that it displays information for both of the dynamic tunnels between the spoke routers and the hub.
Part 3: Configure EIGRP Routing for the Tunnel Networks
Cisco recommends that EIGRP be used to route DMVPN networks. Because the hub router uses a single interface to reach multiple networks, the split horizon rule will affect connectivity. For that reason, split horizon should be disabled on the hub router. Finally, improve network performance by configuring the spoke routers as stubs.
You will configure two separate EIGRP routing processes to route the overlay and underlay networks. Each network will use a different autonomous system number. Care should be taken not to route the underlay interface network using the same routing process as the overlay network. This can disrupt routing protocol operation on the hub router, severely impact performance, and possibly cause the router to crash. This condition is called recursive routing. Cisco IOS should detect recursive routing and provide syslog information regarding this error. In addition, IOS will temporarily disable the tunnel interface until recursive routing has stopped.
Step 1: Configure dynamic routing for the overlay network.
- Remove the static routes from the three routers and the Layer 3 switch by pasting the commands below
into the console of the appropriate devices.
R1, R2, and R3
DMVPN switch - Create a named EIGRP process with the name DMVPN_TUNNEL_NET. This process and AS will route the overlay network. Note that the DMVPN switch must also be configured. Add the tunnel interface and Loopback 1 interface networks to the routing process. Loopback 1 simulates a LAN that will be sending traffic through the tunnel. Note that split horizon is disabled on the hub router tunnel interface. Also note that the two hub routers are configured as stub routers. Configure the three routers as follows:
Step 2: Configure dynamic routing for the underlay network.
- Create a new named EIGRP process with the name DMVPN_TRANS_NET with AS 168. This process and AS will route the underlay, or transport, network. Note that the DMVPN Layer 3 switch did not need to have routing knowledge for the tunnel network. However, it does need to be configured to route between the point-to-point underlay networks. After configuring the DMVPN Layer 3 switch with EIGRP, you will see EIGRP new adjacency syslog messages on the DMVPN switch for EIGRP AS 168 and on R1, R2, and R3 for EIGRP AS 68 and EIGRP 168.
- Verify dynamic routing on all three routers by using the show ip route eigrp | begin Gateway and show ip route eigrp commands followed by the AS number. Do this on all three routers to verify that the underlay and overlay networks appear in the routing tables for the correct AS. Output is shown for the hub router.
Step 3: Verify DMVPN Phase 1 operation.
You have completed the configuration of DMVPN Phase 1. Verify communication as follows:
- On R1 execute a traceroute to the Loopback 1 interface IP addresses on R2 and R3. You should see the path use the tunnel network.
- On R1, execute a traceroute to the Loopback 0 interface IP addresses on R2 and R3. You should see the path use the physical point-to-point networks of the underlay transport network.
- Repeat the traceroute commands on R2 and R3.
- You have successfully configured a DMVPN Phase 1 network. Save your configurations. You will use them as the starting point for the DMVPN Phase 3 lab.