
Redmi A1 (ice): unlock bootloader (Windows)
This process will erase user data so please make a backup before continuing with the procedures below.
Mi Unlock tool does not work with Redmi A1 because there is no way to bind Mi account (there is just no option on the menu to add Mi account). If you try to unlock Redmi A1 with Mi Unlock tool you will get this error: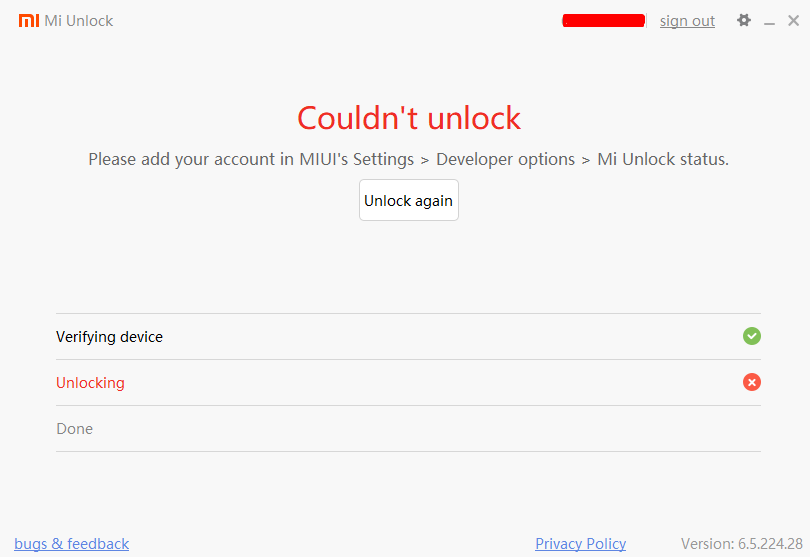

Xiaomi Redmi A1 features [GSMARENA]
Introduction
The SoC for Redmi A1 is the MediaTek MT6761 Helio A22. Beware that MediaTek devices have less support when it comes to custom ROMs development due to MediaTek SoC source code not being open source.
Some devs has stated that:
MediaTek will happily release the source code for their processors but at a price (which is against the GPL policies Android is distributed under). You can contact MediaTek now and pay for a license for your chip!! (but how many thousands of $ would they ask we don’t know, and the fact is it should be free).
Source: Why does custom rom development lacks in terms of MediaTek only?
Android scene concepts
- Kernel: The kernel is the central part of any operating system and talks to the underlying hardware on a device. Where possible, the AOSP kernel is split into hardware-agnostic modules and vendor-specific modules.
- Bootloader: All Android devices come with a bootloader that executes the kernel and defines how the Android system is booted (aka. the boot process).
MediaTek devices boot up and download
On MTK (MediaTek) devices, the bootloader is called the preloader, a proprietary loader developed by MTK. MTK devices also have a secondary loader (U-Boot ) which prepares the Linux compatible environment before entering the Linux kernel itself.
Apart from being responsible for the boot process, the preloader on MTK devices can also act as an interface to download/flash firmware files to the NAND memory of the device, which is where the Android OS resides. Something very identical to the EDL mode on Qualcomm devices.
Boot up
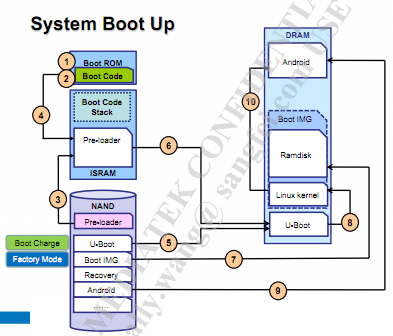
Normal system boot up process (when it boots to Android)
First of all, it needs to be clear that the system image files such as Pre-loader, Android, Recovery, as shown in the image, are stored in NAND as you can see above. Each MTK chip has a BROM (boot rom) shown as the box in the upper left in the image.
The BROM loads the preloader into the internal SRAM (ISRAM). Why is it loaded in ISRAM instead on external RAM (DRAM)? That's because the DRAM has not been initialized at this time.
After the preloader is loaded in ISRAM, the process exits the BROM and jumps to preloader itself to start execution. The preloader then initializes the DRAM.
The preloader loads the U-Boot into the DRAM, and then executes it. The U-Boot then loads the Linux kernel, which loads the Boot IMG (including kernel and ramdisk) and then executes the kernel part and Android is started.
Download process
The above is the startup process. In addition to the startup function, the preloader also has the download function. At a high level, know that this mode will allow us to flash, unlock the bootloader, and many other things:
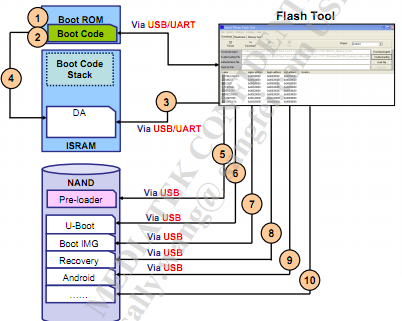
Why are specific drivers needed for this process? The primary purporse of these drivers is to help Windows recognize the device's preloader/BROM mode when the phone is booted to BROM mode.
Sources:
Driver_All_In_One_V1_MT6575_4.0.pdf
mtk preloader
MediaTek Preloader USB VCOM Drivers for MT65xx, MT67xx, and MT68xx Chipsets
About BROM mode and DAA/SLA and mtkclient
MediaTek devices include DAA (Download Agent Authentication) and SLA (Serial Link Authentication).
Its task stands simple- to prevent the unauthorized flashing of files to the device’s respective partitions. Ideally, only authorized people from manufacturer (Xiaomi service centers) could bypass both. If an unauthorized user tries the flashing process, the BROM will straightaway stop the flashing process.
In practice, this translates that without bypassing them, the phone will constantly reconnect to PC while in BROM mode, and you would have to stay pressing Vol Up, Vol Down, and Power keys to stay in BROM mode.
With that said, there does exist a handy workaround to bypass both, which we will see later on the bypass tool section.
For now, know that you can enter the Redmi A1 BROM mode by pressing all hardware keys while the phone is on (Vol Up, Vol Down, Power) for a few secs until the screens turns completely off.
The point is to reach BROM mode, once there we can unlock the bootloader with mtkclient. This is "The Tool", we can do a lot of things with this, but for now know that this is the tool to unlock the bootloader.
Pre-steps
Enable developer options, OEM unlock and USB debugging
Settings > About phone > tap a few times on Custom build version until it says "Developer options enabled"
Settings > System > Developer options > OEM unlocking (enable it)
Settings > System > Developer options > USB debugging (enable it)
Settings > System > Default USB configuration (select File Transfer)
Now connect the phone to the PC and accept the notification that appears on the phone screen to allow connection to the PC. The phone should appear on Device Manager, similar like this.

Download tools pack
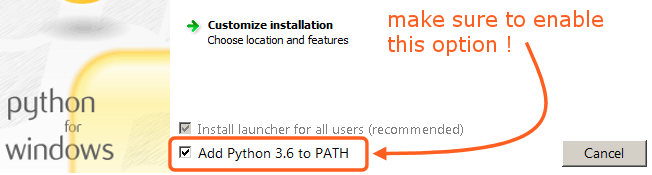
Download and install Python
Download the latest version from here.
Just leave default installation path and make sure you check "Add Python to PATH option"
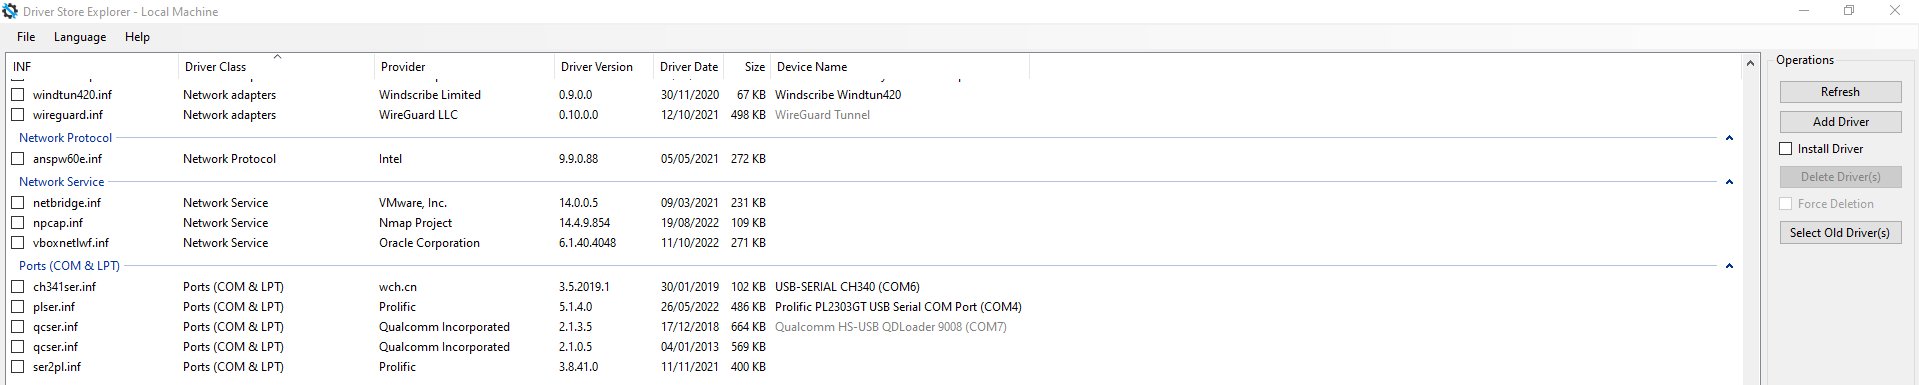
Step 1: Check there are no MediaTek drivers installed
To do so, download Driver Store Explorer [RAPR].
We have to check there are no MediaTek provider drivers under sections Ports (COM & LPT) , Android Phones and Universal Serial Bus controllers/Universal Serial Bus devices.
If there is something from MediaTek provider there, just select them and in the upper right part of the program check Force Deletion and click Delete Driver(s).
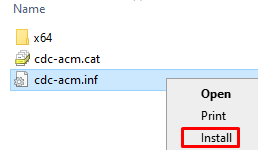
Step 2: Install driver
On the tools pack, navigate to "Driver" folder, right-click on cdc-acm.inf and click Install.
If you open the file with notepad, and scroll to the end of the file you will see this:
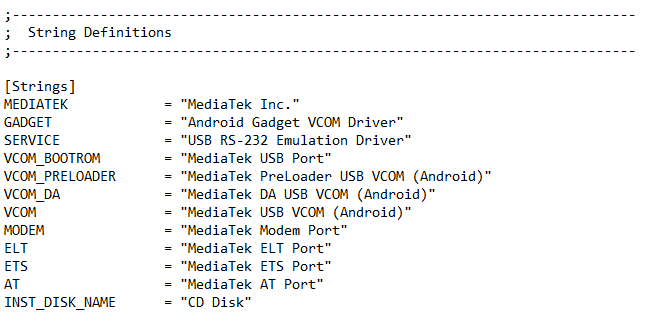
By default, the phone will be recognized on BROM mode with "MediaTek USB Port driver" (VCOM_BOOTROM) as we will see later.
We can check in Driver Explorer that the driver installed under Ports (COM & LPT):
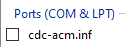
If it does not appear, click on Refresh on the upper right.
Source for reference: Link of the driver
Step 3: Install libusb and UsbDk, and check PATH
Install libusb-win32-devel-filter-1.2.6.0.exe from tools pack, then install UsbDk_1.0.22_x64.msi. It may ask to restart PC, do so if notification appears.
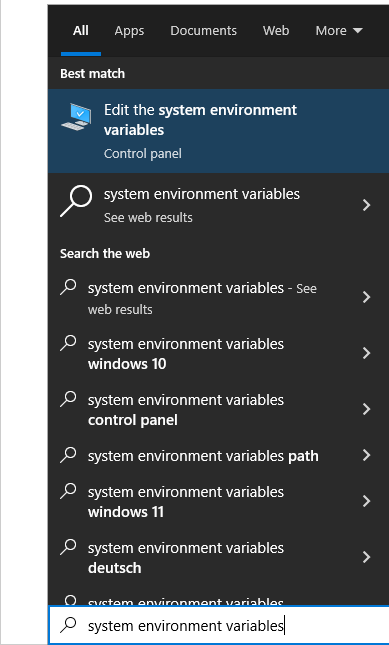
Then, go to Edit the system environment variables
Search and add the "C:\Program Files\UsbDk Runtime Library" folder to system Path (click on image to make it bigger):
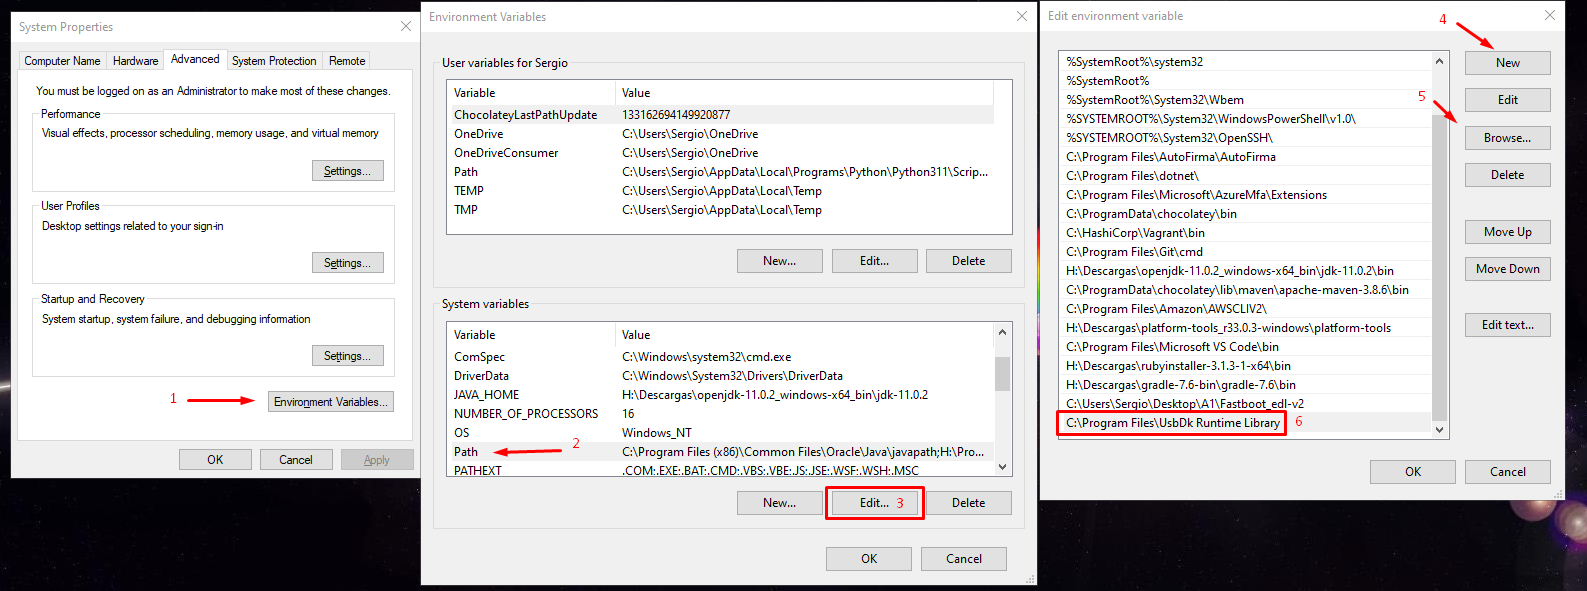
Source for reference: libusb Github, UsbDk Github
Step 4: Preparing bypass tool
Open cmd as admin, and cd to mtk-pack-jimenez\Bypass folder
Enter command:
pip install pyusb json5This will download dependencies required by the bypass tool to work.
Source for reference: MTK Bypass utility GitHub
Following instructions are just for reference, there is no need to download the payloads, as they are already included in the pack.
NOTE: Just downloading and running the tool itself will not work, we have to download the payloads, as stated in the tool's GitHub.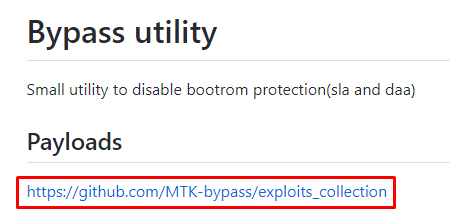
We would have to download files from that repository and put them in the Bypass tool folder. As we can see in the exploits collections page, the Redmi A1 SoC's is supported by the tool (mt6761).
Source for reference: Exploits collection GitHub
Step 5: Preparing the mtkclient tool
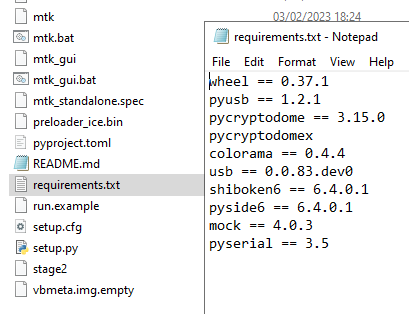
Inside mtk-pack-jimenez\mtkclient folder there is a file called requirements.txt which are the dependencies for mtkclient tool to work.
If you open the file from the repository you would see this:
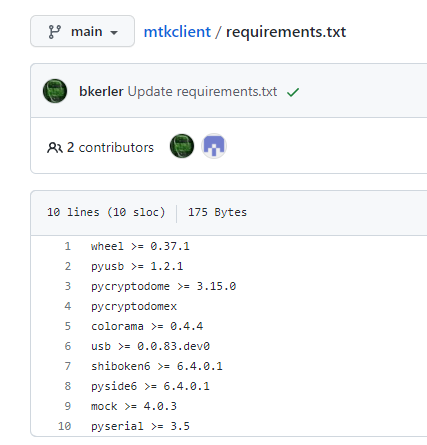
As you can see the operand >= indicates that the latest version found will be installed and it should be newer or equal to the indicated version.
I have in other projects that some tools will not work if they are very new than the less required version, so I have changed this in the pack and set the operand to == so the exact indicated version is installed and this way we guarantee 100% that this dependencies will work with the mtkclient version downloaded.
So, now we have to install those dependencies, so just as we did in the previous step with the bypass tool dependencies, open an cmd as admin and cd to the mtkclient folder.
Then enter this command:
pip3 install -r requirements.txtAll the dependencies should be installed succesfully.
Source for reference: mtkclient GitHub
Step 6: Install USB filter for the phone
Open Filter Wizard (this is part of libusb):
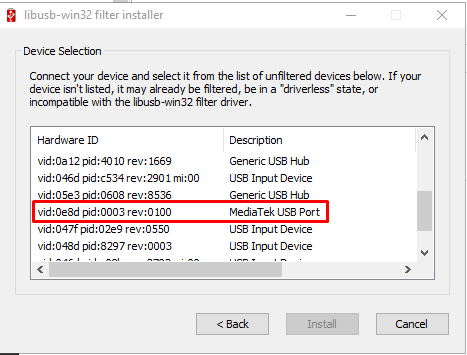
Select "Install a device filter", then you should see a list devices. Keep that window open for now.
Now, with the phone connected by USB to the PC, hold and press Vol Up, Vol Down, and Power keys at the same time and keep them pressed. The screen will turn off and at the Filter Wizard window you will see it refreshes with a new device added, MediaTek USB Port, quickly select it and click Install.
After the operation it successful this will appear:
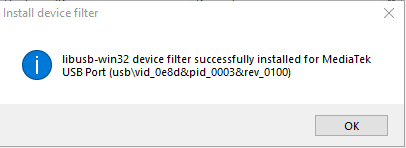
Now we can release the buttons and disconnect the phone from the PC, the phone should restart to Android.
Step 7: Using the bypass tool
In the last step it was heard on Windows like the device was reconnecting constantly while keeping the buttons pressed, this is the DAA/SLA protection keeping us to entering BROM mode.
So we have to bypass this so we can stay in BROM mode without the buttons pressed.
Open cmd as admin and go to the Bypass folder, then enter the following command to launch the bypass utility:
python main.py
While in this state (Waiting for device), press and hold Vol Up, Vol Down, and Power again till the following appears on screen:
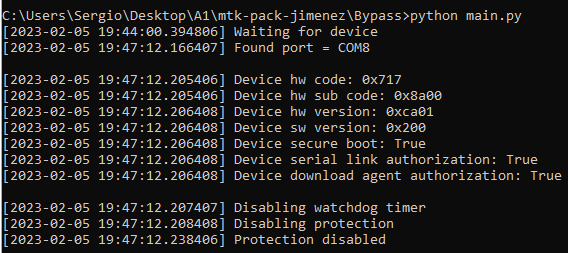
Now you can release the buttons and the phone will stay in BROM mode. We can now disconnect phone from PC, it will stay with the screen off and in BROM mode.
Step 8: Using the mtkclient to unlock bootloader
So at this point we have the phone disconnected from PC and in BROM mode. Now on cmd we have to cd to the mtkclient folder and launch the following command:
python mtk e metadata,userdata,md_udc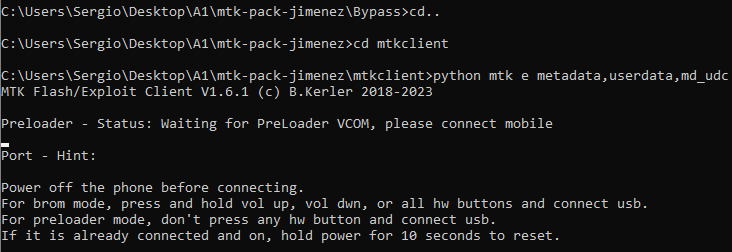
python mtk da seccfg unlockC:\Users\Sergio\Desktop\A1\mtk-pack-jimenez\mtkclient>python mtk da seccfg unlock
MTK Flash/Exploit Client V1.6.1 (c) B.Kerler 2018-2023
Preloader - Status: Waiting for PreLoader VCOM, please connect mobile
Port - Device detected :)
Preloader - CPU: MT6761/MT6762/MT3369/MT8766B(Helio A20/P22/A22/A25/G25)
Preloader - HW version: 0x0
Preloader - WDT: 0x10007000
Preloader - Uart: 0x11002000
Preloader - Brom payload addr: 0x100a00
Preloader - DA payload addr: 0x201000
Preloader - CQ_DMA addr: 0x10212000
Preloader - Var1: 0x25
Preloader - Disabling Watchdog...
Preloader - HW code: 0x717
Preloader - Target config: 0x0
Preloader - SBC enabled: False
Preloader - SLA enabled: False
Preloader - DAA enabled: False
Preloader - SWJTAG enabled: False
Preloader - EPP_PARAM at 0x600 after EMMC_BOOT/SDMMC_BOOT: False
Preloader - Root cert required: False
Preloader - Mem read auth: False
Preloader - Mem write auth: False
Preloader - Cmd 0xC8 blocked: False
Preloader - Get Target info
Preloader - BROM mode detected.
Preloader - HW subcode: 0x8a00
Preloader - HW Ver: 0xca01
Preloader - SW Ver: 0x200
Preloader - ME_ID: ----
Preloader - SOC_ID: ----
DA_handler - Device is unprotected.
DA_handler - Device is in BROM-Mode. Bypassing security.
PLTools - Loading payload from mt6761_payload.bin, 0x264 bytes
PLTools - Kamakiri / DA Run
Kamakiri - Trying kamakiri2..
Kamakiri - Done sending payload...
PLTools - Successfully sent payload: C:\Users\Sergio\Desktop\A1\mtk-pack-jimenez\mtkclient\mtkclient\payloads\mt6761_payload.bin
Port - Device detected :)
DA_handler
DA_handler - [LIB]: ←[33mDevice is in BROM mode. No preloader given, trying to dump preloader from ram.←[0m
DAXFlash - Uploading xflash stage 1 from MTK_AllInOne_DA_5.2136.bin
xflashext - Patching da1 ...
Mtk - Patched "Patched loader msg" in preloader
xflashext
xflashext - [LIB]: ←[33mError on patching da1 version check...←[0m
Mtk - Patched "Patched loader msg" in preloader
Mtk - Patched "get_vfy_policy" in preloader
xflashext - Patching da2 ...
DAXFlash - Successfully uploaded stage 1, jumping ..
Preloader - Jumping to 0x200000
Preloader - Jumping to 0x200000: ok.
DAXFlash - Successfully received DA sync
DAXFlash - DRAM config needed for : 9b01005932503033
DAXFlash - Sending emi data ...
DAXFlash - DRAM setup passed.
DAXFlash - Sending emi data succeeded.
DAXFlash - Uploading stage 2...
DAXFlash - Upload data was accepted. Jumping to stage 2...
DAXFlash - Successfully uploaded stage 2
DAXFlash - EMMC FWVer: 0x0
DAXFlash - EMMC ID: Y2P032
DAXFlash - EMMC CID: 9b010059325030333200d1e102433963
DAXFlash - EMMC Boot1 Size: 0x400000
DAXFlash - EMMC Boot2 Size: 0x400000
DAXFlash - EMMC GP1 Size: 0x0
DAXFlash - EMMC GP2 Size: 0x0
DAXFlash - EMMC GP3 Size: 0x0
DAXFlash - EMMC GP4 Size: 0x0
DAXFlash - EMMC RPMB Size: 0x1000000
DAXFlash - EMMC USER Size: 0x747c00000
DAXFlash - HW-CODE : 0x717
DAXFlash - HWSUB-CODE : 0x8A00
DAXFlash - HW-VERSION : 0xCA01
DAXFlash - SW-VERSION : 0x200
DAXFlash - CHIP-EVOLUTION : 0x0
DAXFlash - DA-VERSION : 1.0
DAXFlash - Upload data was accepted. Jumping to stage 2...
DAXFlash - DA Extensions successfully added
sej - HACC init
sej - HACC run
sej - HACC terminate
sej - HACC init
sej - HACC run
sej - HACC terminate
sej - HACC init
sej - HACC run
sej - HACC terminate
Progress: |██████████████████████████████████████████████████| 100.0% Write (Sector 0x1 of 0x1, ) 0.00 MB/s
DA_handler - Successfully wrote seccfg.The output may not be the same cause I have already unlocked the bootloader, but the important thing to know is that it should output DA_handler - Successfully wrote seccfg. at the end. This is the indicator that the bootloader has been successfully unlocked.
Finally enter this command to reboot the phone:
python mtk resetDisconnect the phone from PC. If the phone is not rebooted, keep pressed the power button until it reboots.