Redmi A1 (ice): root the phone with Magisk
This tutorial should be followed after unlocking bootloader. According to Magisk installation instructions here, the bootloader must be unlocked.
Introduction
For this tutorial I am assuming the OS used is MIUI latest version after having unlocked the bootloader on the previous tutorial. We also should create a working folder i.e under Desktop: C:\Users\<user>\Desktop\A1. We will put the necessary files there.
Enabling developer options and USB debugging
First of all we need to enable the Developer options menu: go to Settings > About phone > Build number (tap there multiple times).
Once a message appears that reads "Developer options enabled", go to: Settings > System > Developer options > USB debugging (enable).
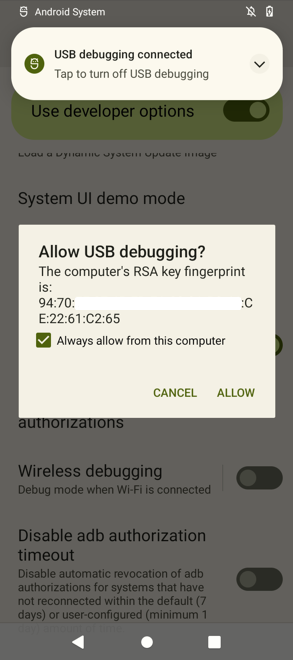
Now connect the phone to the PC. We must accept the popup that will appear on the phone.
Installing Magisk app on the phone
The first step is to install the Magisk app. The .apk file can be downloaded from the official GitHub project:
https://github.com/topjohnwu/Magisk ---- The latest release as of 10th Feb 2023 is v25.2 (download link)
Put the Magisk APK file on your working folder.
To install the APK we will use the adb install command from PC:
adb install Magisk-v25.2.apk
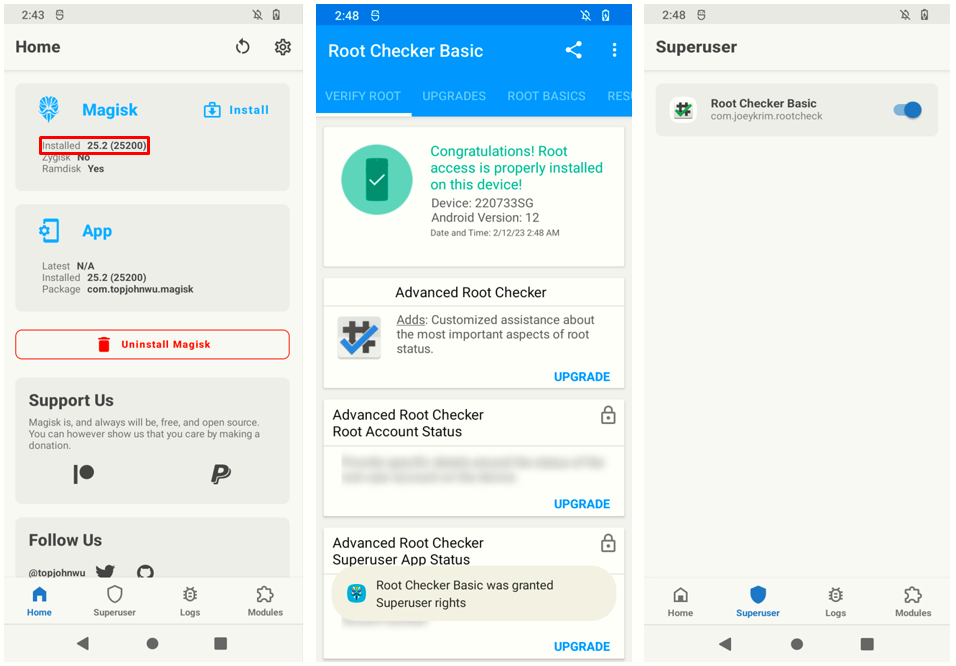
Open the app on the phone to verify it has installed successfully. You should see something similar to this:
The three (3) prerequisites
According Magisk official installation instructions, we must have (or know) 3 things:
- Whether your device has boot ramdisk
- Whether your device has a separate
vbmetapartition - A
boot.img
For the first one, we already know from the Magisk app itself (as you can see on the latest screenshot) that the device has boot ramdisk.
Now we should know if the Redmi A1 has a separate vbmeta partition. To do that, issue the following command on the PC which will list every single partition on the phone adb shell ls -l /dev/block/by-name:
C:\Users\Sergio\Desktop\A1>adb shell ls -l /dev/block/by-name
total 0
lrwxrwxrwx 1 root root 21 2023-02-12 01:34 boot_a -> /dev/block/mmcblk0p29
lrwxrwxrwx 1 root root 21 2023-02-12 01:34 boot_b -> /dev/block/mmcblk0p42
lrwxrwxrwx 1 root root 20 2023-02-12 01:34 boot_para -> /dev/block/mmcblk0p3
lrwxrwxrwx 1 root root 22 2023-02-12 01:34 bootloader1 -> /dev/block/by-name/lk1
lrwxrwxrwx 1 root root 22 2023-02-12 01:34 bootloader2 -> /dev/block/by-name/lk2
lrwxrwxrwx 1 root root 20 2023-02-12 01:34 countrycode -> /dev/block/mmcblk0p2
lrwxrwxrwx 1 root root 20 2023-02-12 01:34 cust -> /dev/block/mmcblk0p8
lrwxrwxrwx 1 root root 21 2023-02-12 01:34 dtbo_a -> /dev/block/mmcblk0p30
lrwxrwxrwx 1 root root 21 2023-02-12 01:34 dtbo_b -> /dev/block/mmcblk0p43
lrwxrwxrwx 1 root root 21 2023-02-12 01:34 efuse -> /dev/block/mmcblk0p21
lrwxrwxrwx 1 root root 20 2023-02-12 01:34 expdb -> /dev/block/mmcblk0p5
lrwxrwxrwx 1 root root 20 2023-02-12 01:34 ffu -> /dev/block/mmcblk0p7
lrwxrwxrwx 1 root root 21 2023-02-12 01:34 flashinfo -> /dev/block/mmcblk0p52
lrwxrwxrwx 1 root root 21 2023-02-12 01:34 frp -> /dev/block/mmcblk0p10
lrwxrwxrwx 1 root root 20 2023-02-12 01:34 gsort -> /dev/block/mmcblk0p6
lrwxrwxrwx 1 root root 21 2023-02-12 01:34 gz_a -> /dev/block/mmcblk0p27
lrwxrwxrwx 1 root root 21 2023-02-12 01:34 gz_b -> /dev/block/mmcblk0p40
lrwxrwxrwx 1 root root 21 2023-02-12 01:34 lk_a -> /dev/block/mmcblk0p28
lrwxrwxrwx 1 root root 21 2023-02-12 01:34 lk_b -> /dev/block/mmcblk0p41
lrwxrwxrwx 1 root root 21 2023-02-12 01:34 logo_a -> /dev/block/mmcblk0p32
lrwxrwxrwx 1 root root 21 2023-02-12 01:34 logo_b -> /dev/block/mmcblk0p45
lrwxrwxrwx 1 root root 21 2023-02-12 01:34 md1img_a -> /dev/block/mmcblk0p23
lrwxrwxrwx 1 root root 21 2023-02-12 01:34 md1img_b -> /dev/block/mmcblk0p36
lrwxrwxrwx 1 root root 21 2023-02-12 01:34 md_udc -> /dev/block/mmcblk0p13
lrwxrwxrwx 1 root root 21 2023-02-12 01:34 metadata -> /dev/block/mmcblk0p14
lrwxrwxrwx 1 root root 20 2023-02-12 01:34 misc -> /dev/block/mmcblk0p1
lrwxrwxrwx 1 root root 18 2023-02-12 01:34 mmcblk0 -> /dev/block/mmcblk0
lrwxrwxrwx 1 root root 23 2023-02-12 01:34 mmcblk0boot0 -> /dev/block/mmcblk0boot0
lrwxrwxrwx 1 root root 23 2023-02-12 01:34 mmcblk0boot1 -> /dev/block/mmcblk0boot1
lrwxrwxrwx 1 root root 21 2023-02-12 01:34 nvcfg -> /dev/block/mmcblk0p11
lrwxrwxrwx 1 root root 21 2023-02-12 01:34 nvdata -> /dev/block/mmcblk0p12
lrwxrwxrwx 1 root root 21 2023-02-12 01:34 nvram -> /dev/block/mmcblk0p22
lrwxrwxrwx 1 root root 21 2023-02-12 01:34 otp -> /dev/block/mmcblk0p51
lrwxrwxrwx 1 root root 20 2023-02-12 01:34 para -> /dev/block/mmcblk0p4
lrwxrwxrwx 1 root root 21 2023-02-12 01:34 persist -> /dev/block/mmcblk0p18
lrwxrwxrwx 1 root root 23 2023-02-12 01:34 preloader_a -> /dev/block/mmcblk0boot0
lrwxrwxrwx 1 root root 23 2023-02-12 01:34 preloader_b -> /dev/block/mmcblk0boot1
lrwxrwxrwx 1 root root 22 2023-02-12 01:34 preloader_raw_a -> /dev/block/mapper/pl_a
lrwxrwxrwx 1 root root 22 2023-02-12 01:34 preloader_raw_b -> /dev/block/mapper/pl_b
lrwxrwxrwx 1 root root 21 2023-02-12 01:34 proinfo -> /dev/block/mmcblk0p20
lrwxrwxrwx 1 root root 21 2023-02-12 01:34 protect1 -> /dev/block/mmcblk0p15
lrwxrwxrwx 1 root root 21 2023-02-12 01:34 protect2 -> /dev/block/mmcblk0p16
lrwxrwxrwx 1 root root 20 2023-02-12 01:34 rescue -> /dev/block/mmcblk0p9
lrwxrwxrwx 1 root root 21 2023-02-12 01:34 scp_a -> /dev/block/mmcblk0p25
lrwxrwxrwx 1 root root 21 2023-02-12 01:34 scp_b -> /dev/block/mmcblk0p38
lrwxrwxrwx 1 root root 21 2023-02-12 01:34 sec1 -> /dev/block/mmcblk0p19
lrwxrwxrwx 1 root root 21 2023-02-12 01:34 seccfg -> /dev/block/mmcblk0p17
lrwxrwxrwx 1 root root 21 2023-02-12 01:34 spmfw_a -> /dev/block/mmcblk0p24
lrwxrwxrwx 1 root root 21 2023-02-12 01:34 spmfw_b -> /dev/block/mmcblk0p37
lrwxrwxrwx 1 root root 21 2023-02-12 01:34 sspm_a -> /dev/block/mmcblk0p26
lrwxrwxrwx 1 root root 21 2023-02-12 01:34 sspm_b -> /dev/block/mmcblk0p39
lrwxrwxrwx 1 root root 21 2023-02-12 01:34 super -> /dev/block/mmcblk0p46
lrwxrwxrwx 1 root root 21 2023-02-12 01:34 tee_a -> /dev/block/mmcblk0p31
lrwxrwxrwx 1 root root 21 2023-02-12 01:34 tee_b -> /dev/block/mmcblk0p44
lrwxrwxrwx 1 root root 21 2023-02-12 01:34 userdata -> /dev/block/mmcblk0p50
lrwxrwxrwx 1 root root 21 2023-02-12 01:34 vbmeta_a -> /dev/block/mmcblk0p33
lrwxrwxrwx 1 root root 21 2023-02-12 01:34 vbmeta_b -> /dev/block/mmcblk0p47
lrwxrwxrwx 1 root root 21 2023-02-12 01:34 vbmeta_system_a -> /dev/block/mmcblk0p34
lrwxrwxrwx 1 root root 21 2023-02-12 01:34 vbmeta_system_b -> /dev/block/mmcblk0p48
lrwxrwxrwx 1 root root 21 2023-02-12 01:34 vbmeta_vendor_a -> /dev/block/mmcblk0p35
lrwxrwxrwx 1 root root 21 2023-02-12 01:34 vbmeta_vendor_b -> /dev/block/mmcblk0p49
As you can see at the bottom of the output, the phone has a lot of separate vbmeta partitions so yes, Redmi A1 has a separate vbmeta partition.
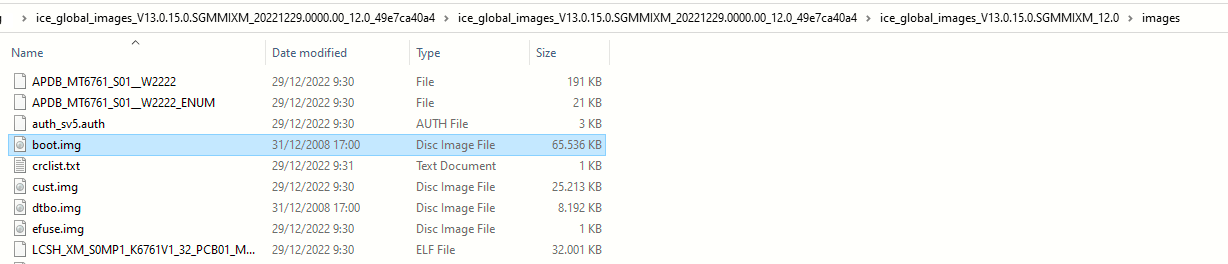
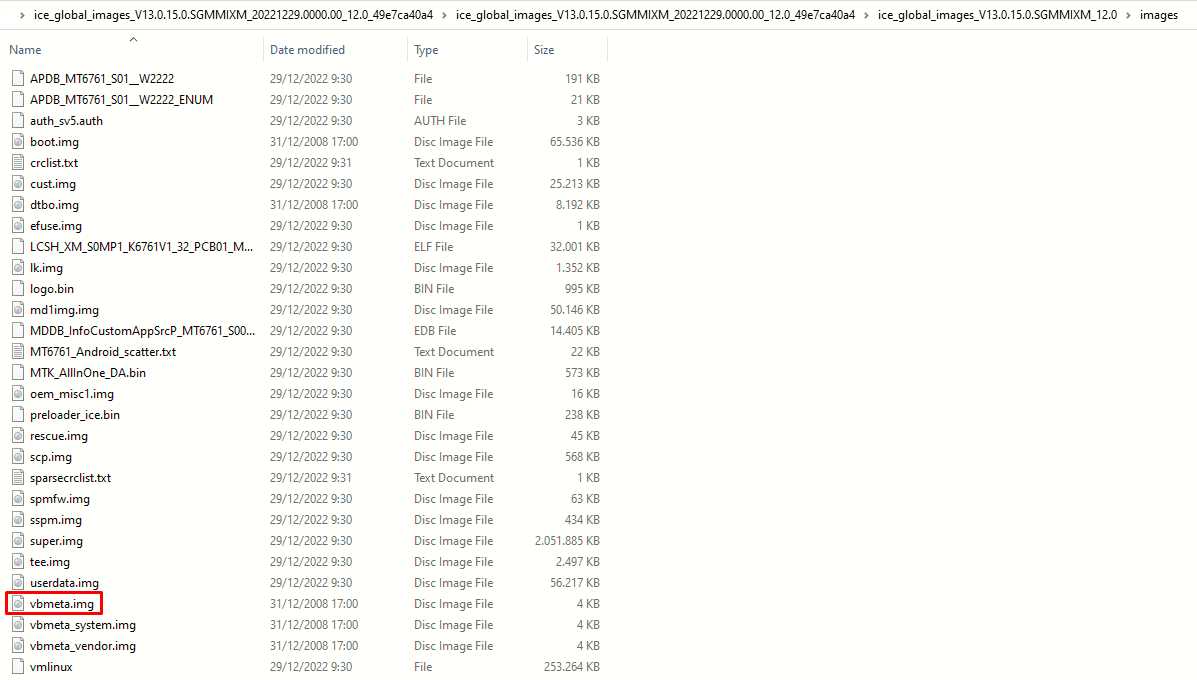
Now on to the third and last requirement. We must get a copy of boot.img. The boot.img file is included on the ZIP package of the official fastboot ROM.
I am on version MIUI 13.0.15.0 SGMMIXM so I will get a copy of the official fastboot ROM package from here. On this page you have to search for your version's fastboot ROM, download it, and extract the ZIPs till you get to the boot.img. Then copy the boot.img to your working folder.
If there is no fastboot version, and there is only recovery ROM for your version, as is the case for the MIUI 13.0.8.0 SGMEUXM version, you will have to follow this tutorial to get the boot.img.
Ok, so now we do have the 3 prerequisites:
- Our device has ramdisk.
- Our device has a separate vbmeta partition.
- We have a copy of the boot.img
Patching boot.img
The next step will be the patching of the boot.img we just got from the official ROM package. Copy the boot.img to your phone; I will do it via ADB, copying the file to the Download folder on the phone:
C:\Users\Sergio\Desktop\A1>adb push boot.img /sdcard/Download
boot.img: 1 file pushed, 0 skipped. 154.1 MB/s (67108864 bytes in 0.415s)
Open the Magisk app and tap Install. Then search for the boot.img we just copied on the Download folder and tap Let's Go. The patching will begin and after a few minutes you should see the following output showing the process was successful:
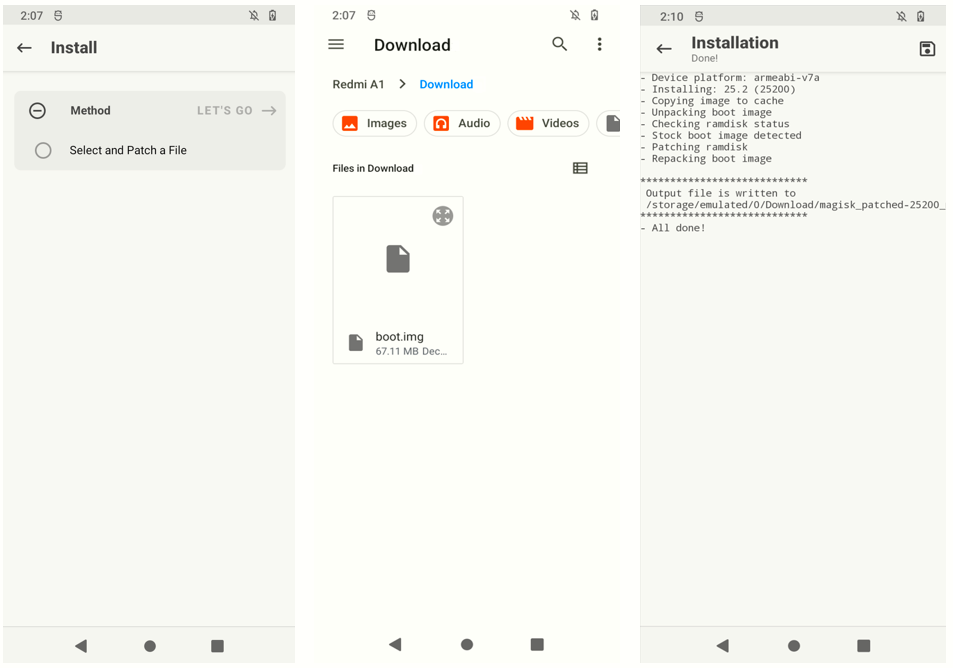
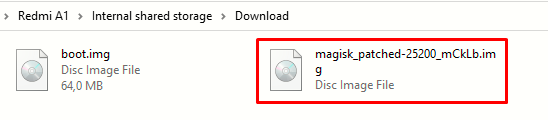
The patched boot.img will be put in the same folder as the original boot.img. In my case, it is in the Download folder. We now need to copy the patched boot.img to the working folder on the PC (easiest is way is via Windows Explorer).
Flashing the patched boot.img
First step is to reboot to fastboot mode. With the phone connected to PC issue this command adb reboot bootloader.
Ok, now we should have one thing in mind. In this phone there are two boot partitions, boot_a and boot_b as you can see from the list of the partitions above. Therefore, we must flash the patched boot.img to both partitions as follows:
C:\Users\Sergio\Desktop\A1>fastboot flash boot_a magisk_patched-25200_mCkLb.img
Sending 'boot_a' (65536 KB)                        OKAY [  1.519s]
Writing 'boot_a'                                   OKAY [  0.912s]
Finished. Total time: 2.439s

C:\Users\Sergio\Desktop\A1>fastboot flash boot_b magisk_patched-25200_mCkLb.img
Sending 'boot_b' (65536 KB)                        OKAY [  1.518s]
Writing 'boot_b'                                   OKAY [  0.900s]
Finished. Total time: 2.423s
Please beware of the commands:
fastboot flash boot_a <name of the patched magisk>.imgfastboot flash boot_b <name of the patched magisk>.img
Don't reboot or disconnect the phone yet!
Patching vbmeta
Since we have a separate vbmeta partition we have to patch it also, but this easier. We have to get the vbmeta.img file from the previously downloaded ROM ZIP file (where the boot.img was located also) and copy it to our working folder:
One important thing to note is that, like the boot partition, we have 2 vbmeta partitions (vbmeta_a and vbmeta_b) as you can see from the list of the partitions. We can ignore the 2 vbmeta_system and vbmeta_vendor partitions.
To patch the vbmeta partitions we just have to flash the original vbmeta.img BUT with the following parameters on the command:
fastboot flash vbmeta_a --disable-verity --disable-verification vbmeta.imgfastboot flash vbmeta_b --disable-verity --disable-verification vbmeta.img
C:\Users\Sergio\Desktop\A1>fastboot flash vbmeta_a --disable-verity --disable-verification vbmeta.img
Rewriting vbmeta struct at offset: 0
Sending 'vbmeta_a' (4 KB)                          OKAY [  0.006s]
Writing 'vbmeta_a'                                 OKAY [  0.006s]
Finished. Total time: 0.018s

C:\Users\Sergio\Desktop\A1>fastboot flash vbmeta_b --disable-verity --disable-verification vbmeta.img
Rewriting vbmeta struct at offset: 0
Sending 'vbmeta_b' (4 KB)                          OKAY [  0.006s]
Writing 'vbmeta_b'                                 OKAY [  0.006s]
Finished. Total time: 0.017s
Now we can finally reboot the phone with the command fastboot reboot
Verification